Estimated reading time: 10 minutes
What is the first tool that you should have in a fire kit? If you said a lighter, then you are correct! What about the second? If you said matches, correct again! Now the third option may be up for debate among some people, but in my opinion, it should be a ferrocerium rod or more commonly, a ferro rod.
It may be a little low down on the list of options, but a ferro rod has been one of my favorite tools to use to start a fire for a long time. When I first discovered them and started using one, I didn’t have anyone around to teach me how to use it. I had to learn by trial and error.
Right about now I can hear the experienced users in the background saying, “What’s there to know? You hold the ferro rod and strike it.” Yes, I would agree that is how it works, but I have also seen my fair share of ferro rods being misused and have heard a lot of questions about using them. But let’s take this from the top.
Want to save this post for later? Click Here to Pin It On Pinterest!
What is a Ferro Rod?
A ferrocerium rod, or ferro rod for short, is composed of rare earth metals. It can come in many different shapes and sizes but most commonly it has a cylindrical shape.
When the surface of a ferro rod is scraped quickly and firmly against another metal surface, primarily one with a high content of carbon, the rod produces hot sparks. You can think of a ferro rod much like an old flint and steel. However, modern ferro rods are much easier to use and produce a lot more sparks per strike. The sparks are then used to start a fire or ignite a stove in an outdoor environment.
How to Use a Ferro Rod
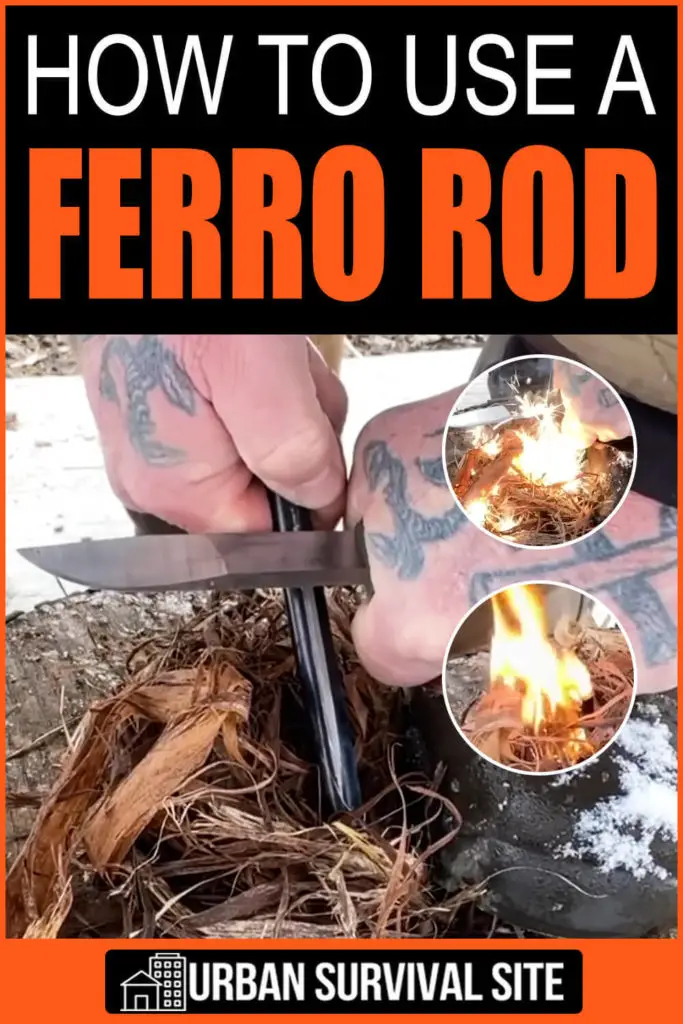
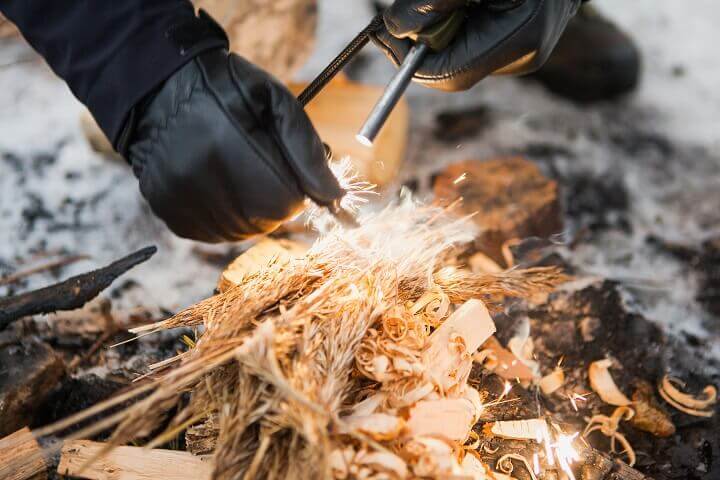
A ferro rod is a simple device and as I hinted at earlier, they are simple to use. A striker or another metal surface such as the spine of a knife or the edge of an ax are used to scrape along the length of the rod. Sounds pretty simple, right? Well, even if it does, I have put together a list of tips and methods that will hopefully make using them even easier for you.
Push Method
This is the first method that I learned when using a ferro rod and from what I have seen, it is the method that is used the most.
To use the push method, hold the ferro rod in one hand and hold the striker in your other hand. Place the striker onto the ferro rod, close to your hand so that the striker is resting on its edge. Quickly push the striker away from your body while applying firm downward pressure.
I think that this is probably the easiest and quickest way to start producing sparks for a beginner. However, there are a couple of downfalls to this method. First, it can be difficult to direct the sparks. Second, if a person is not careful it is easy to knock over a tinder bundled during the push motion with the hand holding the striker. Lastly, it does require two hands. The first two problems can be solved by moving on to the next method.
Pull Method
The pull method is basically the reverse of the push method. Place the ferro rod in one hand and the striker in your other hand. Position the striker the same way you would with the push method and place the tip of the ferro rod as close as possible to a tinder bundle. Now, here is the difference. Instead of pushing the striker, firmly hold it in place and pull the ferro rod backwards against it.
I like using this method the most because it eliminates the problem of knocking over a tinder bundle and directs most of the sparks into the area you want them. The only downfall of this method is that it requires two hands. But what if you only have one hand to use? To solve that problem, read the next method.
One-Handed Method
How would you start a fire with a ferrocerium rod if one of your hands or arms became injured and you couldn’t use it? During a survival situation or other emergency, there is always the chance of injury. Therefore, it is important to understand the different ways a piece of gear can be used and to practice those methods.
While there are many ways to accomplish something, here are two methods that I recommend for using a ferrocerium rod one-handed:
The first method involves placing the ferrocerium rod either directly into a tinder bundle or as close as possible to it. Next, step on the end of the ferro rod that is farthest away from the bundle. Lastly, put the striker in your good hand and scrap away. This can also be accomplished by kneeling on the ferro rod, but this is a bit uncomfortable, and the rod is not as secure.
The second method works best if your ferro rod is larger. It won’t work that great if you are using a miniature, toothpick-sized ferro rod. First, squat down and kneel on the ground. Insert the ferro rod behind the knee so that it is sandwiched between the upper and lower leg. Leave enough of the ferro rod sticking out that it can be scraped with the striker.
Also, be sure to do this on the same side of your body that your good hand is on. For example, if your left hand is injured, place the rod behind your right knee so that your right hand (your good hand) can easily reach and strike the rod. Place a large tinder bundle under and around the ferro rod to catch the sparks.
Strike Method
I do not hear about this method being used a lot, but I do hear about it from time to time. It reminds me of using an old flint and steel because the striker is used to “hit” the ferro rod rather than remain in contact with the rod, like it does during the push or pull method. To perform this method, take the ferro rod in one hand and the striker in the other. Use the striker to impact the ferro rod quickly, firmly, and at a downward angle.
I have used this method on several occasions, and it does work. However, I find it to be a bit uncontrolled.
Ferro Rod Advantages
At the beginning of this article I listed a ferro rod as the number three item you should have in your fire kit and I have been asked in the past, “Why should I even carry one?”
It may not produce an instant flame like a butane lighter or matches, but it certainly has some advantages over those two tools.
In terms of uses, the average size ferro rod is rated up to 5,000 or more strikes. This would be like carrying twenty full boxes of kitchen matches, which nobody is going to do. A butane lighter is rated for around 3,000 strikes but you will probably have a problem with the fuel or the lighter itself before that limit is reached. So, a ferro rod is going to provide many more opportunities for getting a fire going.
Durability is another consideration. Lighters can be temperamental when exposed to temperature extremes and various parts on them are subject to breaking. Matches are also easily broken. A ferro rod on the other hand is quite durable in that it holds up to extreme temperatures and doesn’t break easily if dropped, stepped on, or is tossed around in a pack. However, even if a ferro rod does break it will still function if there is enough area on the rod to be scrapped.
And lastly, one of the best qualities of ferro rods is that they are waterproof and windproof. A lighter is water resistant but if they get wet or if they are submerged in water, they need to be dried out before they will work but even then, it is not always a guarantee that they will. Most matches are even worse, and if they become wet they will quickly deteriorate. Also, keeping a lighter or matches lit in windy conditions is always a tricky proposition.
A ferro rod doesn’t have any of the above issues. A ferro rod can be left submerged in a puddle of water for half a day, taken out, wiped off, and it will function just fine. I know this from personal experience. Wind also doesn’t really affect the number of sparks that it can produce but if they are unprotected from the wind, the sparks may not last as long.
Ferro Rod Trouble Shooting
There is not much that can go wrong with a ferro rod, but I have seen and heard of people having trouble getting a fire started with one. To that end, I decided to add a couple of tips or troubleshooting measures.
First and foremost, make sure you are using proper tinder and that you have a lot of it. Remember that a ferro rod doesn’t produce an instant flame like a butane lighter does. It uses sparks to create an ember or a flame, so it needs a good tinder base to work.
Second, and I see this one a lot, don’t hold the ferro rod high above the tinder bundle. The sparks will go everywhere, and they will die out before they reach their destination. Bring the ferro rod right down to the tinder bundle and place the tip of the rod against the ground or another solid surface. This will give you a lot more control, direct the sparks where they need to go, and allow the sparks to do their job before they die out.
Lastly, if you are having difficulty igniting a tinder bundle, try this out. Place one end of the ferro rod directly into the center of the bundle and use the scraper to slowly scrape it. This will produce shavings and dust from the rod that will begin to collect in the tinder bundle. When ignited, these small shavings will act like a fire aid that will last a bit longer than a single spark and will burn extremely hot.
Once you have a pile of shavings that is roughly the size of a quarter, go ahead and ignite it. I recommend using the pull method for this because it is very using to knock the pile of shavings everywhere with the push method.
Ferro Rod Pros and Cons
Pros:
- Waterproof
- Windproof
- Easy to use with a little bit of practice
- Can last for hundreds or thousands of strikes depending on its size
- Affordable
- It Will still work even if the rod breaks
Cons:
- Does not produce an instant flame
- Can be difficult to use with gloves or unsteady hands but this will also depend on the size of the ferro rod that you are using
FAQs
Q: What do I do if the rod isn’t making a lot of sparks?
A: If you are having trouble producing sparks, start by adjusting the angle of the scraper, adjust the amount of pressure you are using, and adjust the speed of the scraping motion. If that doesn’t help, the scrapper could be of poor quality, try swapping it out.
Also, not all ferrocerium rods are made equal! Unfortunately, some ferro rods are made of poor quality and these will never make a lot of sparks. After trying the troubleshooting steps above without success, it could be time to purchase a better quality ferrocerium rod.
Q: How long will a ferro rod last me?
A: This depends on the size of the it but the average ferro rod is rated for several thousand strikes. Realistically, for most people, one ferro rod could last you the rest of your life. (but it’s always a good idea to have backups!)
Conclusion
Whether you are new to using a ferrocerium rod or have a lot of experience with one, I hope you enjoyed the article, possibly learned something new, and will now have better success when using one.
Do you have any thoughts or questions about ferrocerium rods? If so, be sure to leave a comment below. Thanks for reading!
Like this post? Don't Forget to Pin It On Pinterest!
You May Also Like: