Estimated reading time: 30 minutes
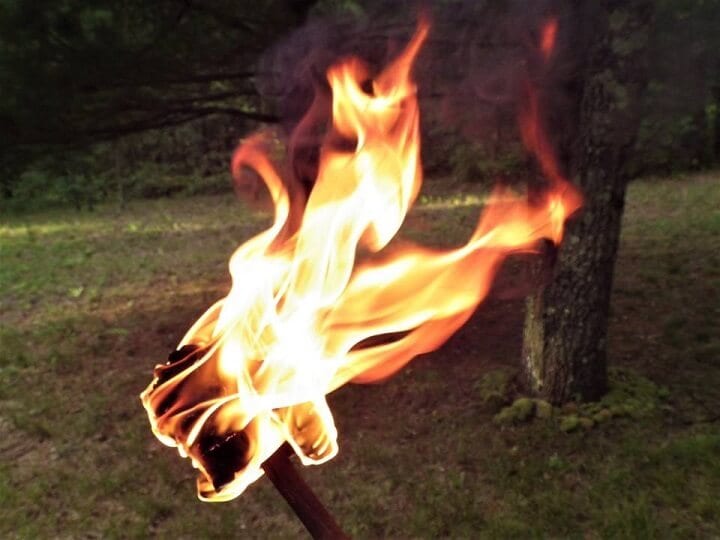
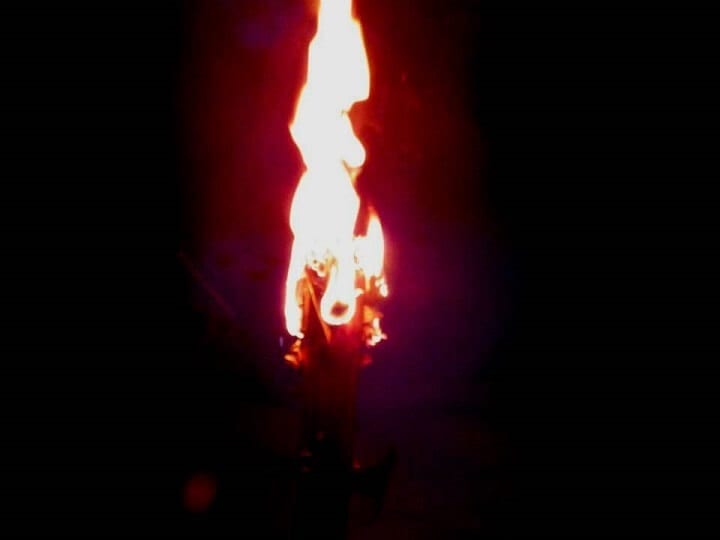
For Thousands of Years, a Torch in the Forest Was the Nightlight of Civilization
In the vast majority of wilderness survival situations, there is one inevitable event that often forces people to confront an unplanned night in the woods. It gets dark.
These days we might pull out our cell phone and hit the flashlight button, but we all know how fast those batteries run down. The same goes for any flashlight. That’s probably a good time to revert to the past and make a torch.
But there might be a little bit more to it than we think.
Want to save this post for later? Click Here to Pin It On Pinterest!
Torches 101
I’ve been in nine wilderness survival situations in my life, mostly due to bad luck or sheer stupidity. On two occasions, I had to improvise a torch in the wild. While I had reasonable success, it was enough to motivate me to research and practice the fundamental concepts of torch making. The result is four approaches to making a torch in the wilderness.
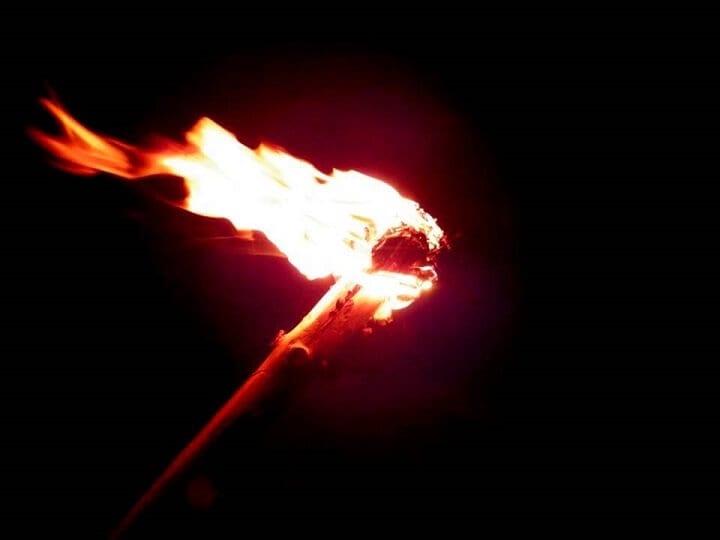
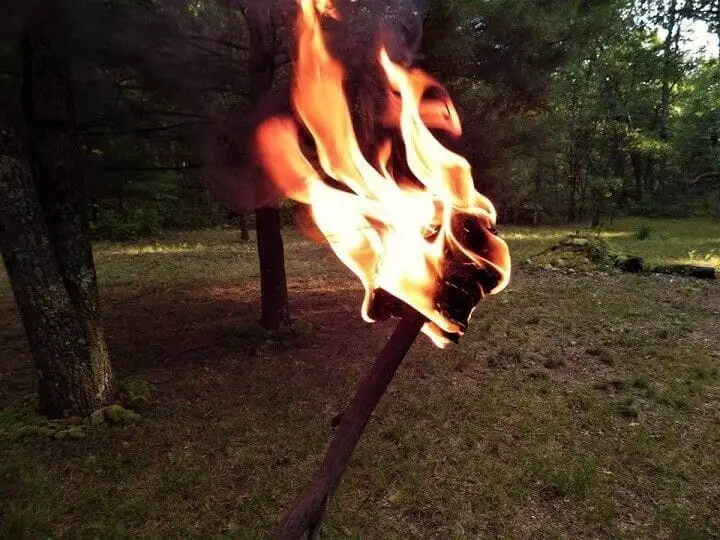
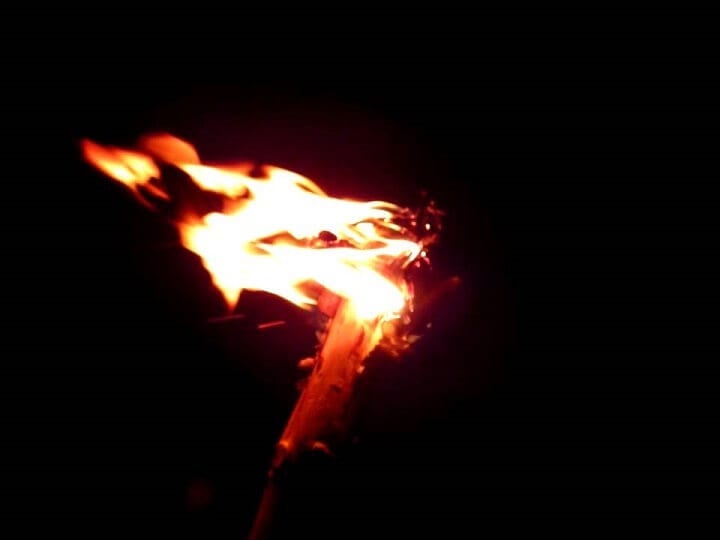
What defines a successful survival torch is its ability to burn for a sustained period of time. Anything flammable from cardboard to pine needles will burn for a while, but after seconds to a minute, the flames are gone. A true torch keeps on burning. That’s critical if you’re relying on it to light your way in the deep woods at night.
The challenge of making a torch in the wilderness is your location, the time of year, local weather, and the general availability of torch-making materials.
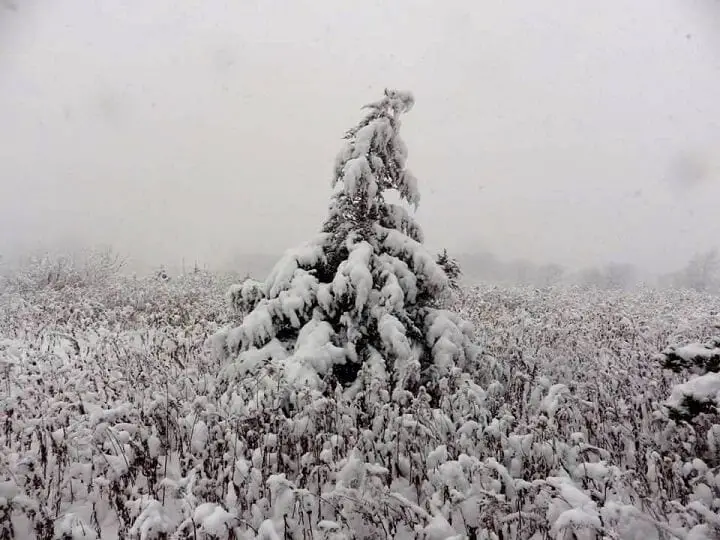
Fashioning a torch after a blizzard may seem like an impossible task, but it can be done. That’s why it’s a good idea to understand the concept of what makes a torch effective and how to construct it from scratch.
What allows a torch to keep on burning is the combination of the types of materials that are burned and how they are bound to the end of the torch. It’s actually pretty easy to make a torch out of rags and kerosene, but how many people have access to kerosene in a survival situation?
Rags are actually a little easier to come by in the wilderness if you’re willing to burn your T-shirt, but if you need additional torches, you’re going to need to find other resources. Unless you enjoy being naked and afraid.
Approaches to a Torch
Like most things, there’s more than one way to make something like a torch.
The approaches we’ll explore assume a survival situation and limited tools and wilderness resources, although you may have a couple of useful items in a survival kit like a knife or a hatchet on your belt. That’s fair because you’ll also hopefully have a way to light your torch with matches or a firestarter from that same survival kit.
These torches can burn from 15 minutes to an hour or more. It all depends on the fuel used for the torch and how it’s bound to the handle.
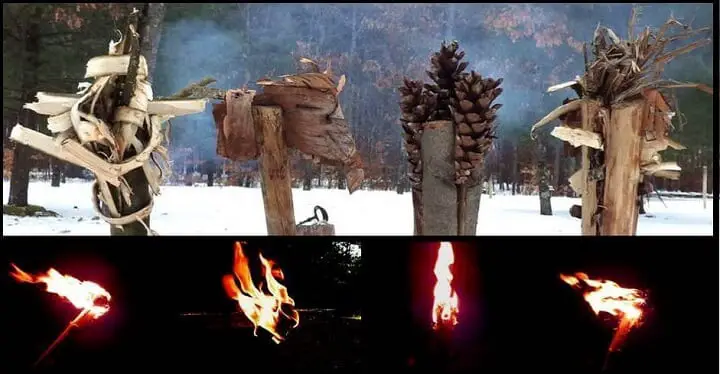
Wild Torches

- The Pine Knot Torch
- The Birch bark Torch
- The Pine Cone/Pine Pitch Torch
- The Survivor Torch (Hybrid)
Steps to Torch Success
There are some smart things you can do to make your torch bright and long burning. Here are few ideas to keep that torch going.

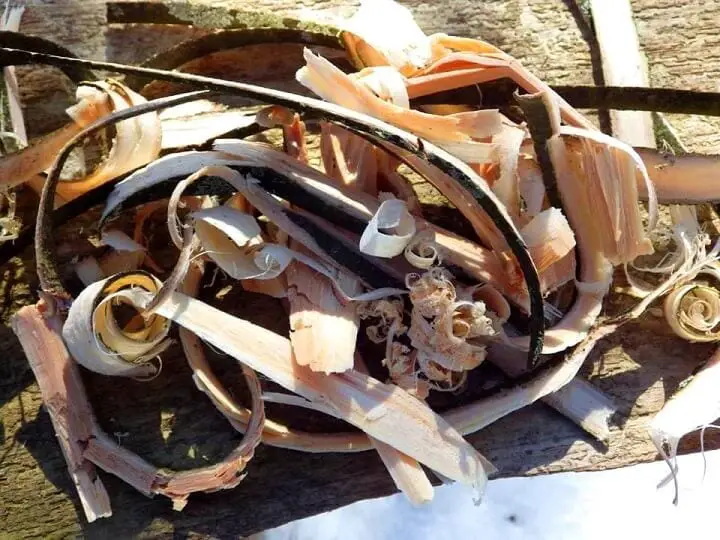
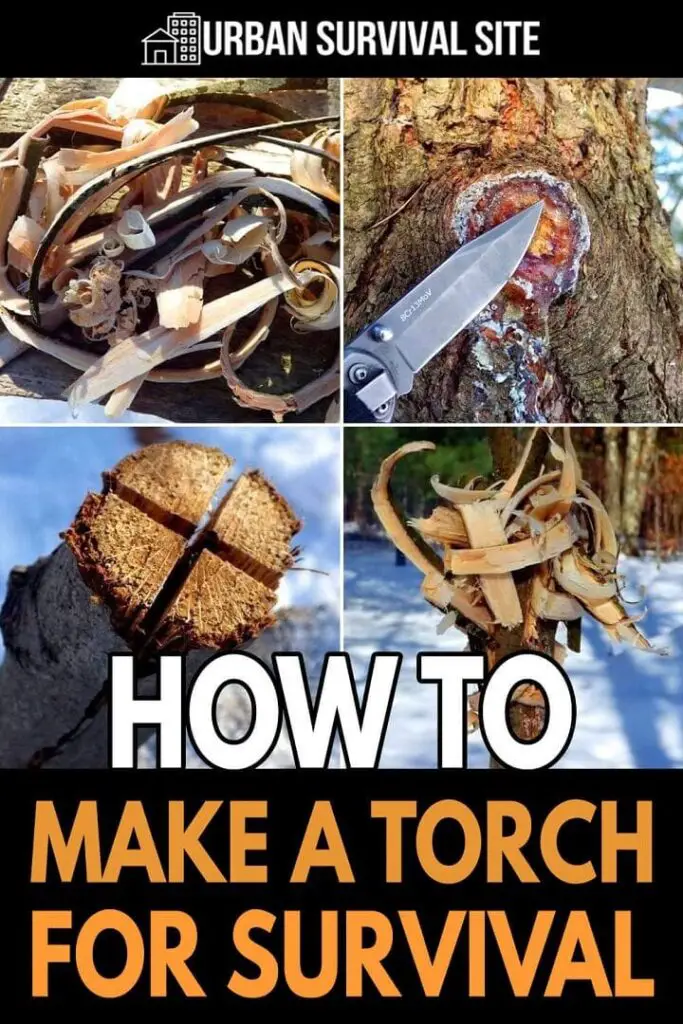
- Look for natural materials that are combustible like birch bark, pine sap or pitch, wood shavings (especially pine), cattail heads, reeds or dry canes, cedar bark shaved off the trunk, fibrous plants like dry burdock stems, and even pine cones if properly soaked with flammable material like pine pitch.
- A green branch about 2 feet long and 1 to 2 inches thick makes for a good torch handle. Dead, dry wood can burn off at the end, although some woods like oak and maple can hold up even when dry. This burn-off can happen quickly, especially if you had to split the ends of the torch to hold the flammable materials.
- Cutting splits in the end of the branch is actually a good idea. It not only helps to keep the materials on the head of the torch together, but certain flammable saps from pine, birch, aspen, tamarack, and hickory are released from the splits as the torch burns further, fueling the fire.
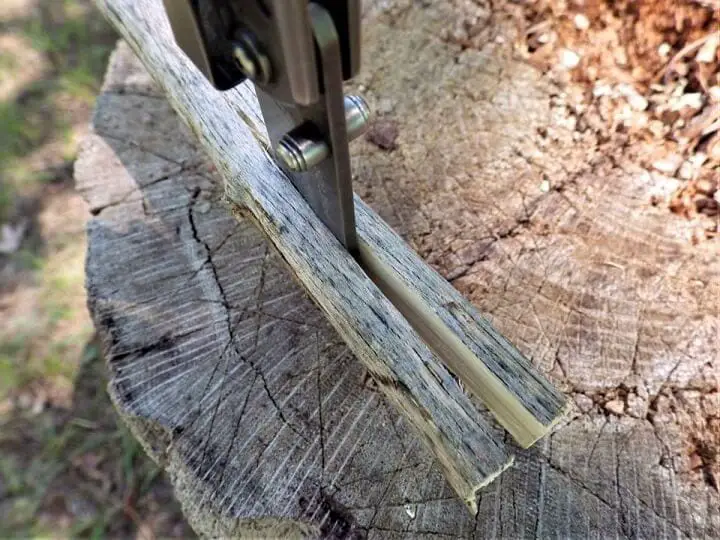
- If all you have is a knife, you can still cut slits in the wood. Hold the knife over the end and tap the top of the knife with a rock. Wiggle the knife to crack open the slit and use your twigs to help wedge it wider.
- If you’re really lucky and have about 3 feet of baling wire or other flexible wire in your survival kit, you can do a great job of binding materials together on the head of the torch and reuse the wire to rebuild the torch when the torch burns out.
- 100% cotton is the fabric of choice if no natural, combustible materials are available, whether it’s fabric from clothing, rope, or even spare socks.
- Accelerants like pine sap or pitch and animal fats like duck fat or goose fat are an excellent way to extend the burn-life of your torch. Assuming you can find them.
- Soaking materials or accelerants into the torch in a liquid such as melted pine sap also extends the burn time of the torch. Alternatively, you can insert naturally flammable materials like chunks of pine sap, chunks of animal fat like duck or goose fat, or strips of birch bark as you build up and layer the head of the torch.
- Layering and combining natural materials like bark, sap, and wood shavings in your torch helps to not only keep it lit but keep it burning over time. This is a good alternative if you have no way to melt hardened pine sap or animal fats.
- You might want to sharpen the end of the torch handle where you hold it. This would allow you to stick it into the ground. If you want, you could make the handle up to 6 feet long and insert it into the ground and use it as a Tiki torch to provide light around an area.
When Torches Fail
There’s a right way to make a torch and a lot of wrong ways. Here are some classic fails:
- The flammable materials are not bound or inserted into the head of the torch properly and burn off or drop to the ground quickly. (This will happen regardless of how well the torch is made but it’s a matter of delaying the inevitable).
- The materials themselves are not sufficiently flammable to maintain a flame.
- Conversely, the materials and how they are bound to the torch are so combustible that the torch burns intensely and quickly goes out.
- Plastic is incorporated into the torch head in the form of nylon, polyester, or some other plastic form and only smolders or simply melts while dropping hot, burning drops of plastic onto the ground and the person carrying the torch.
- Flammable materials are not properly integrated, layered, or penetrated into the torch head resulting in rapid burn-off or the torch goes out.
- Materials that are too flammable like dry pine needles and dead leaves will burn quickly but won’t sustain the flame of a torch. You can use them to ignite a torch but it’s best to leave them out of torch assembly.
- The handle of the torch is too thin or dry and the torch head burns off at the top and falls to the ground.
Torch Cheats
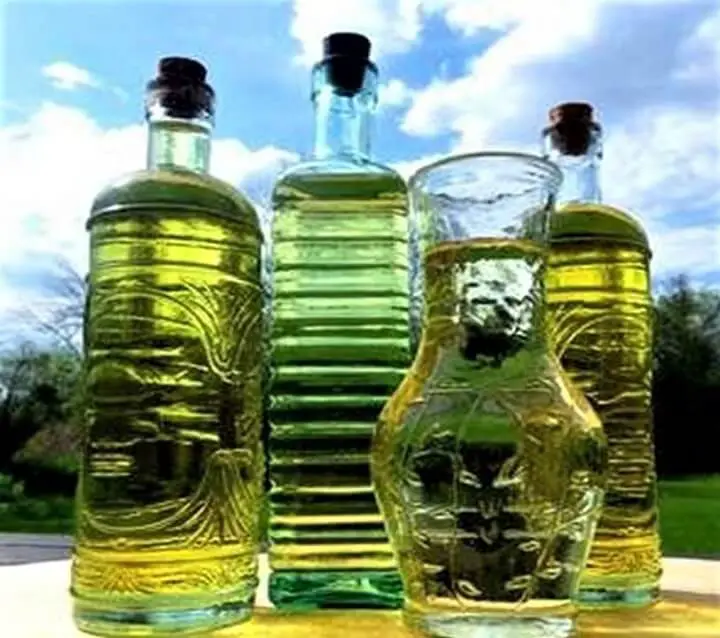
There are certain flammable materials like vegetable oil, animal fats, or even motor oil, kerosene, wax, or lamp fuel that can make a torch successful.
Unfortunately, most wilderness survival situations are a bit of a surprise so the odds are good you won’t have these on hand but if you do, use them. In a pinch, gas is always an option but it burns hot and fast so the burn time will not be as long.
The standard caution with highly flammable liquids is to be very careful. Don’t light the torch next to any container holding a flammable liquid.
Of the animal fats, beef tallow is touted as the best with pork fat or lard a close second. In a pinch, you could use duck fat or goose fat which you actually may be able to hunt down in the wild. One survival expert touted the use of bear fat as a natural accelerant. That’s no doubt true but tracking, shooting, and butchering a bear to get some fat for a torch seems like a bit of a stretch.
Another cheat is how you light the torch. If you have a good combination of flammable materials and liquid accelerants like melted pine pitch, animal fats or a petroleum-based liquid, you can probably light your torch with a match.
If you have materials that are not highly flammable or just hardened bits of pine sap or fat tucked into your torch, you may have to insert it into a fire to get it started, or use a catalyst like a dried branch of pine needles to get it going.
Torch Challenges
Nature doesn’t always cooperate, and your ability to find the best materials for a torch may be limited by the area, weather, geography, time of year, or type of forest biome. For that reason, we’re going to look at some options for torch making that make the best of the natural materials you might encounter.
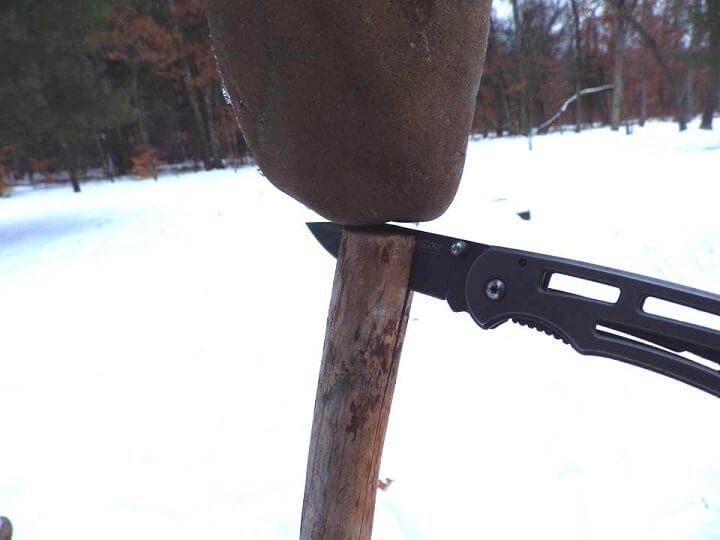
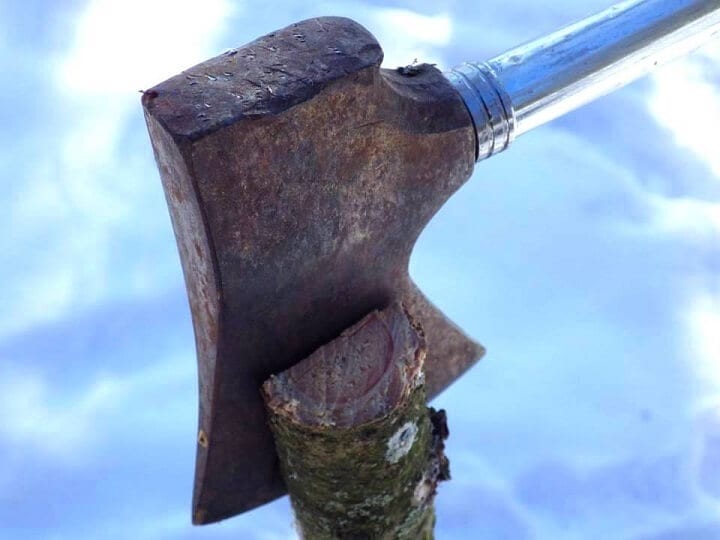
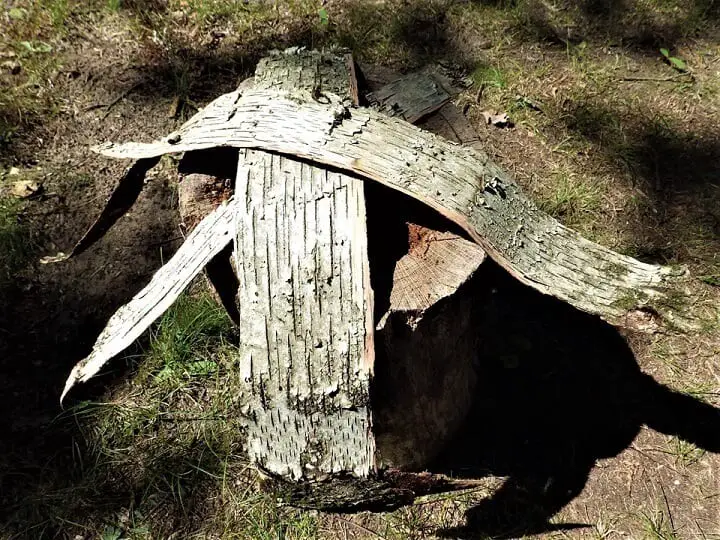
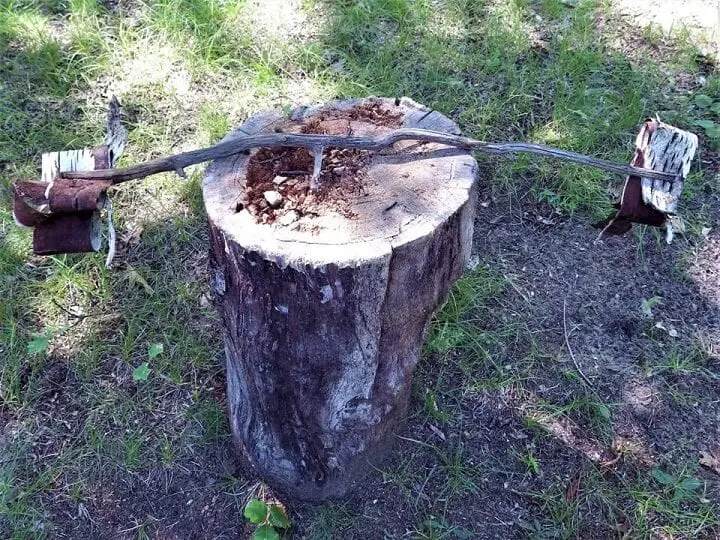
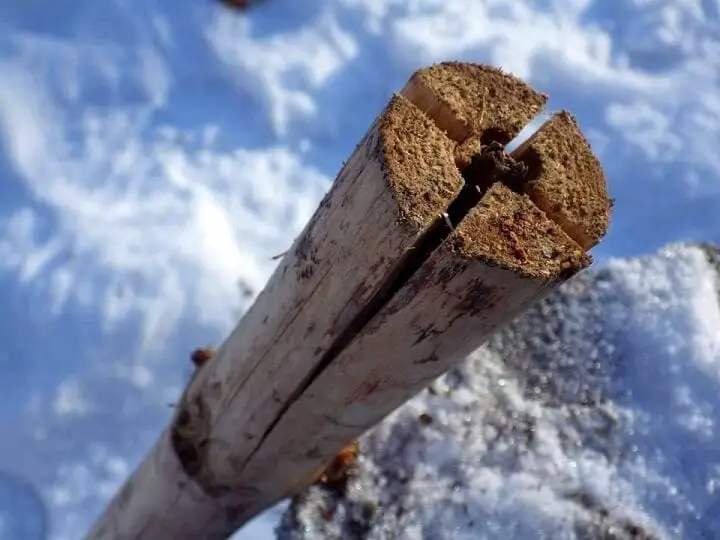
1. The Pine Knot Torch
Pine trees are relatively common, so this may be a good place to start. This is the most basic torch and could last anywhere from 10 to 15 minutes. What makes the pine knot torch effective is the natural flammability of pine sap.
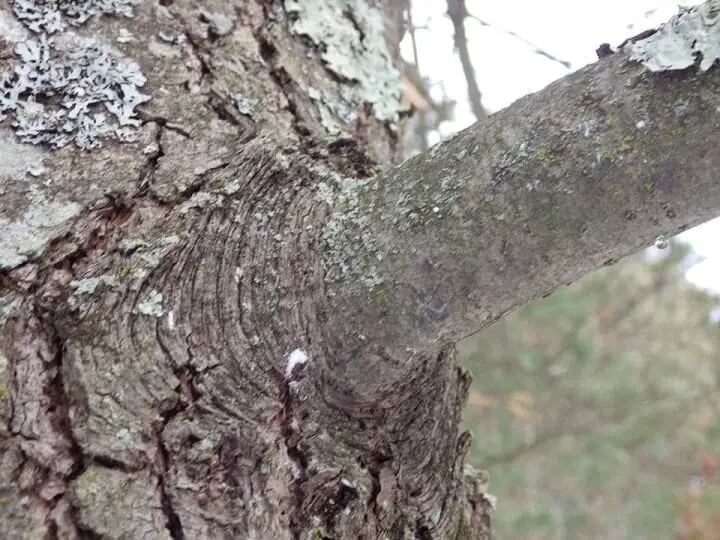
The knot is simply the end of a branch that meets the tree.
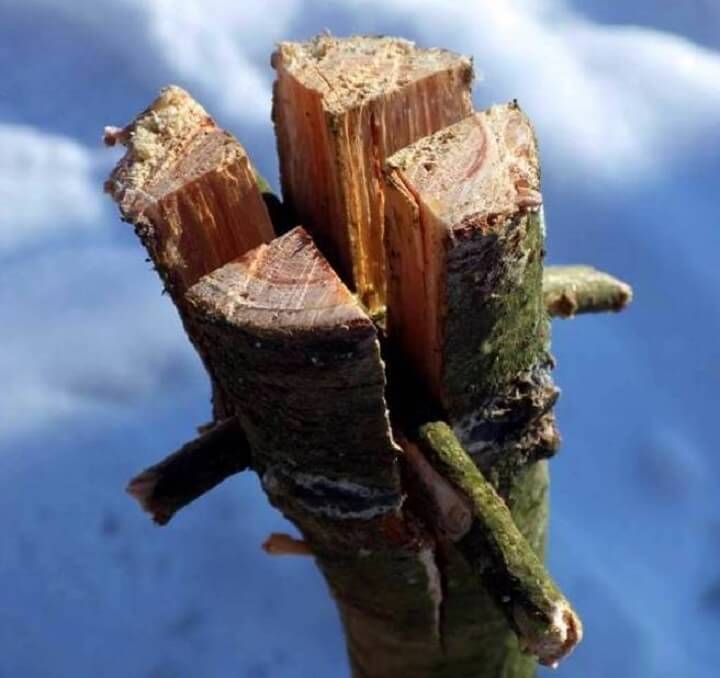
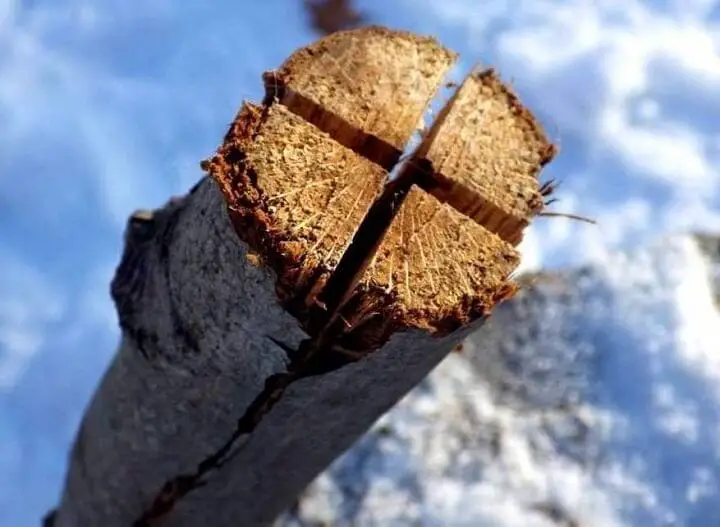
Most torches call for a split to be cut into one end of a branch. The splits cut into the pine branch help to hold the torch materials in place and also enhance the flame. The opposing surfaces within the slit reflect heat back and forth, maintaining combustion, and cause the release of pine sap or pitch which further feeds the flame.
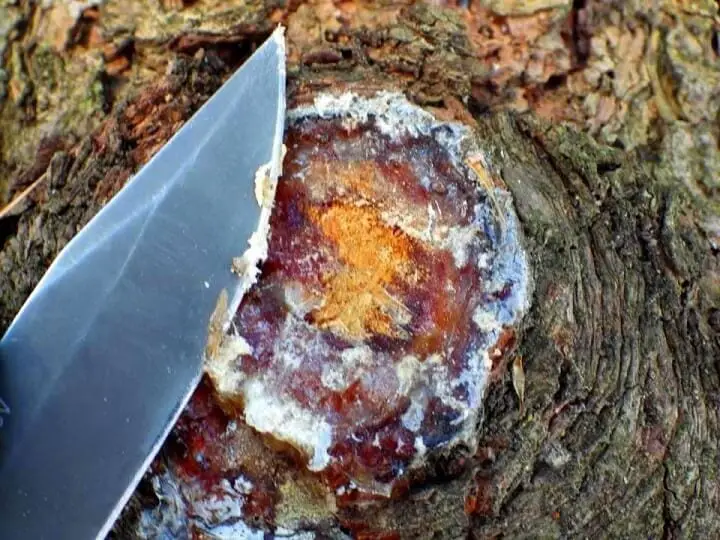
If you spot any pine sap on any pine tree, collect it and incorporate the hard pieces into the head of your torch. We’ll cover a variation on a torch that involves melting the sap so you can pour it onto the torch and make it more combustible.
Tools:
- Saw, hatchet or knife
Materials:
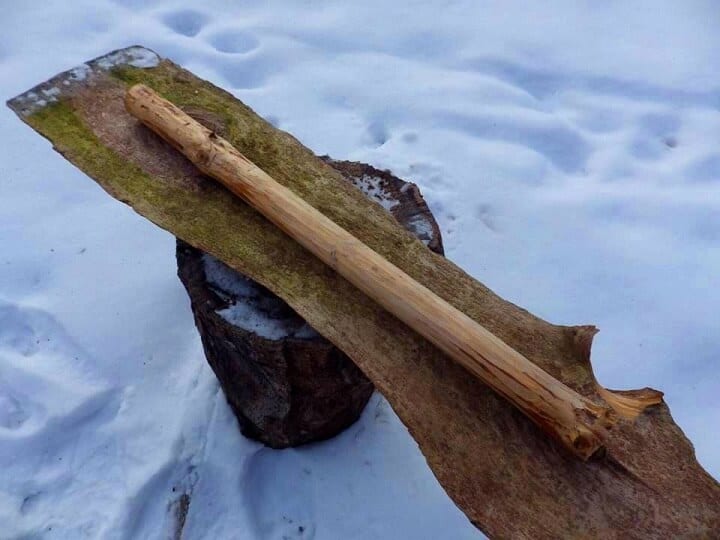
- 1 to 2-inch thick green pine branch about 2 feet long and cut off at the trunk
- 2 twigs
- Pine branch shavings
- Pine sap scraped or picked off the trunk
Assembly:
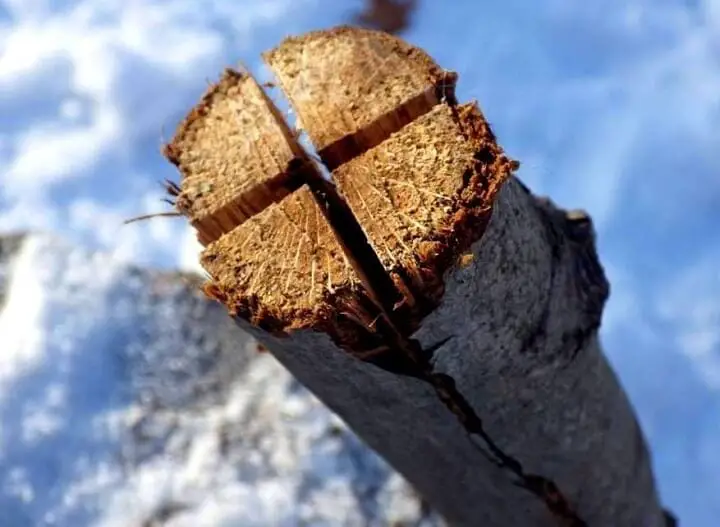
- Cut the green pine branch where the branch meets the tree trunk.
- Trim any small branches and cut the branch to about a 2 foot length from the end of the branch.
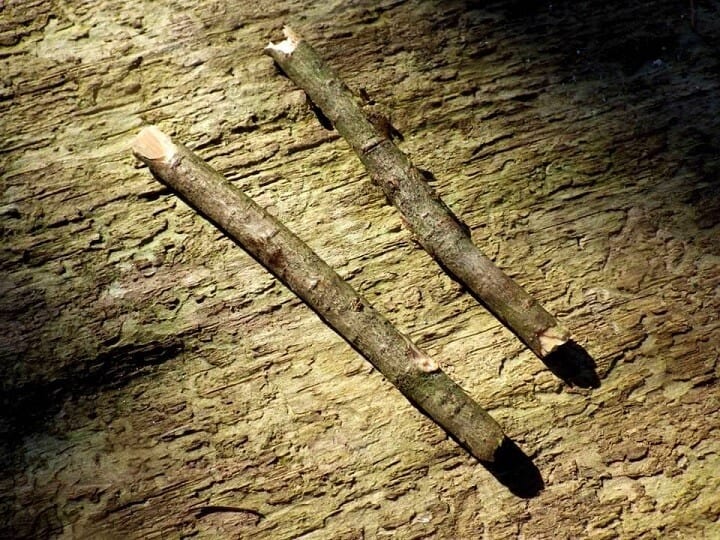
- Cut a crisscross of slits in the end of the branch about 4 inches down on the branch end.
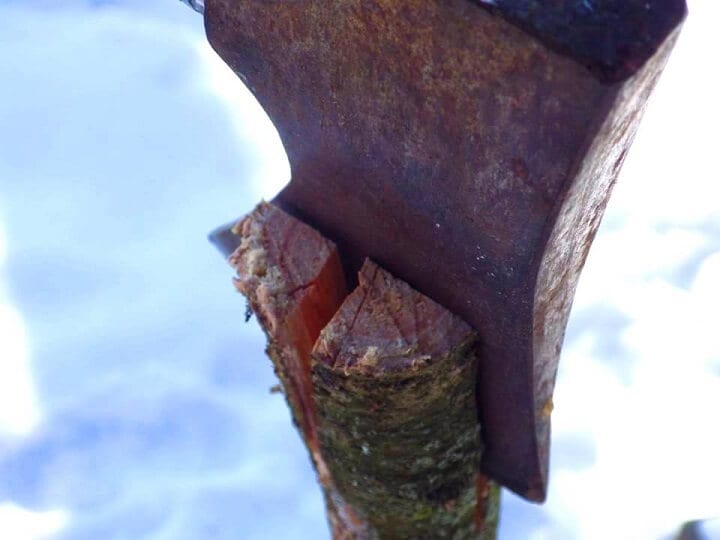
- Wedge the slits open and use the twigs to hold them open to create two gaps.
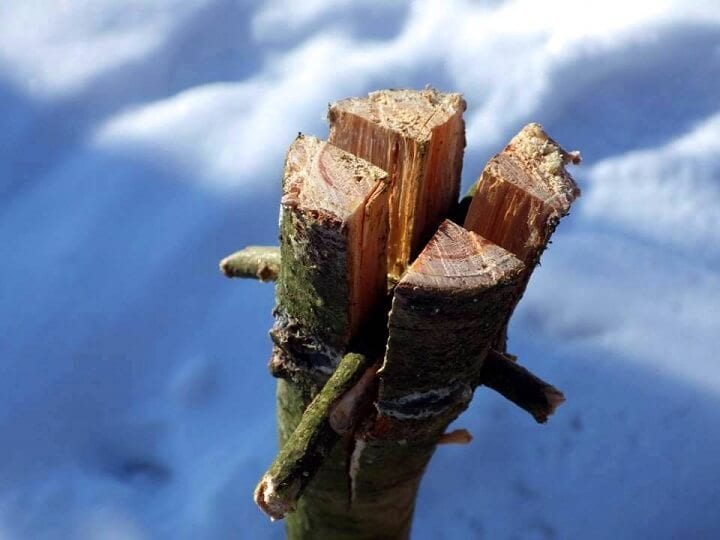
- Insert the pine branch shavings and any bits or chunks of pine sap into the wedges with the shavings. If the sap has only stained the bark, cut the stained bark off in strips and add them to the gaps.
- Pull out the twigs allowing the splits to snap shut on the materials in the splits. Squeeze in more flammable material where you can.
- Light the torch. If you have a campfire going, insert the head of the torch into the fire to get it started. You could also use a dead pine branch with brown, dead pine needles as a catalyst to get the torch started.
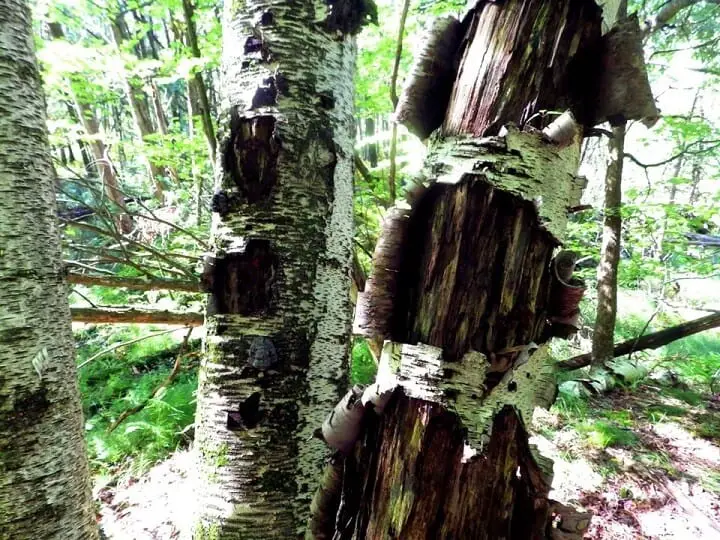
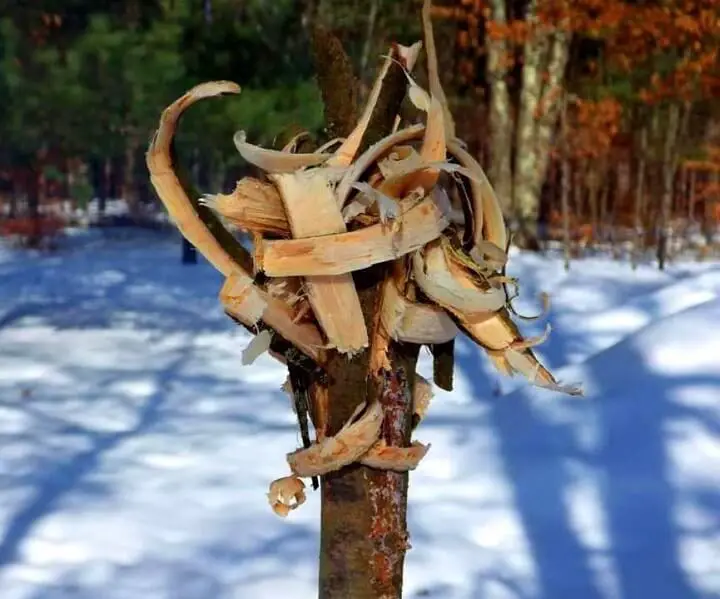
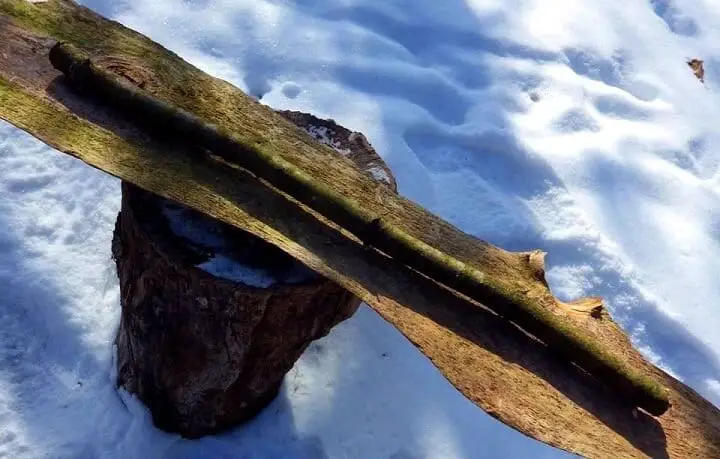
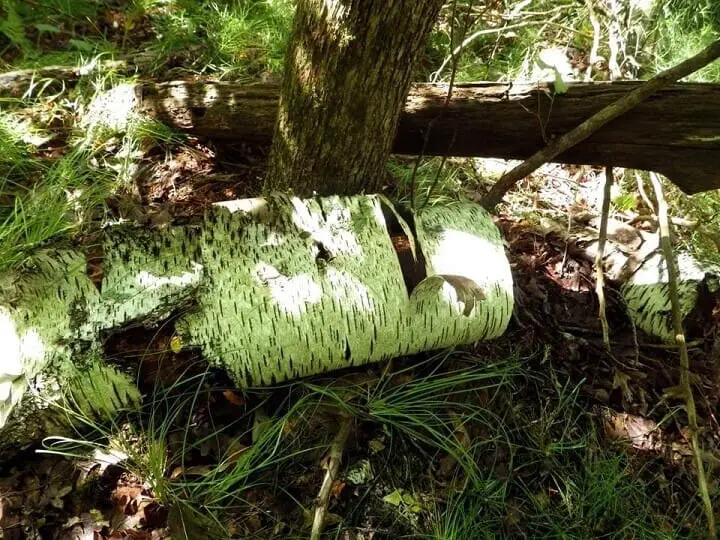
2. The Birch Bark Torch
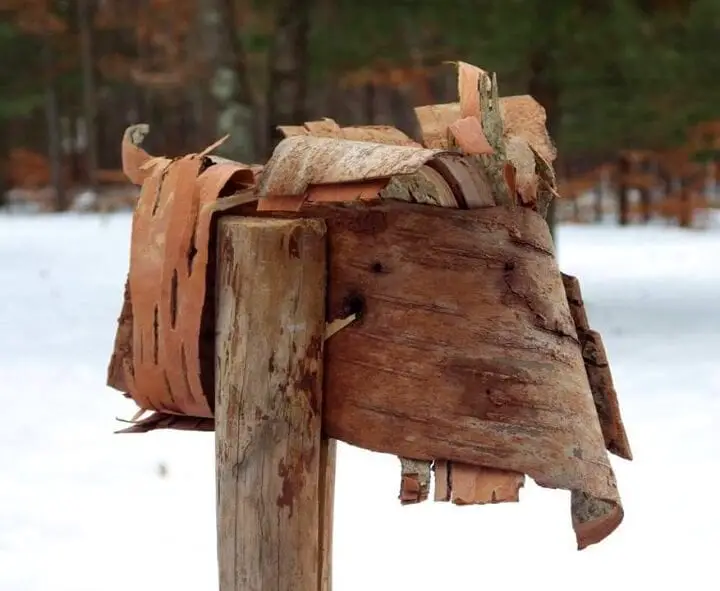
If you’re in a wilderness survival situation and come across a birch tree, you are a very lucky person. You can make all sorts of survival gear from birch bark, and a torch made from birch is not only the easiest torch to make but will last a fairly long time. Figure 20 minutes or more and longer as you refill and relight with spare folds of birch bark from your pocket.
Better yet, you can make a birch bark torch without any tools in case your situation really caught you by surprise. Unfortunately, birch trees don’t show up everywhere, but if you come across one, don’t pass it by.
Tools:
- A knife would be nice but not critical
Materials:
- 3-foot length of a green branch about 1 to 2 inches thick
- Multiple strips of birch bark.
Assembly:
- Collect as much birch bark as you can carry. You can use extra birch bark to replenish your torch as you go.
- Cut a green branch about 3 feet long and 1 inch thick.
- Make one slit on both ends of the branch about 6-inches down the length of the branch end.
You’re going to insert folded birch bark into both ends of the stick. You’ll light one end and then transfer the flame as the other end burns down.
- Cut the birch bark into strips 2 feet long and 4 inches wide.
- Fold one of the birch bark strips into a flat package about 4 x 4 inches.

- Wedge the folded birch bark into the slit at the end of the stick.
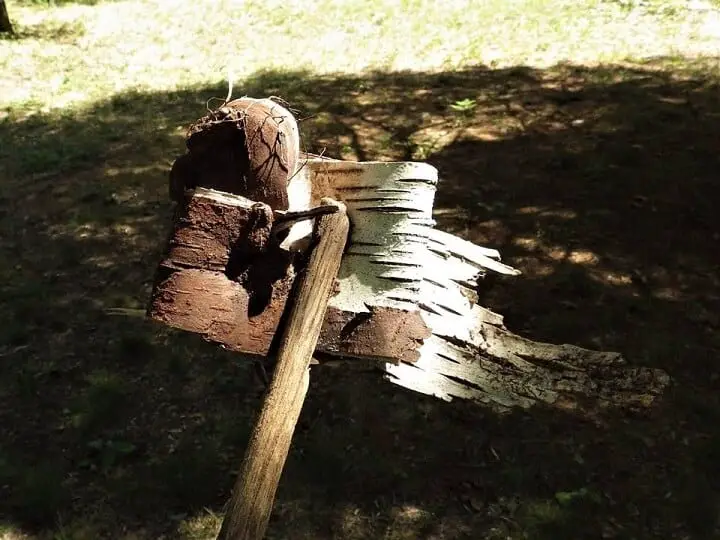
- Wedge a second folded package of birch bark into the other end the same way.
Carry extra packets of birch bark in your pocket so you can replenish the torch as you go. Have some small, 1-inch by 6-inch birch bark strips in your pocket to transfer the flame from one end to the other.
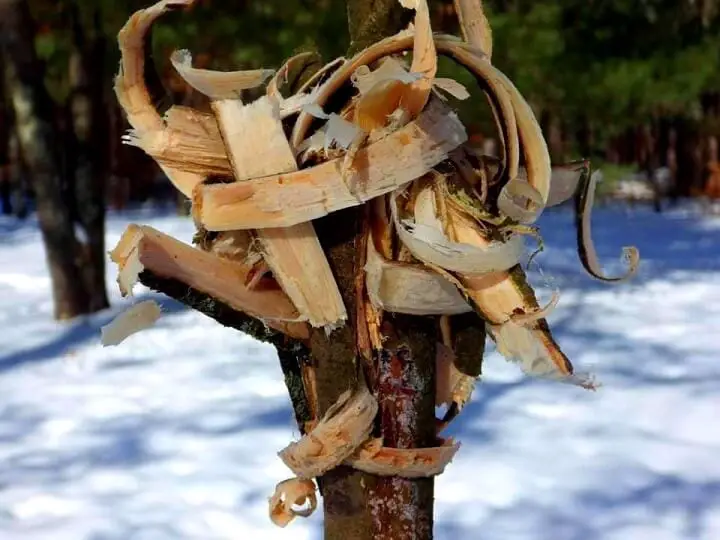
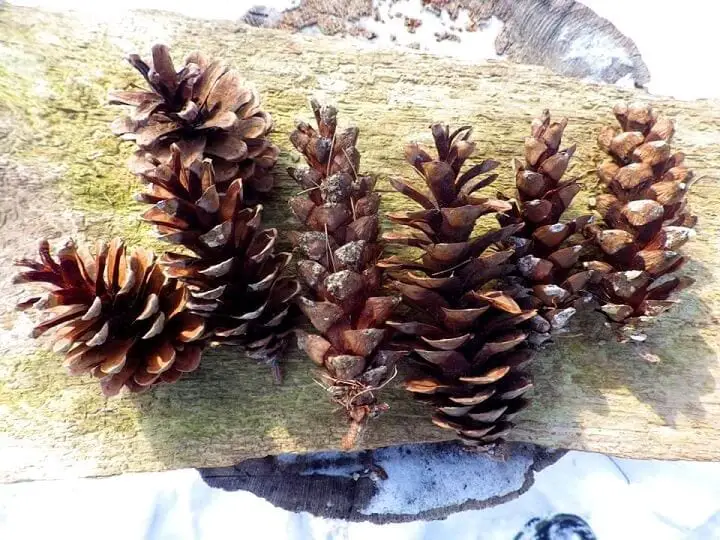
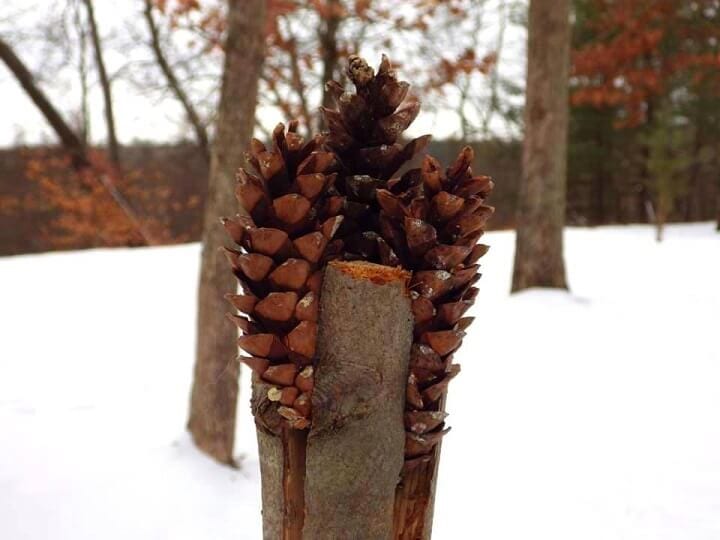
3. The Pine Cone/Pine Pitch Torch
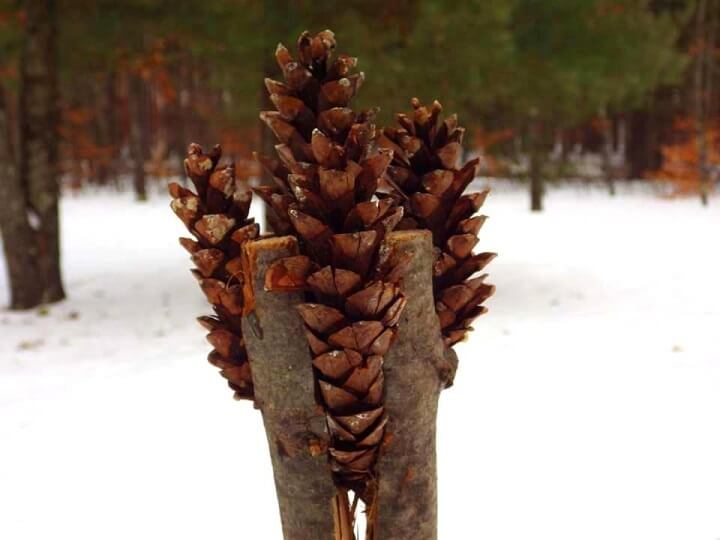
This is a more ambitious variation on a pine torch using melted pine sap or pitch to add to the flammability. Contrary to what some people think, most pine cones don’t burn that well on their own. However, a pine cone makes an excellent receptacle for various flammable materials, especially pine sap or pitch.

By combining pine cones in the splits on the end of a forked brand and coating in pine pitch, you can make a very effective torch that lasts 20 to 30 minutes.
Tools:
- A saw and knife
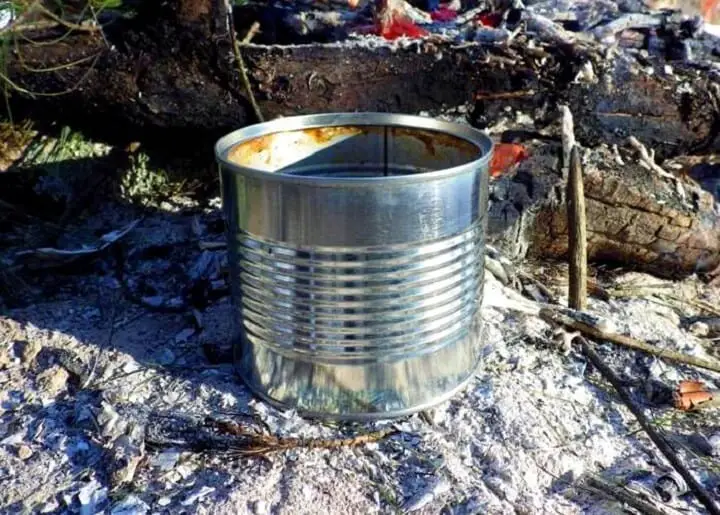
- A metal can to melt the pine sap
Materials:
- 2 foot length or a green pine branch about 1 to 2 inches thick
- 4 to 8 pine cones depending on size
- Pine sap
- Other combustible materials like pine shavings.
Assembly:
- Cut the green pine branch to about a 2-foot length from the trunk of the tree.
- Scout surrounding pine trees and look for dribbles and chunks of pine sap on the bark.
- Use your knife or a stick to collect it in your metal can. If you don’t have a metal can, you can use a piece of bark to collect the pitch.
- While you’re scouting the pines for pitch, keep your eyes peeled for pine cones. Collect a variety of sizes and types so you can pick and choose which ones will fit best in the head of the final torch.
- Cut a crisscross of slits in the end of the branch that met the trunk about 6 inches down.
- Wedge the slits open and use the twigs to hold them open to create a large gap.
- Begin to put the pine cones into the gap. Ideally, you have one in each of the 4 gaps and a large one in the center.
The leaves or petals of the pine cones should be pointing up to better catch and hold the melted sap.
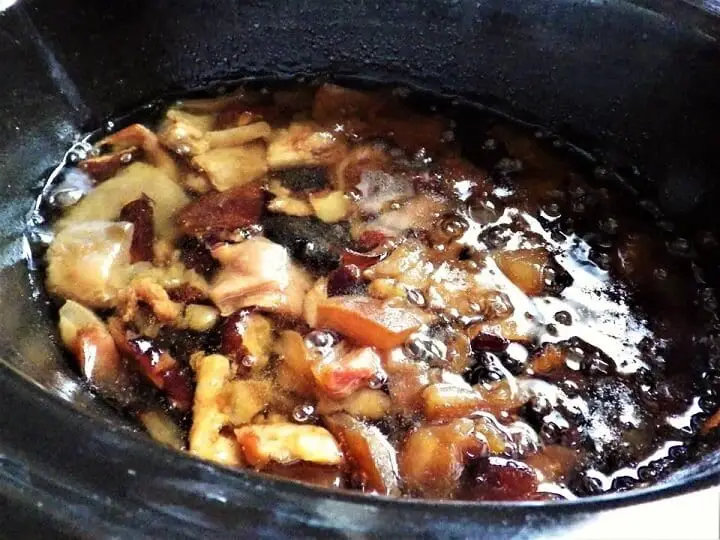
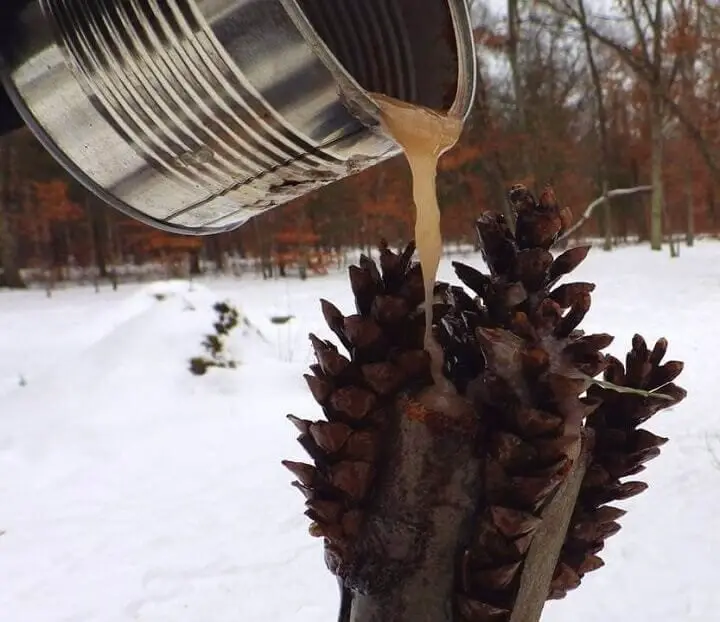
- Melt the pine sap in a tin can next to a fire, being careful to not let the can get too hot and ignite the pitch.
- When the pitch is a syrupy liquid, pour over the pine cones starting with the large, center cone and then working to the outside.
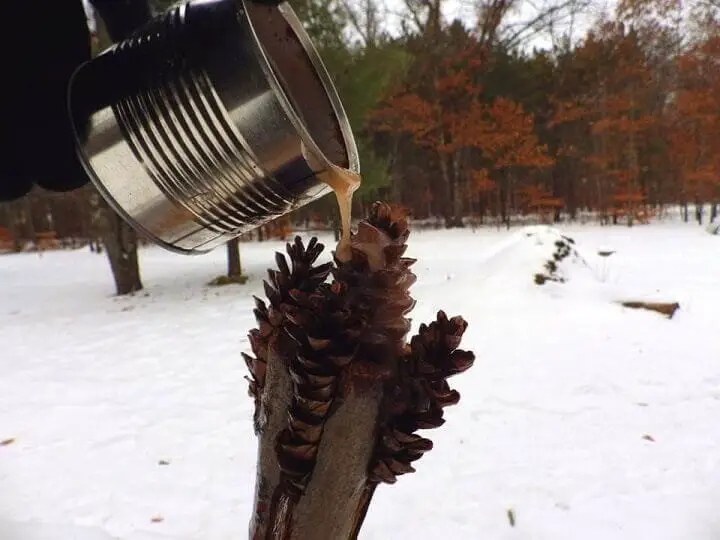
You may need to do this 2 or 3 times to let the sap ooze down and into the cones.
If you don’t have a can, you can lay the pitch pieces on a piece of bark next to the fire so it melts.
- Pour or use a stick to apply the pitch and incorporate the pitch saturated bark into the torch.
- Let the torch dry for a while if you don’t need it immediately.
- Insert some brown pine needles into the gaps in the pine cones to act as tinder and light.
- When the pitch burns down, you can pour more pitch over the toasted cones or replace them, unless the forks on the branches have burned through.
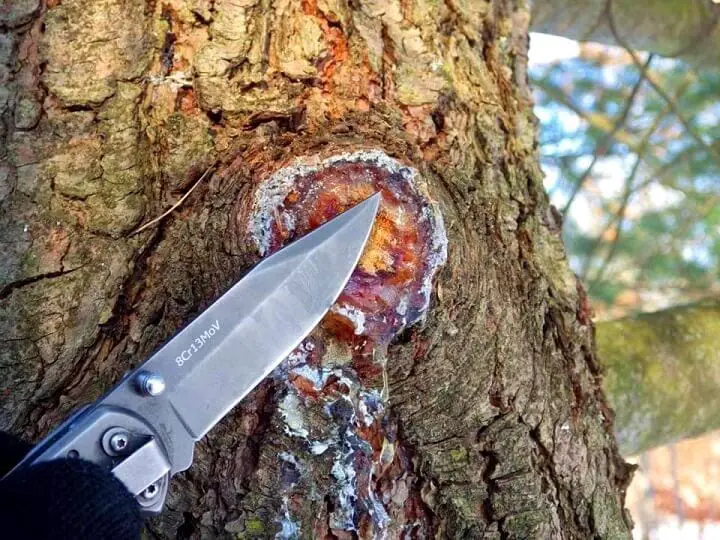
Notes on Pine Pitch
If there are pine trees in the vicinity there’s a chance you’ll find pine pitch.
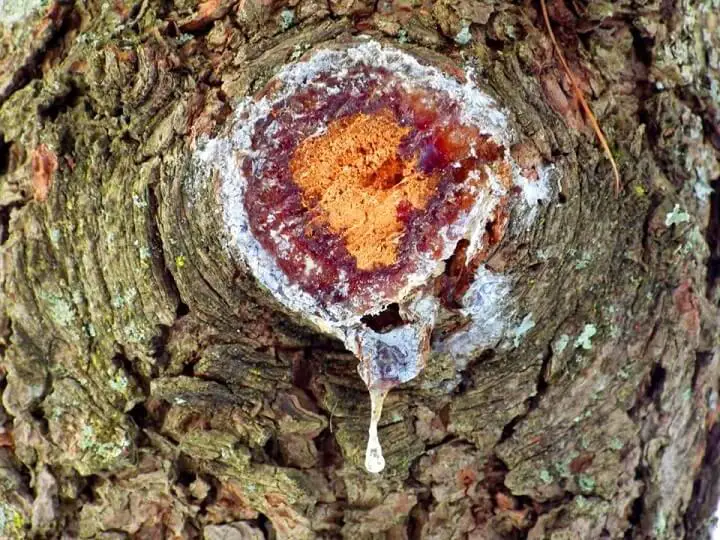
It’s the sap of the tree that drips from cuts, wounds, and scrapes on the bark.
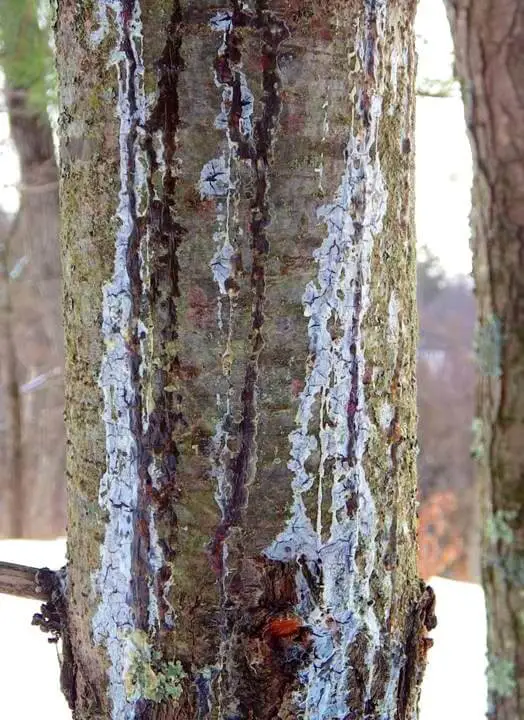
The easiest way to find it is to look for long, whitish stains on the bark of a pine. You can see this at a distance and it will save you from inspecting every inch of every pine.
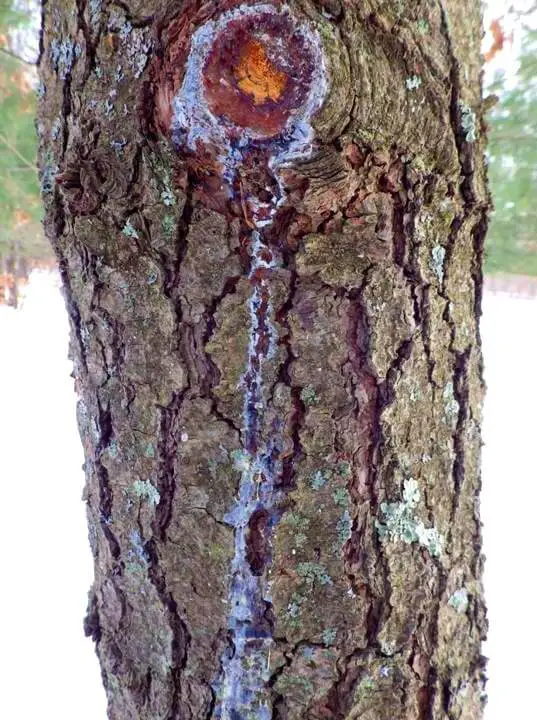
Look up towards the source of the stain and you should find a concentration of pitch. You can either work the hardened sap into your torch head or if you have the time, melt it.
To melt pine sap into pitch, collect the sap on a piece of bark or in an empty tin can and place next to a fire.
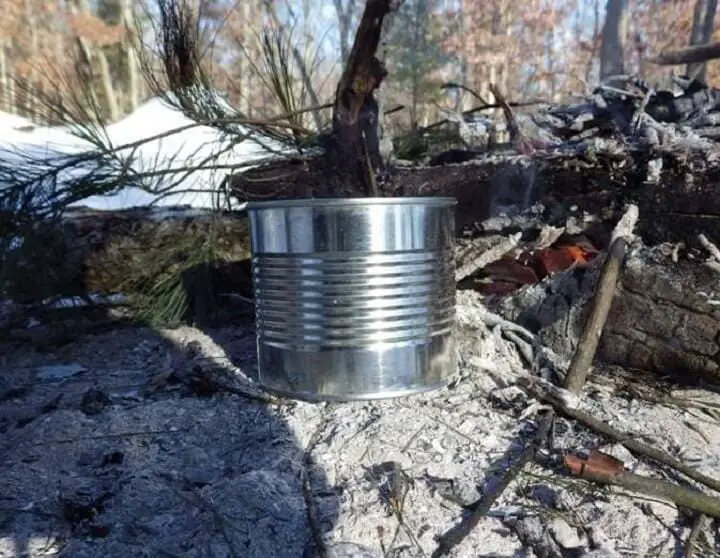
If you have a lot of pitch, you can immerse the head of the torch in the can and let it soak until you need it or it gets dark.
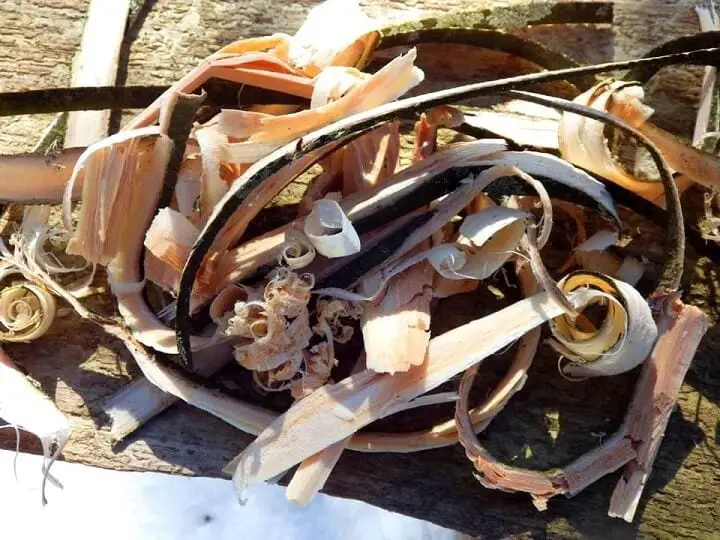
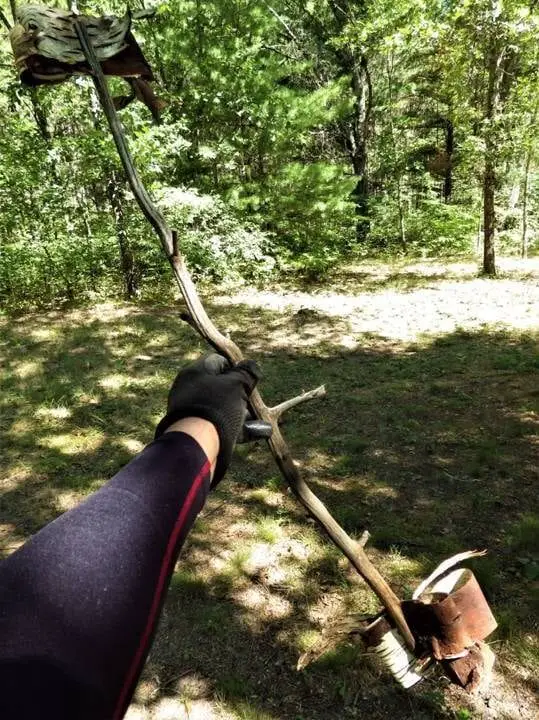
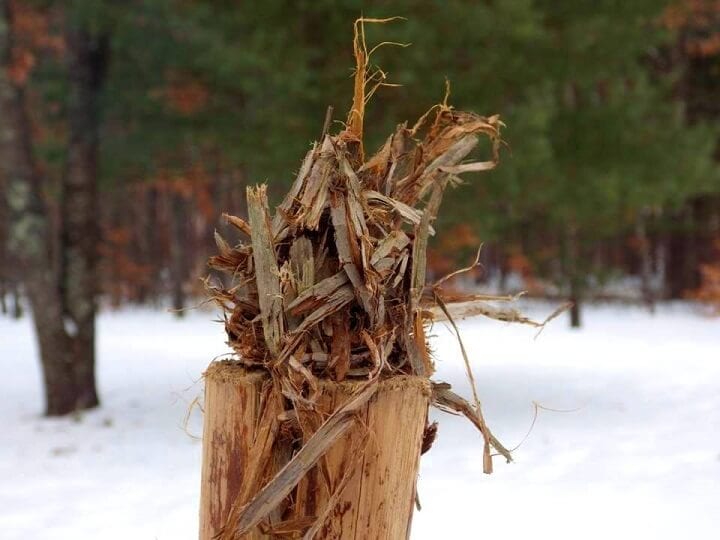
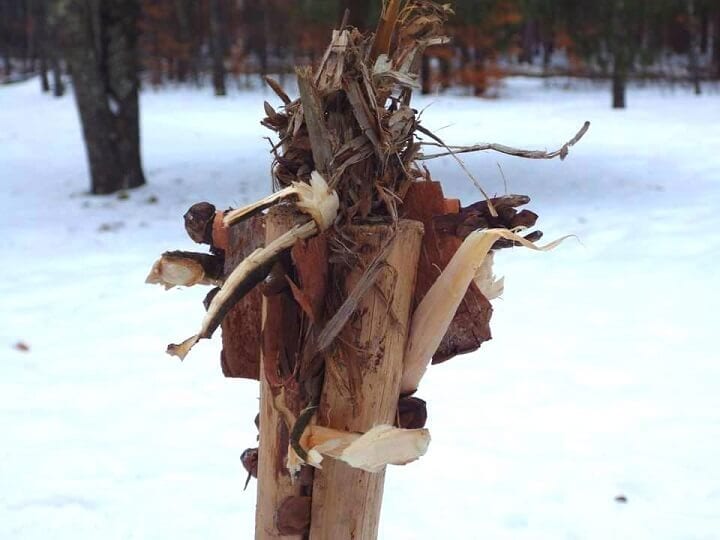
4. The Survivor Torch (A Hybrid)

It’s quite possible you won't be able to find the perfect materials for a torch in a survival situation. There are no birch trees and no pines as far as you can see, and there’s nothing in sight that looks like it will easily burn. That’s when it’s time to get creative and do your best to combine materials to make a torch.
You may also want to use a dead, dry branch for your torch handle because you won’t have the benefit of pine sap from a pine branch, and a dry torch handle will be more flammable. Just make sure it’s not rotted wood and not too thin.
Depending on the materials you find and how well they are combined and held together, this torch could burn for 10 to 20 minutes or more.
Tools:
- Hatchet or saw
- Knife
Materials:
- 2 foot “dead and dry” branch about 1 to 2-inches thick from any tree
- 2 twigs
- Wood shavings from the dead branch of any tree
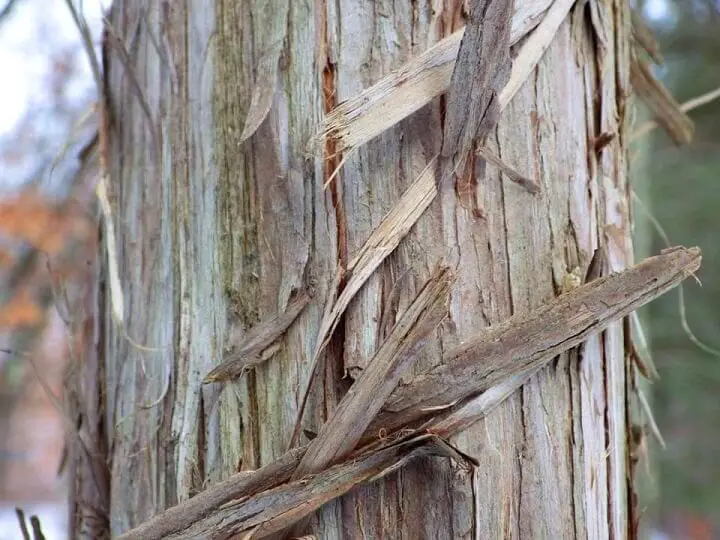
- Thin and dead bark strips from younger trees with smoother bark, or scaly bark from any type of dead tree. Avoid the thick bark of mature trees.
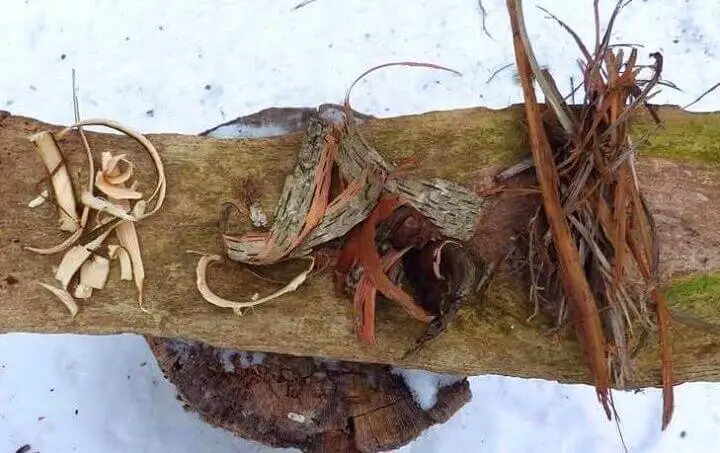
- Wicks rolled from scraped cedar bark or the dry main stems of burdock or other fibrous and dry plant stalks that have been twisted and broken into fibers. These long fibers can also be used as wrapping around the torch head.
- Anything else you can find that you think you could incorporate into the torch that would burn for at least some length of time.
Assembly:
- Cut a dry branch about 2-feet long.
- Cut a crisscross of slits in the end of the branch about 6 inches down at the branch end.
- Wedge the slits open and use the twigs to hold them open to create a gap.
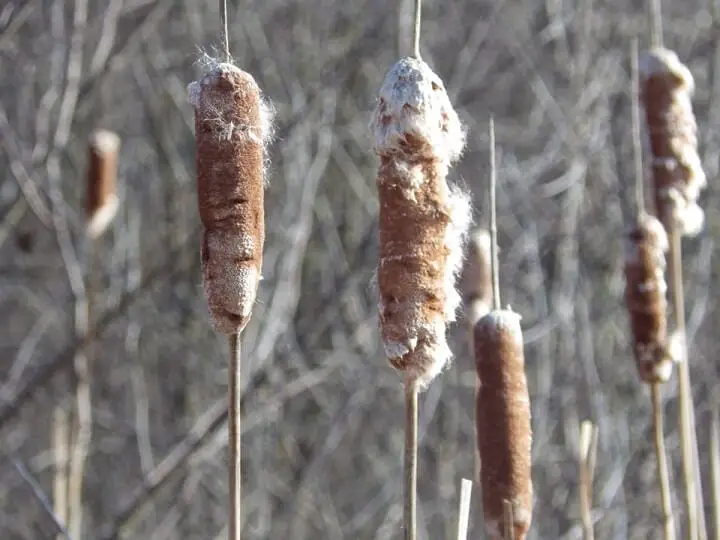
- Insert your collected, combustible materials starting with a wick made from crushed cedar or other fibrous bark or plants jammed into the center of the splits. A dry cattail flower head is another possibility.
- Continue to add materials to the slits while wedging them in the best you can.
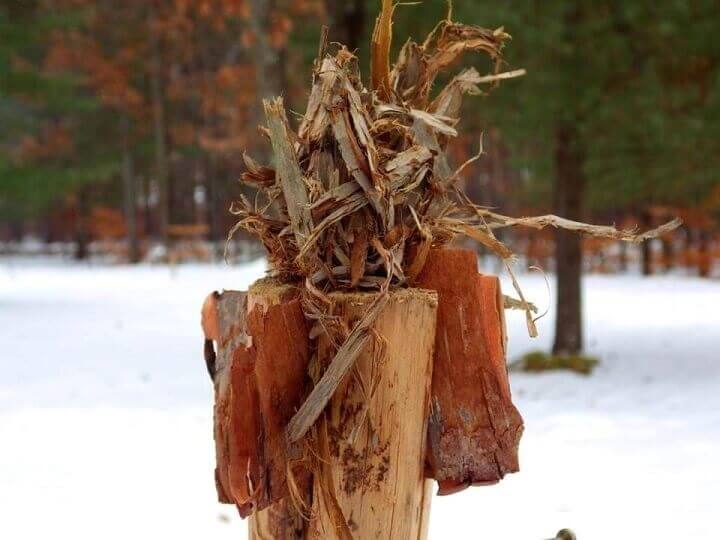
- Jam your wood shavings into the slits and use any long strips to weave in and out and contribute to holding the torch head together.
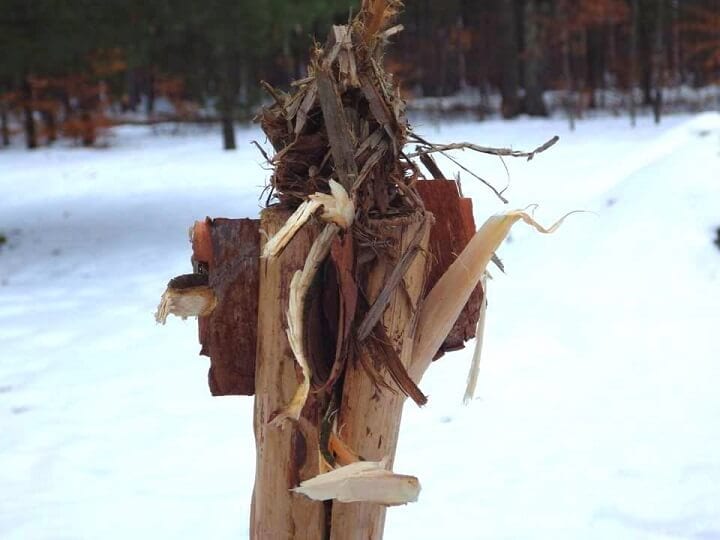
- Pull out the twigs allowing the splits to snap shut on the materials in the splits. If you have more fibrous material, wrap the head of the torch some more.
- Light the torch. You may need to use some tinder on the ground to get the torch going.
Variations on a Torch
When you consider that our civilization has been using torches for thousands of years to light the night, it should come as no surprise that there are many variations on how to make a torch.
In Asia, hollow bamboo branches are stuffed with coconut fibers and either coconut oil or animal fats to make long burning torches. Various dry canes are used across jungles and savannas and bound together and dipped in fats or oils to burn bright and long.
A torch used by pioneers across the plains of North America was made from cattail flower heads. They were also bound together and dipped in fats or oils and their tops served as natural wicks.
There’s no limit to the number of ways you can make a torch as long as you have a flammable material that burns and if at all possible, an accelerant like an oil or fat to keep it going. The best thing to do if you’re so inclined is to practice and make a torch or two.
In my experience, the best survival torch I ever made was the simplest: the birch bark torch. It required no tools, only two materials—birch bark and a branch—and because I could reload the branch with extra birch bark in my pocket, it was sustainable over a long haul through the dark woods.
Got a Better Idea?
If you’ve ever made a torch before and can think of something we missed, please share it in the comments section below. We didn’t cover desert torches from Yucca plants or papyrus torches from the Nile but maybe you have.
One Last Caution
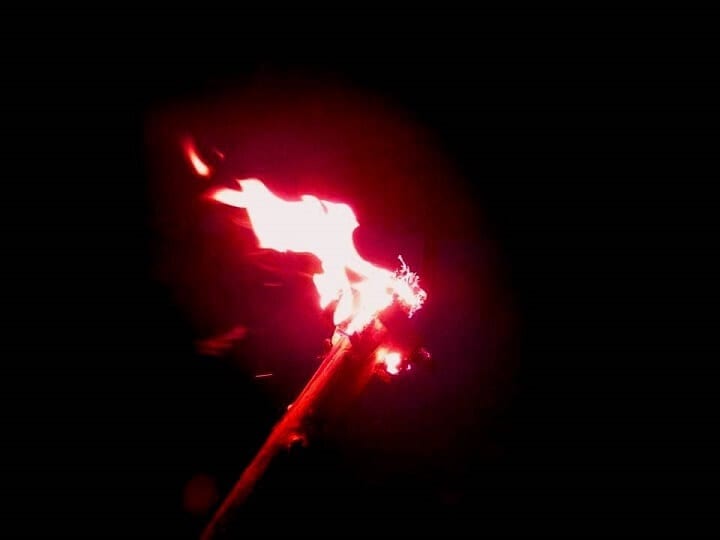
Regardless of where or when you use a torch, it’s dangerous. It’s a ball of flame on the move, and even the best-made torches will drop smoldering—if not flaming—bits of burning stuff on the ground. Or worse, on you. Be mindful of anything that falls from your torch. Hold the torch in front of you at a 45-degree angle whenever possible.
Every wild torch will drop bits of hot coals and burning materials as it burns, and you don’t want them to fall on your head or shoulders. Anyone enduring a wilderness survival situation has enough to think about without having to run from a forest fire started by a torch.
Like this post? Don't Forget to Pin It On Pinterest!
You May Also Like: