

Estimated reading time: 16 minutes
All You Need is a Mylar Blanket, a Knife, and Mother Nature’s Hardware Store.
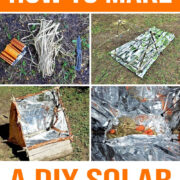
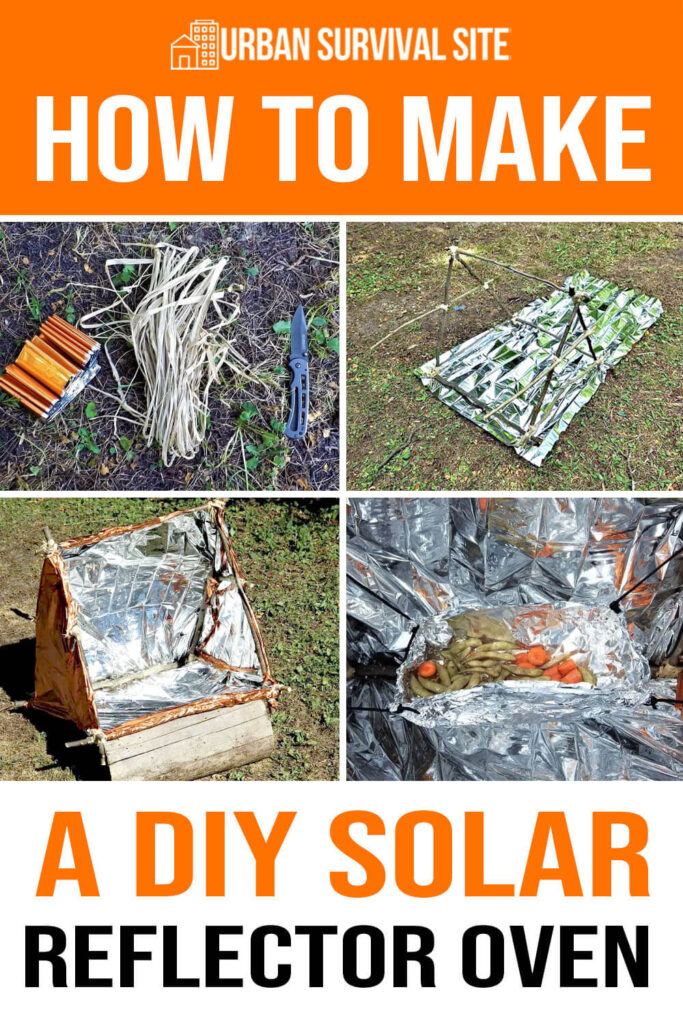
A small, pocket-size Mylar blanket is a standard item in any survival kit. You can do a lot of things with them, even make a reflector oven. All you need are straight branches, some twine like your shoelaces or sturdy grasses, and some basic binding skills.
For this article, I'm going to show you step-by-step how to build a reflector oven from found materials. Then I'll cook some food on it and provide a few simple cooking tips.
Want to save this post for later? Click Here to Pin It on Pinterest!
What is a Solar Reflector Oven?
Any Boy Scout or Girl Scout will tell you that a solar oven consists of two polished surfaces that are angled to capture the sun’s rays and reflect the heat into the oven. Okay, maybe they’ll just say it’s a way to cook with sunlight, but that’s true too.
What you can cook with a solar reflector oven really depends on how cloudy it is along with the surrounding air temperature and wind. Colder temperatures make the solar oven less effective. Winds gusting into the oven take away any concentrated heat.
But if you have clear skies, decent temperatures, and little or no wind, you’re good to go. The standard advice is that you don’t want to cook foods that are too fussy about temperature. In spite of your best efforts, temperatures will vary during the cooking process. In other words, forget about baking a cake.
What Can You Cook in a Solar Reflector Oven?
Assuming you have ideal weather, you can cook vegetables, meat, fish and even bake bread, although dough wrapped around a stick seems to work best. The thing to remember is the on-going temperature variance. Here are the factors that affect solar oven temperature.
- The clarity of the sky. Even a bit of haze will diminish the radiant heat from the sun. A partly cloudy day is not ideal. If it’s a cloudy day, no dice.
- The rotation of the Earth. If you are cooking something that takes a long time, you’ll have to reposition the oven back towards the sun from time to time.
- Any wind or gust of wind can increase cooking time.
- Time of day affects the intensity of the sunlight. Sunlight is most intense at noon but less so in the morning and early evening.
- Any temperature drop can affect cooking time.
- The location of the food in the oven is important. You can briefly put your hand in the oven to determine the hot spot and best location for the food. Do this quickly. The heat may surprise you. It may also disappoint.
Supporting Food in a Solar Reflector Oven
Commercially manufactured solar ovens have a tray to support a pan or optional spit or skewers. Some commercial solar ovens are shaped like a parabolic dish and the food is placed at the bottom of the parabola.
We’re going to improvise our own and cover some options for cooking, including a spit, suspended pan, and skewers.
Let’s Get to Work on Our DIY Solar Reflector Oven
Equipment and Supplies
- Mylar Space Blanket
- Cordage
- Knife
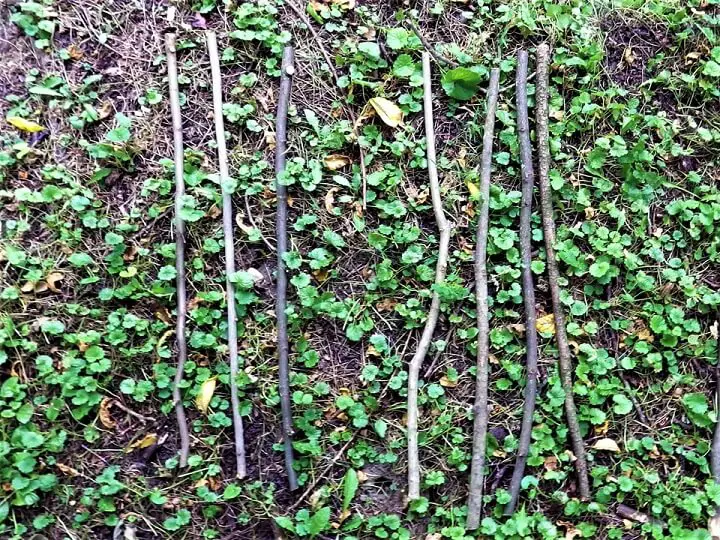
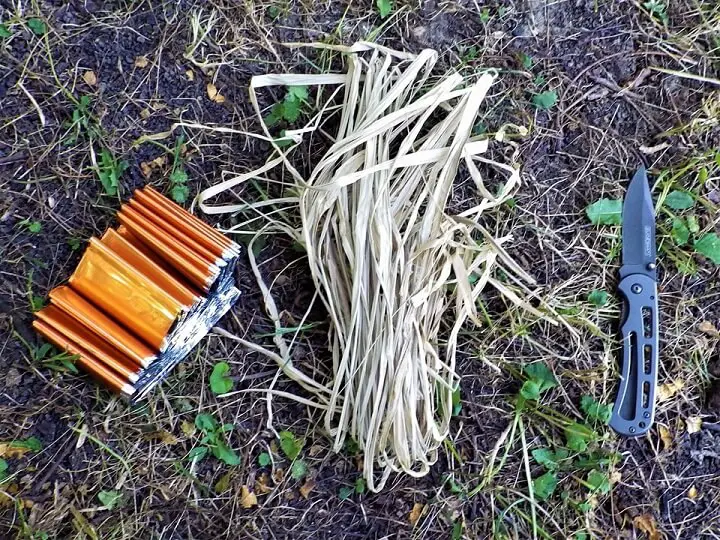
- 10 long sticks
- 7 sticks of equal length about 2 feet long for the frame.
- 2 more sticks of equal length about 2 feet long for high-noon cooking support.
- 1 stick sharpened on both ends for spit roasting – 3 feet long.
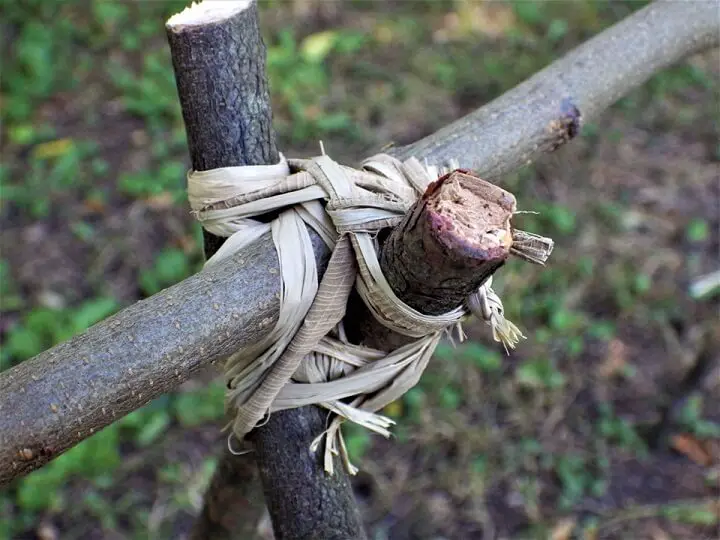
A Note on Sticks for the Frame
Attaching the mylar blanket material to the frame is important.
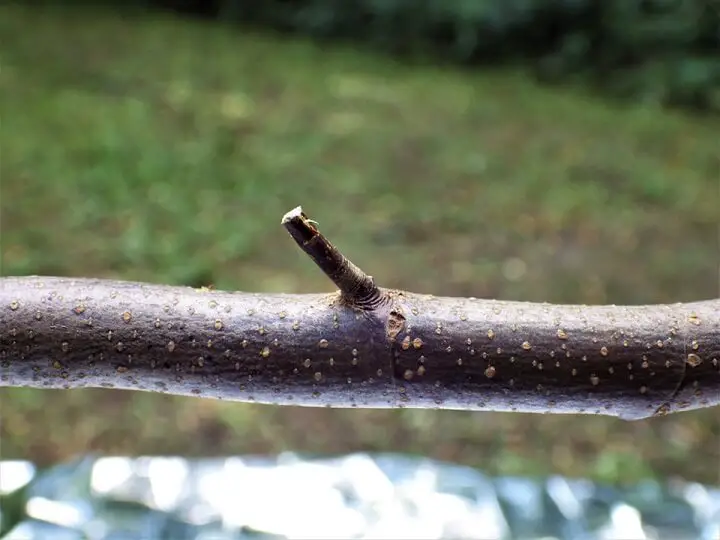
One thing that can help is to leave small branch ends protruding from the sticks when you cut them. When you wind the mylar blanket material over the sticks, these small branch points will help to hold the blanket tightly on the frame.
Resist the instinct to cut these nubs close to the branch.
A Note on Cordage
75 feet of paracord is ideal, but in the wilderness, it may be a luxury. Natural materials can be substituted including:
- Straw or long grasses
- Grapevines
- Willow tree branches
- Strips of bark
- The stalk of the burdock plant once used by the Romans to braid rope
- Or in a pinch, your shoelaces
We’re going to use long, dead grass stalks. Any natural material you use should be soaked in water to soften it and make it more pliable.
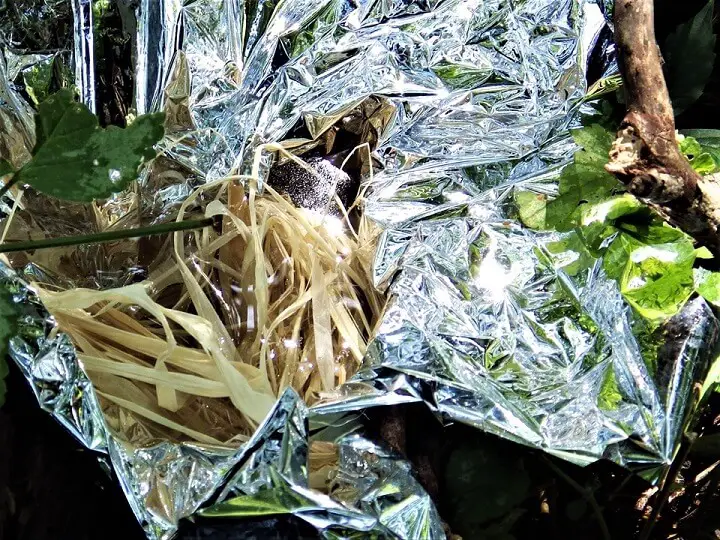
You can use a section of your mylar blanket in a nest of small branches to make a bowl to soak your natural cordage. You don’t have to cut the mylar. Just press enough into the depression to soak the grasses for about 10 minutes and then dump out the water.
Assembling the Frame
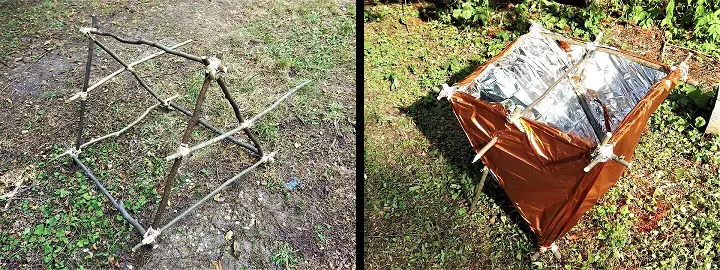
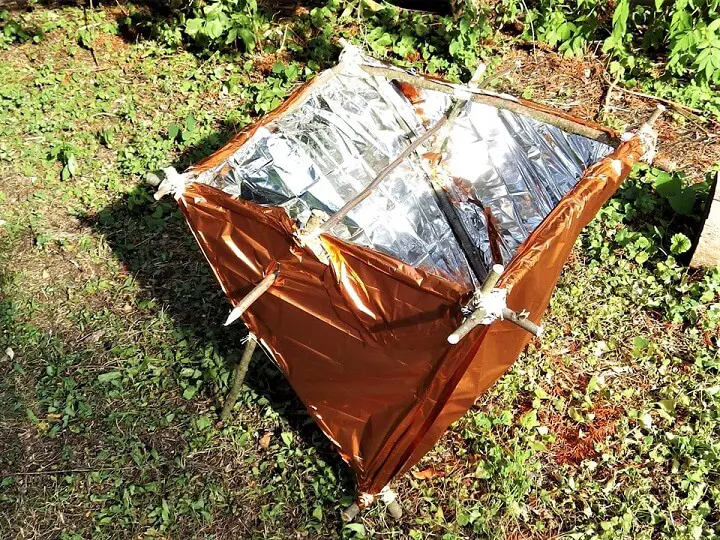
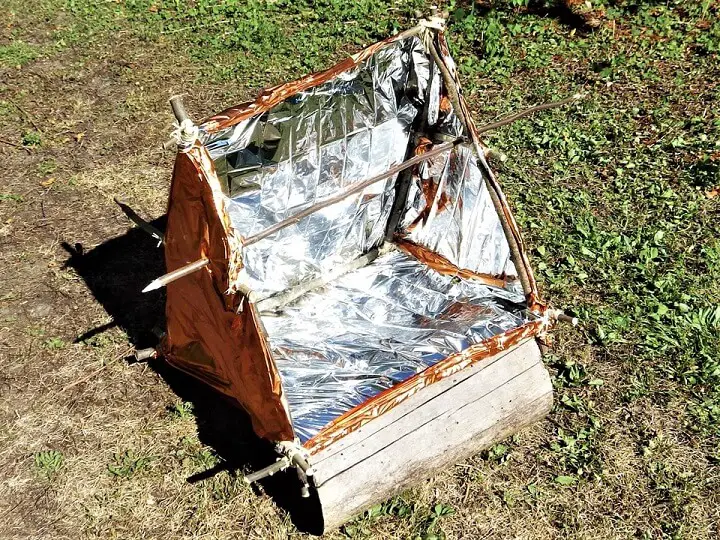
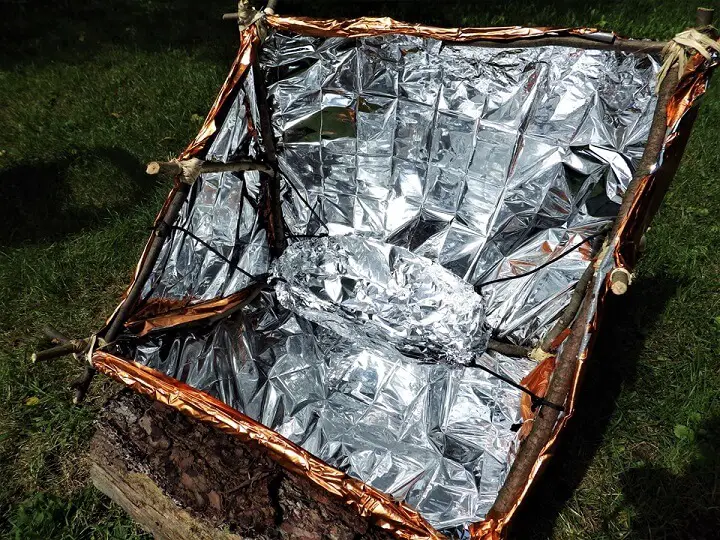
This is the finished frame we’re going to build. The two sticks on the side stick out from the “A” in the structure so the solar oven can be titled back and pointing straight up at the sun at high noon in a “high noon” position.
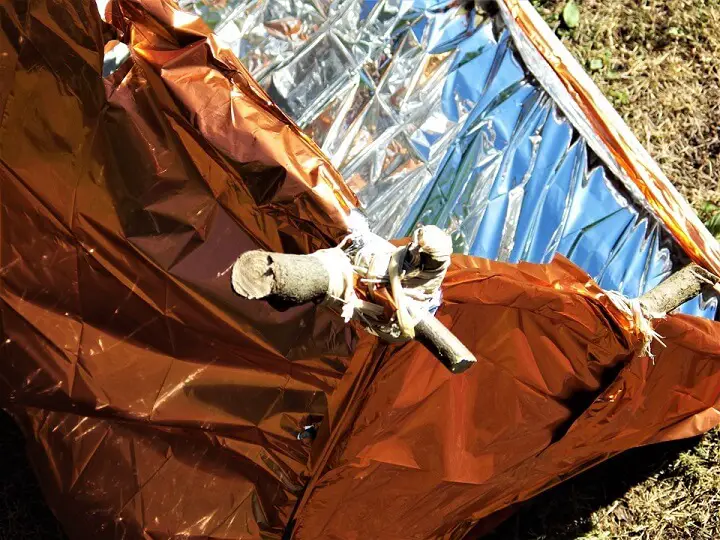
1. To start, take 2 of the 7 frame support sticks and bind them together at the end about 2 to 3 inches from the ends. Tie off the ends tightly with a square knot.
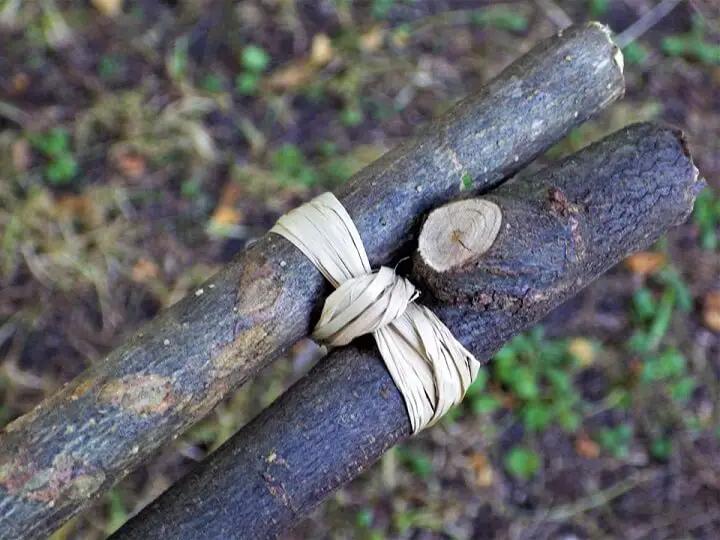
2. Repeat this with two more sticks from the 7. These 4 sticks should all be of equal length.
3. Spread the sticks at the binding to create an inverted “V”.
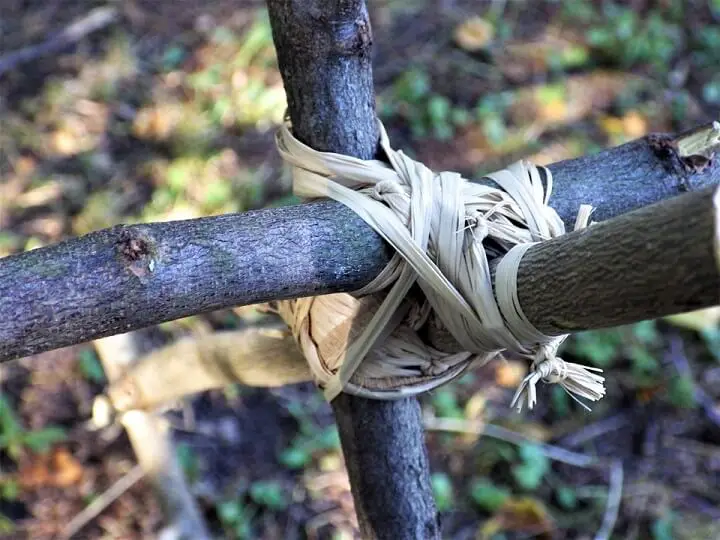
4. Bind another frame support stick in the “V” notch with about 2 to 3 inches of the stick protruding. You’ll repeat this step for a total of 3 times with 3 more of the 7 sticks of equal length to create your v-shaped frame.
5. Continue to bind the 7 frame sticks at the intersections to create a basic support for the mylar blanket.
6. Add more binding to any joints that seem to need re-enforcement. Gently test the integrity of the frame and add more binding and knots if necessary.
7. Attach the two high-noon cooking sticks across the outside of the frame.
These will serve to support your cooking spit and to support the oven when you lean it back to allow for cooking at noon when the sun is directly overhead.
A Note on Cutting Mylar
The best way to cut mylar is with scissors, but there’s a simple trick to make it easy with a knife which may be all you have in a survival situation. The challenge you’re trying to overcome is the ease with which mylar tears.
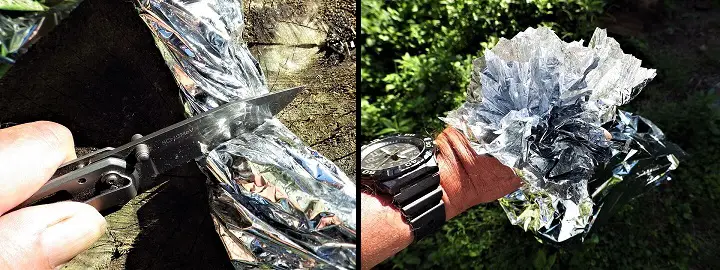
By bunching the mylar and cutting through the bundle, you won’t have the possibility of a cut gone awry. It will happen to you eventually so be patient, be gentle and cut carefully.
If the mylar makes you crazy, just make sure to pack a tightly wound roll of duct tape in your survival kit and you can plan on using that to get the thing done or patch holes on the outside of the oven.
8. Lay the frame on your mylar blanket and cut out the amount of material to create the central reflective surface. (Remember the bunch-cut technique or use those scissors on your Swiss Army knife.)
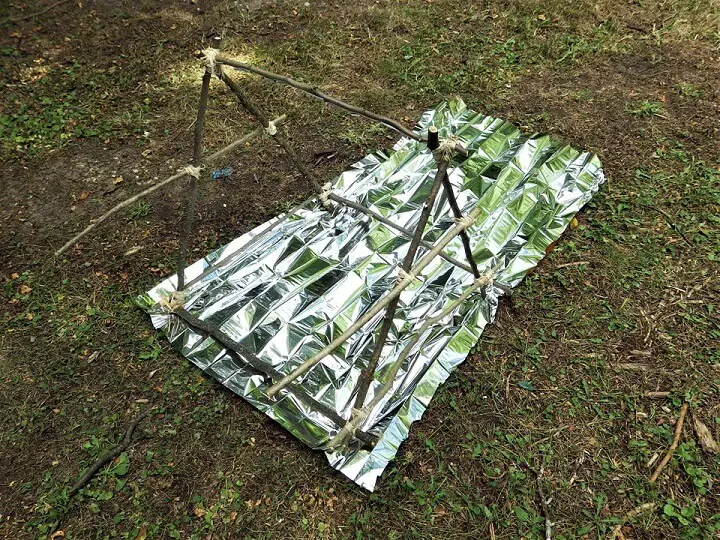
9. Allow for about 4 to 5 inches of overlap for attaching the mylar to the frame. Be generous with overlap. You’ll want to have extra to get your mylar blanket attached to the frame.
10. Beginning at the top of the frame, wind the mylar material around the stick. Hopefully, you’ve got some of those little branch nubs sticking up from the main branch. Remember, handle the mylar gently. It tears easily and once ripped can tear across any length.
11. Bind the mylar at the corners by the V-notches using the protruding branch ends to keep it tight. You can also thread cordage through the mylar material to further bind it to the frame but here again, be careful and gentle.
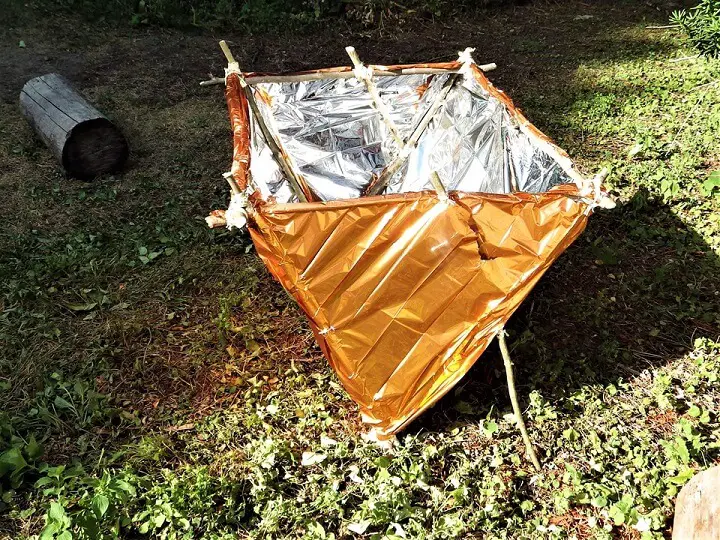
12. Lay the frame on its side and cut a triangle out of the mylar blanket and attach the cut blanket to the sides either by threading over any sticks protruding from the branch or binding the mylar through a small hole you’ve made with a small sharpened stick.
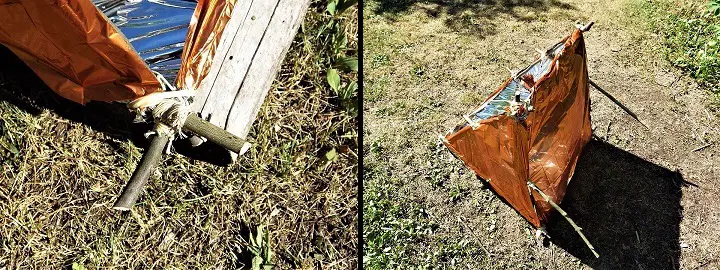
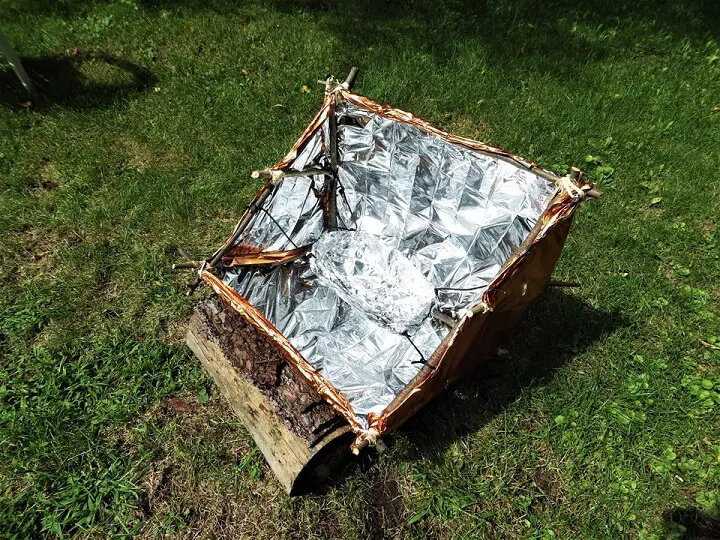
When your solar oven is assembled, you can use a log to direct the reflector oven towards the sun.
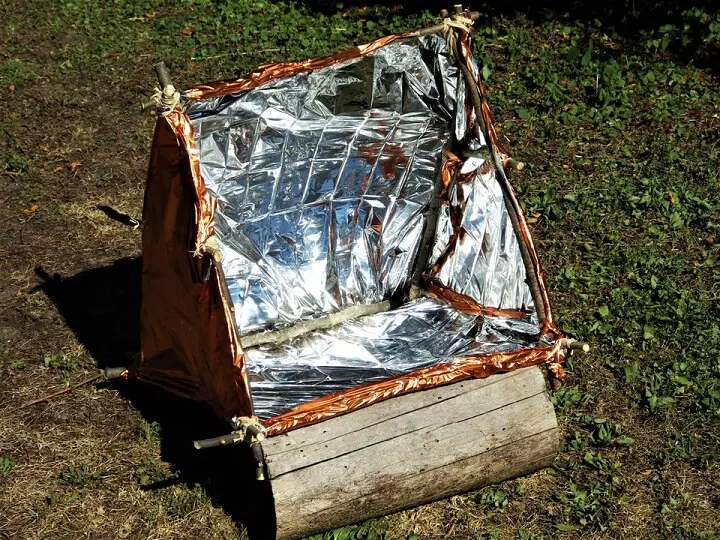
Different sized logs can raise or lower the oven.
When the sun is high in the sky bend it back on the two high-noon support sticks.
Cooking Options
1. Spit Cooking. Use the long stick you collected and gently push a sharpened end through the mylar across the “A” support. Make sure both ends are sharpened.
Impale the food on the spit and carefully push the sharpened end through the mylar on the other side onto the support stick. Attach the spit to the cross sticks with cordage but here again, be gentle. Any hole in the mylar will easily tear.
This is the easiest option and you can impale a strip of meat, a small fish, or wrap bread dough around the stick; let it rise and then bake.
Something to keep an eye on is doneness on one side versus the other. The food side facing the interior of the oven may brown or cook first. All you have to do is gently spin the spit and reattach to the cross braces until the cooking is finished.
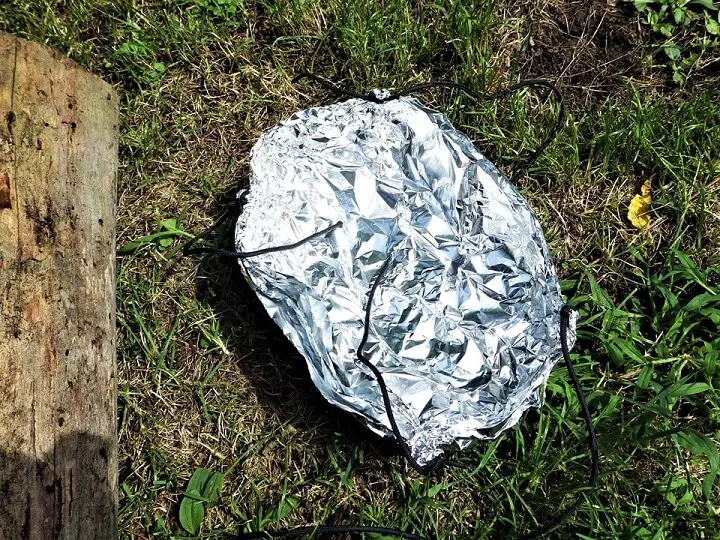
- Suspended Pan. You can use a section of mylar blanket or aluminum foil to make a pan that you’ll suspend from the frame in the center of the oven.
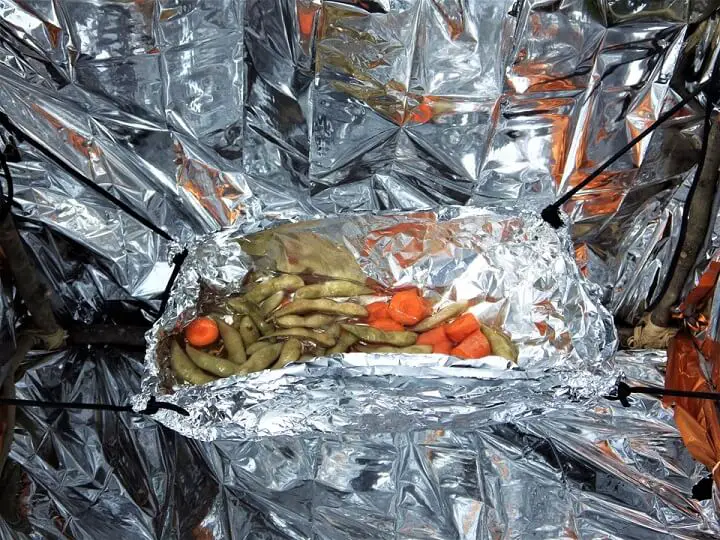
You can use this setup for a variety of meal options.
Suspended Pan Assembly
1. Start by cutting a length of mylar or aluminum foil that you will fold over twice to create a three-ply rectangle equal to the interior size of the oven. You’ll also need 4 lengths of cordage (or shoelaces) at least 18 inches long.
Here's the final product:
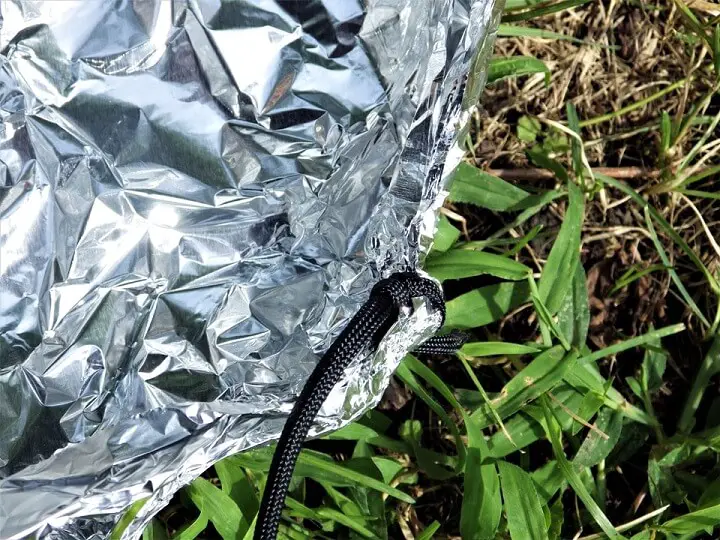
2. Next, tie a knot very carefully on each corner. If using foil, you can simply bunch the foil into a knot. If using mylar, tie a knot at each corner. Attach the cordage to each corner knot with two half hitches until you have all 4 corners tied.
3. After you have the 4 cords attached, loop each end around the support sticks loosely to position the hanging pan in the center of the oven. Once you're satisfied it’s centered, tie the cords tight to the supports with two half hitches.
You can either use this pan setup to boil water to purify it; heat water for coffee or tea, or add vegetables or small bits of meat to make a soup or stew. You could also pour off the water after cooking and drink it as a broth and eat the vegetables and/or meat separately.
Cooking on skewers is as easy as cooking on a spit, but there’s a certain setup that you need to use.
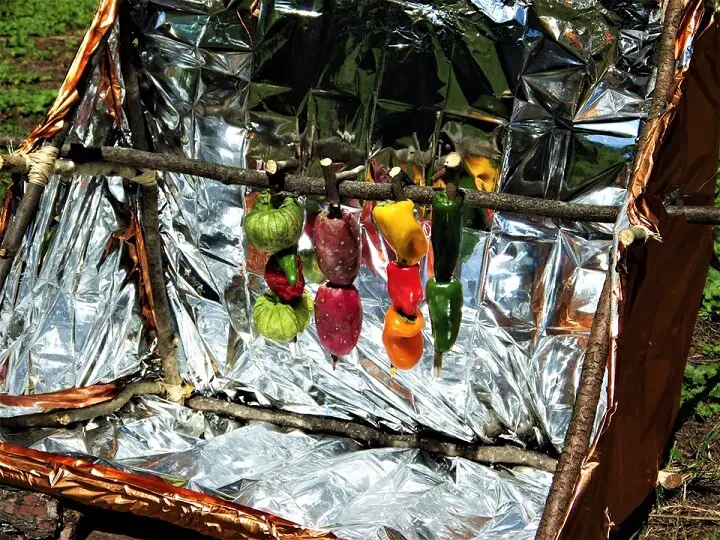
It uses the spit stick as a support, and you hang the skewers from the spit vertically.
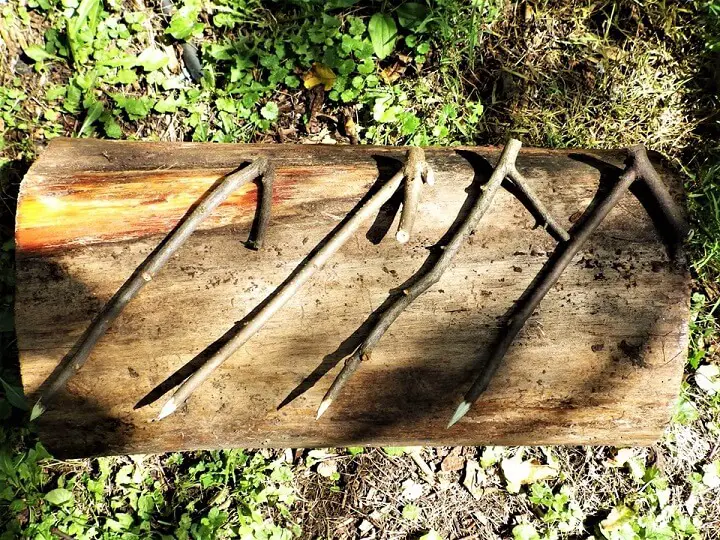
In order to suspend the skewers from the spit, you need a certain configuration on any sticks you use as a skewer. They should have a branch pointing downwards at about a 45-degree angle on one end. Sharpen the points at the other end.

Thread the food onto the skewers.
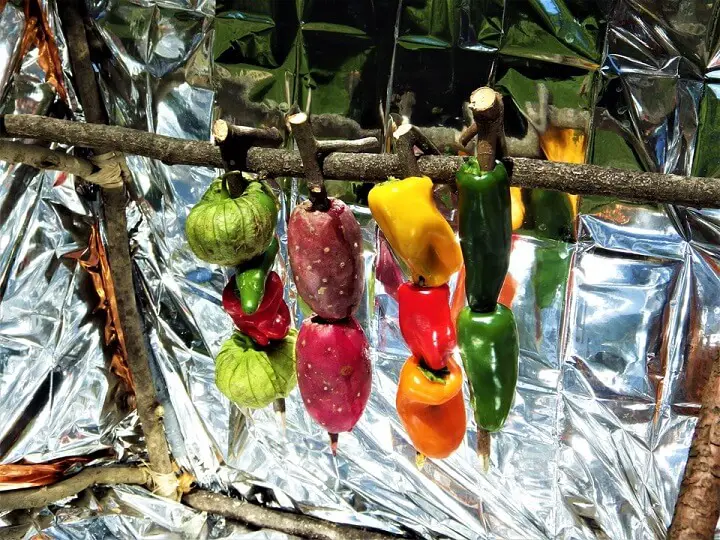
Hang the skewers from the spit. If you have to move the oven to align with the motion of the sun, remove the skewers before moving and then hang them again on the spit.
A Note on Cooking with a Solar Reflector Oven
This is low and slow cooking. The boiling point of water is 212° F. and your solar oven won’t be able to achieve that temperature unless conditions are ideal. Even so, you should be able to cook meat, fish, or vegetables to the point that they are safe to eat, but it will take a while.
WARNING: Be sure to use a meat thermometer to make sure the food is safe to eat. Most beef, pork, and seafood need to reach at least 145 degrees F, and poultry needs to reach at least 165 degrees F. Here is a minimum safe temperature chart with more details.
You may also want to cut an extra sheet of mylar or foil to fit in the bottom of the oven to catch drips when cooking on a spit or skewers. This will help maintain the reflective internal surfaces and keep the critters away from your reflector oven at night.
With any luck, you’ll have success with your improvised solar reflector oven. You may even use it on a regular basis at home just because it’s fun to do.
Like this post? Don't Forget to Pin It on Pinterest!
You May Also Like: