Estimated reading time: 8 minutes
One of the simplest and most popular ways to cook without power is with a charcoal grill. But what if you run out of charcoal? If you're living through a long-term disaster, you can't just run to the store for more. Instead, you'll need to make your own.
Fortunately, charcoal is not that difficult to make. But before you make charcoal, you have to understand what it is.
Simply put, charcoal is wood that has had all the volatile compounds burned out, leaving carbon. Carbonizing wood requires fire and the ability to cut air off from that fire. That way the fire goes out after consuming the volatile compounds, but without completely consuming the wood.
When the fire is gone, you are left with charcoal.

Traditionally charcoal was made in one of three ways. In a pit where the fire was gradually built up and then carefully smothered. The second way was in a clamp or pile, where the pile was built in such a way that it gradually smothered as it burned.
The third way is in a kiln, where the charcoal wood was put in a separate container, surrounded by fire, and the volatile gases were directed into the outer fire to improve the burn.
Tools Needed to Make Your Own Charcoal
• Rake – A heavy duty garden rake with a metal head.
• Shovel – Standard, pointy metal shovel. A square metal snow shovel may also be useful.
• Matches and other material for starting the fire.
• Clear ground, free of underground roots.
• A non-flammable and non-melting piece of material to be used as a lid. I recommend a garbage can lid, or a square piece of metal roofing.
• Wood – While you can use cord-fire wood, I used scrounged wood like branches, stumps, and other miscellaneous wood. If you want charcoal that will be a certain size for your grill or smoker, you can smash it up later.
• Garden hose – Since you are working with fire, keep a water supply nearby and handy to put out any stray sparks (or cool a burn).
Making your Own Charcoal
Step 1
Choose a clear site with no stray roots nearby.

Step 2
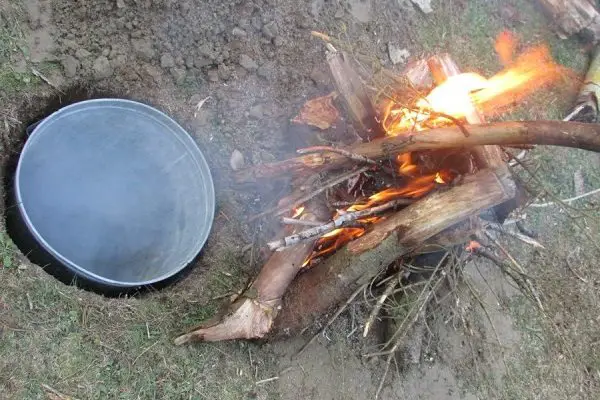
Dig a pit, approximately 3 feet deep and just large enough for your non-burnable lid to fully cover. I took my lid from a bottomless garbage can, and used the can as an extra insert in my pit. Using a can, however, is optional.

Step 3
Prepare your wood. Cut any long branches or tree trunks into lengths that will fit inside your pit. Make sure you have collected more than enough wood to fill your pit. 1/3rd of the wood will be needed just to get the heat high enough for the smolder to work.
Step 4
Start your fire in the bottom of the pit. You want this fire to be quite hot. If you start a fire on the edge of the pit, you can get a good supply of coals going and then dump them into your pit. Tend your fire and build up a 2 inch layer of coals on the bottom of the pit. You need a very high combustion temperature in the pit, as otherwise it won’t pull enough air in to adequately combust all material.
Step 5
Once there is a bed of coals, add in your to-be-charcoaled wood. As soon as this wood is well caught, put your lid on the pit. Use your rake and shovel to position the lid. You want limited air flow for 3-6 hours, depending on how dry the wood is. Air flow should be mostly off-gassing, and a low smolder. It should smell like creosote.

Step 6
After the smolder has maintained for 4-6 hours, there should be barely any smoke rising. At this point, you can either cut off all air, or just wait for 24-48 hours. This wait period lets your charcoal cool, gets rid of live coals, and prevents spontaneous combustion when you open the pit.
Step 7
Remove the soil from the lid (if you sealed it), and remove the lid. The wood will have reduced by half, and up to three quarters depending on the variety. Scoop out your charcoal, and start a second batch if you’d like.

Step 8
Store your charcoal in a dry location. Though the charcoal itself won’t be damaged by water, it re-ignites better if it is dry. If you are using charcoal for grill cooking, use a hammer to smash the larger piece of wood into manageable grill-sized pieces for even heating.
Step 9
Use your pit to make more charcoal. If you do not plan on making more charcoal, then fill the pit in to prevent accidents. If you are in a forested area, flood your pit with water to remove any potential smoulder pockets after you remove your charcoal.
Variations for Long-Term Charcoal Making
If you want to make your own charcoal long-term, but don’t want the tripping hazard of an open pit, then the only additional piece of equipment you need is an old metal garbage can, and another relatively air-tight container that will fit inside it. You can use these two containers to make a charcoal kiln, which provides a slightly more controlled way to create charcoal.
Pack your air-tight container tightly with wood. You want as little free space as you can reasonably get. You may want one or two vent holes; make them so that they will vent into the surrounding fire. Create a metal way to suspend the small container inside the larger can. Start a fire in the can, and sustain the burn for several hours. Let both cans cool completely, and remove your charcoal.
The kiln method can be used to create artist's charcoal using willow rods, or specific charcoals for use in fireworks and other pyro related activities. If you want to use charcoal for water purification, then making your own is one way to ensure that there are zero petroleum additives, or preservatives, in your wood.
While making your own charcoal requires a small investment of time in setting up the burn, it is a very easy and efficient process. Charcoal is most commonly used in grills and smokers, but can also be used in standard woodstoves, wood cookstoves, or for blacksmithing, making it a very useful skill to learn and practice.

You May Also Like: