Estimated reading time: 17 minutes
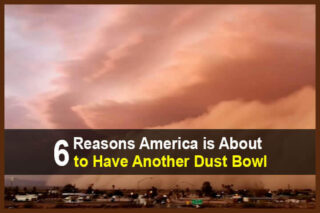
According to the Old Farmer’s Almanac, we’re in for a really rough winter. But the Farmer’s Almanac doesn’t have the best batting average based on past forecasts, so maybe there’s not much to worry about.
Then again, there’s something beyond the folklore of weather forecasting that is showing up more and more in the news feed. Say hello to the polar vortex.
The Polar Vortex
The Polar Vortex was first mentioned a couple of years ago as many parts of North America endured colder than expected temperatures. There were also reports of unusually heavy snowfall.
It seemed like just another periodic weather anomaly like those recurring references to fluctuating ocean currents like La Nina and El Nino. But the Polar Vortex is a little more complicated.
Want to save this post for later? Click Here to Pin It On Pinterest!

The Jet Stream Effect
The jet stream is a prevailing wind that circles the earth at the North and South Poles. It is a constant stream of wind and its flow usually occurs as a consistent, circular pattern with occasional dips and bumps.
But the Jet Stream has started to behave more and more erratically with deeper dips causing frigid, polar air to be driven southward. This was the cause of the 2021 Texas power crisis. We typically don’t associate words like “frigid” with anything “south” and that’s the problem.
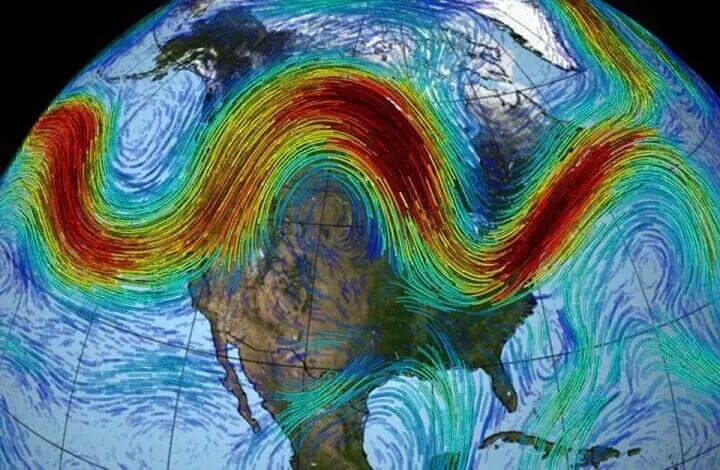
The dips in the Jet Stream are causing the cold air from the poles to migrate on the dips and bumps. In the northern hemisphere, this has caused unseasonably colder temperatures to dive down from the Arctic into Europe, Russia, China and the U.S. The big question is “why?”
Global Warming Strikes Again!
Wait, isn’t global warming supposed to make the globe…warmer? Well, yes and no. It makes the global average temperature warmer, but some places could actually get a lot colder, which is why scientists started using the term “climate change.”
The current fluctuations in the Jet Stream are the direct result of climate change. Temperature extremes and variations have disrupted the air pressure affecting air currents that define the Jet Stream.
Those disruptions result in eddies or dips in the Jet Steam’s flow causing colder temperatures to pool and circle in a vortex at lower, southern latitudes.
The result is a pattern of cold temperatures from the Arctic that move south and hold in position. All indications are that we are in for another round of frigid Polar Vortex weather patterns this coming winter.
4 Steps to Preparing for the Coming Arctic Blasts
Most homes are prepared for varying temperature fluctuations, but the equipment and preparations are often designed for the “usual” temperatures in that area. As we enter into cycles of “unusual” weather patterns, some of those preparations may not be able to keep up with increasing cold.
In many southern parts of the United States, a heat pump is used instead of a traditional furnace commonly found in northern latitudes. They work fine when temperatures below freezing are rare but struggle when temperatures dip lower for an extended period of time.
Even homes equipped with a forced-air furnace may struggle to keep up, and with prices for basic commodities like natural gas and heating oil continuing to rise, staying warm this winter could be a very expensive proposition.
The greatest threat would be power outages which would lead to countless people freezing. And as the nation’s infrastructure continues to age, there are growing threats to the power grid and even natural gas delivery.
With all of those comforting possibilities in mind, it might make sense to consider some preps for serious winter conditions. Here are some steps to ponder:
1. Evaluate and Upgrade Insulation
This is the easiest step that anyone subject to cold temperatures should pursue. Creating heat for a home is one thing, but holding the heat in while keeping the cold out is just as important. You can hire a professional for an assessment of how you can improve your home’s insulation or do it yourself. Here’s what the pros would look at and you should too.
Wall and Attic Insulation
It’s a good bet that most homes have insulated exterior walls, but if you have a wall or room in your home that feels uncommonly cold, you might want to check the insulation in the walls.
An easy way to do that is to remove a cover from an electric outlet or switch on an exterior wall and see if you can observe whether or not the wall is actually insulated or how much. And while you’re at it, there are small, insulated inserts that you can press over outlets and switches to prevent any cold air from coming through the outlets. If an exterior wall isn’t insulated, there are some easy solutions that don’t require demolition.
One option is to cut a small hole towards the top of the wall and pour in loose insulation or expanding foam until the space between the studs is filled. You’ll have to do some repair on the holes at the top of the wall but it’s easier than tearing out drywall and replacing it.
Check the attic too. Many attics have surprisingly little or no insulation. You can unfurl and roll out or attach batts of insulation in the attic or pour loose insulation between the rafters.
Windows and Doors
Hold your hand around the seams of windows and doors and see if you feel any cold air. You could also use an instrument to measure temperature variations. There are various ways to seal these seams or cracks from thin, insulated adhesive strips to caulks and tapes.
Storm windows are always a good idea in winter and if you don’t have them you can either install them or use specially fabricated sheets of plastic that can be temporarily stretched over windows in winter. They’re easily replaced and inexpensive and can keep out the cold surprisingly well.
2. Got a Fireplace?
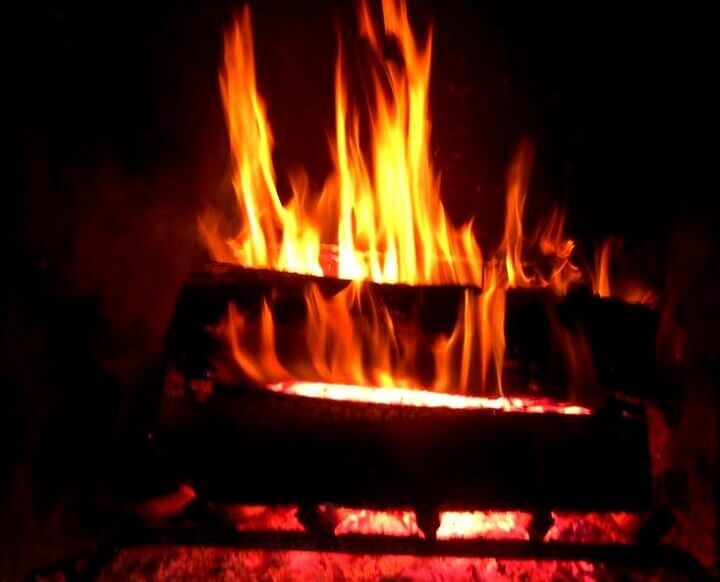
Good news and bad news if you have a fireplace. The good news is you have a chimney installed and a place where you can actually start a fire indoors. The bad news is that most fireplaces are not the most efficient heat sources. Many traditional fireplaces draw warm air up and out of the house as the heat and smoke travel up the chimney.
Consider a Fireplace/Wood Stove Insert
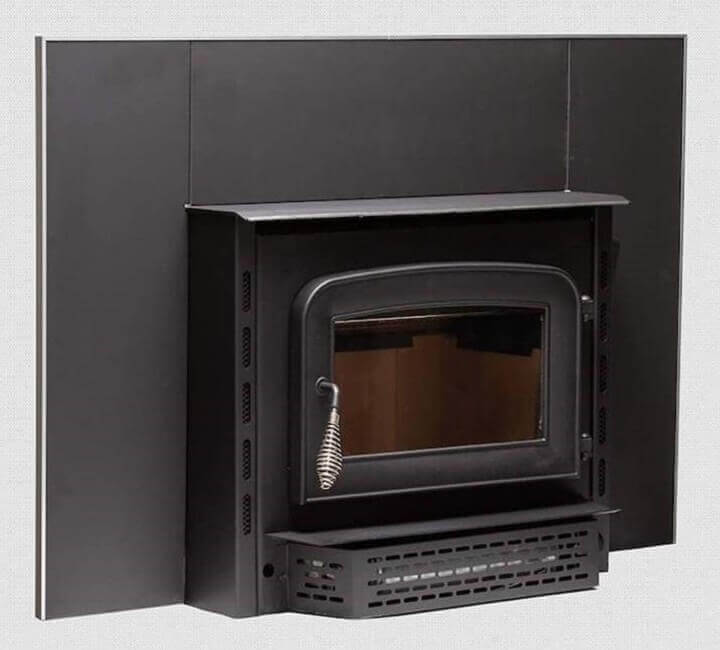
It’s easy to install a wood burning stove into an existing fireplace. You can install these inserts yourself or have it done professionally. Many have a fan built in to force air into a room increasing the heating efficiency.
If your fireplace is a gas fireplace, you can do a gas stove insert that will also be more heat efficient. Gas burning fireplaces give off the least amount of heat compared to burning wood, but a gas stove insert will increase the heat exchanging capability and most also have a forced-air fan built in.
3. Think About Heating Alternatives
Even if you don’t have a fireplace, you can always install various heating alternatives to either serve as your primary source of heat, support an existing heating system, or serve as emergency heat in a power outage. Here are some options.
A Wood Burning Stove
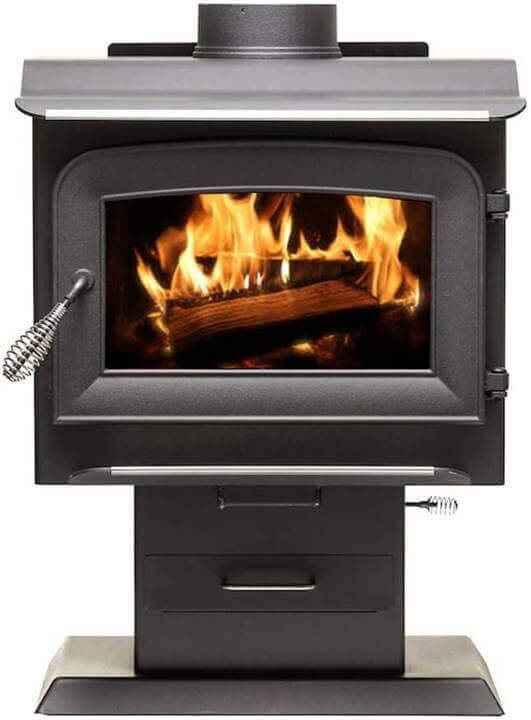
Most require the chimney to run up through the roof so do your homework or hire a professional to determine the best location. You’ll also need to have a reliable and renewable source of firewood.
Some people buy it and have it delivered as an emergency backup but if you are relying on a wood stove as your primary source of heat, you’ll probably need a steady supply of wood that you can harvest and store.
A Pellet Stove
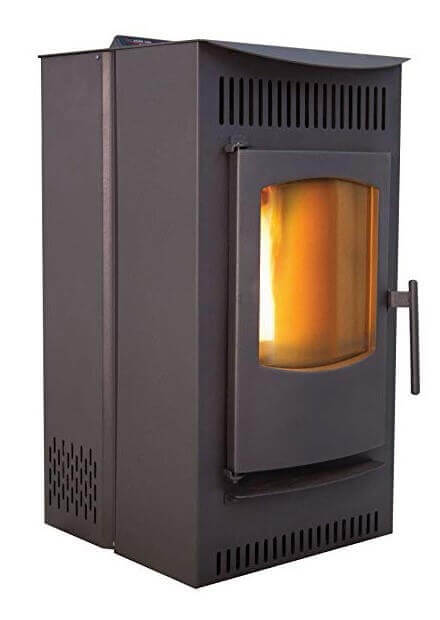
Pellet stoves are increasing in popularity. They burn small pellets made from compressed hardwoods and give off a surprising amount of heat considering the modest heat source.
One benefit of a pellet stove is that the chimney can be vented from the side of a wall rather than through a roof. This gives you more flexibility on stove location.
The downside of a pellet stove is that you have to buy the pellets. There are no natural alternatives like cutting and stacking firewood or burning lumber in an emergency.
A 40 pound bag of pellets lasts about 2 days and ranges in cost from $4 to $6 a bag depending on quantities purchased. The bags also have to be stacked and stored but firewood requires the same.
Most pellet stoves also require electric power to operate. There are non-electric, gravity-fed pellet stoves that can run without electricity, but they lack a forced-air fan to distribute heat. Cast iron, fan trivets are an option for any wood burning or pellet stove to increase heat circulation.
Propane Stoves
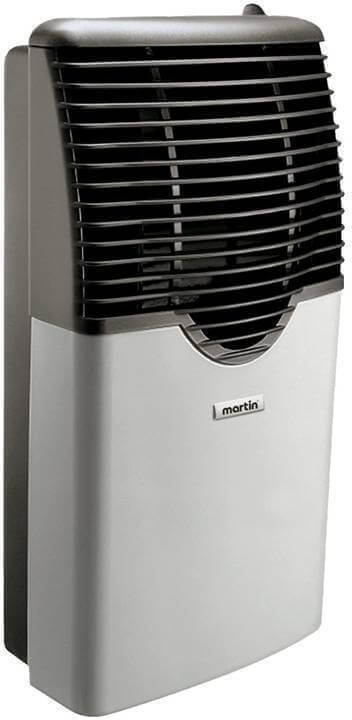
A propane stove is another option for heating, but venting is important. They can be vented through a wall or ceiling and come in various sizes depending on the space being heated.
Kerosene Heaters
Kerosene heaters are hard to recommend for an interior living space. They usually exhaust fumes from the top and the instruction books mention the importance of a well-ventilated space.
If you’ve ever sat next to a kerosene heater in an enclosed room you’ve no doubt noticed the smell and fumes quickly filling the space. The question becomes: how much ventilation do you require and what’s the tradeoff as you ventilate with cold air in a room you’re trying to keep warm?
4. Emergency Heat Sources
Desperate times call for desperate measures. If you don’t have any heating alternatives available and the cold catches you by surprise or a power outage suddenly occurs, you can always improvise solutions that will at least keep the temperatures above freezing.
You’ll probably be spending a lot of time wearing sweaters and hoodies, but these solutions will at least keep you from freezing.
Alcohol Heater
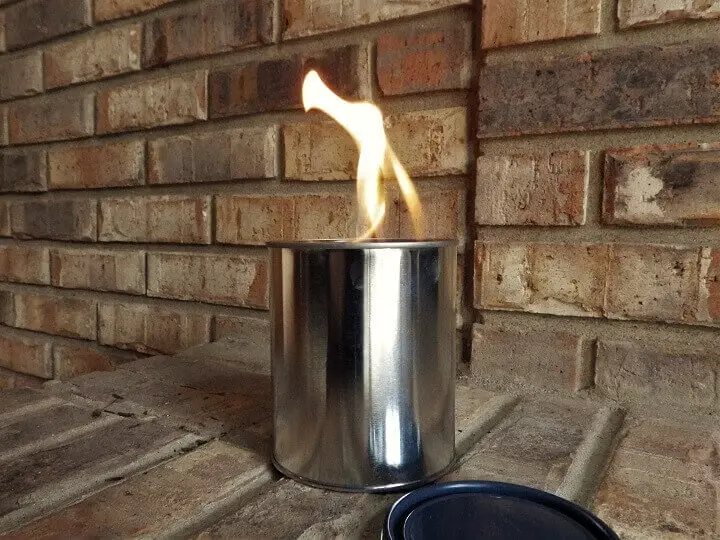
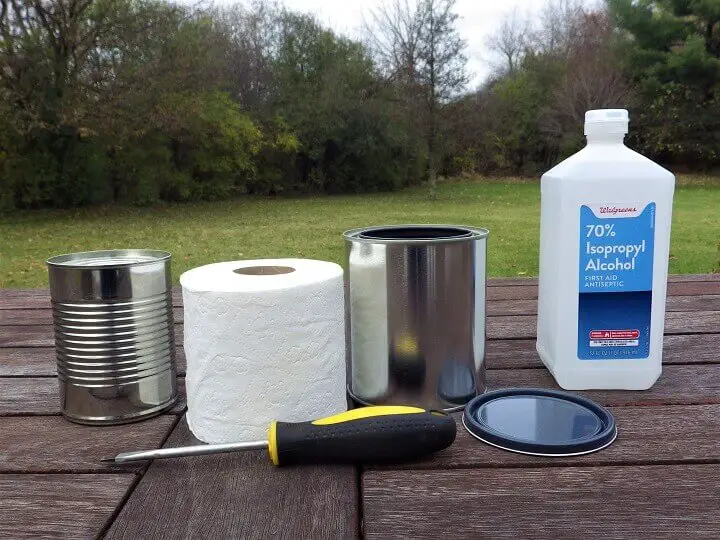
This DIY heater is simple to assemble and kicks out a lot of heat. It produces a fairly large flame, so location is critical. It’s also a potential hazard if it’s knocked over. There is isopropyl alcohol in the can and any spill will burst into flame so be careful with this one.
- 1 new and unused empty 1-quart paint can with lid or rinsed and empty food can
- 1 roll of toilet paper
- 1 bottle of 70% isopropyl alcohol
- A flathead screwdriver
- Use a screwdriver and your hands to remove the card board tube from the center of the toilet paper roll.
- Once the tube is removed, squeeze the roll so it collapses in on itself.
- Slowly insert the toilet paper roll into the can.
- As you approach the end of the roll you might need the screwdriver to get it past the rim.
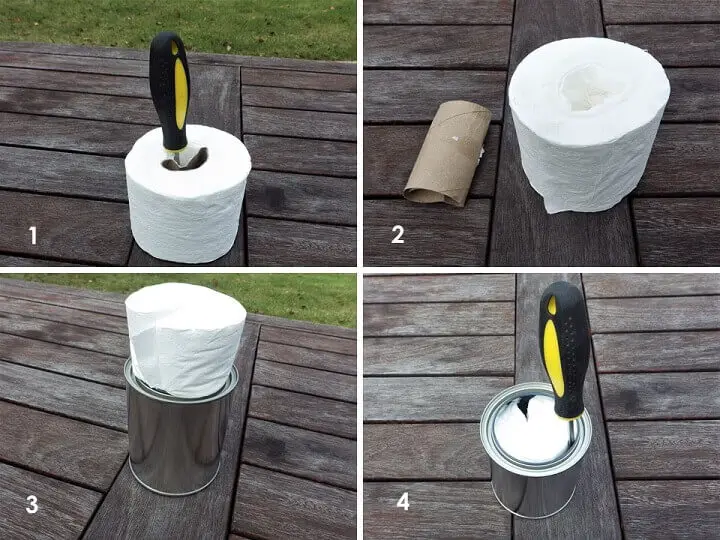
- Make sure the toilet paper is below the rim of the can.
- A large tile at least 1-foot square should be placed under the can.
- Slowly pour the isopropyl alcohol onto the toilet paper wick until it is saturated.
- Light the top of the can but be careful if you place the can in a bright area.The flame can be difficult to see.
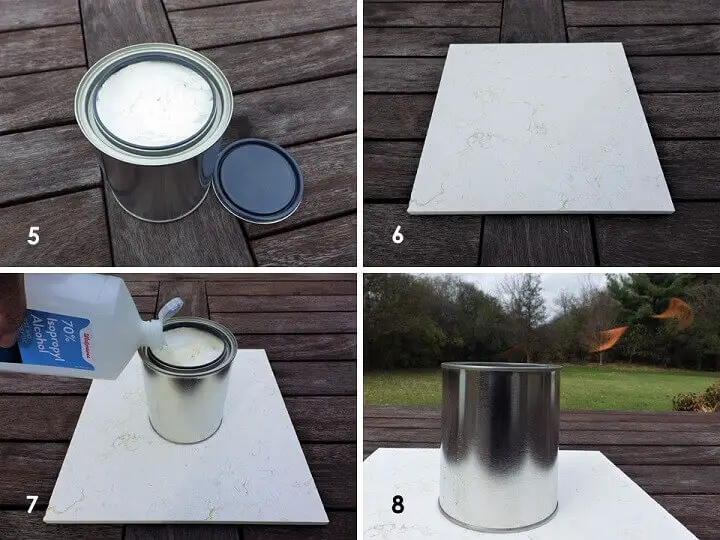
Place the can in a safe location. The can will get very hot, so extinguish it and let it cool before touching although the base will be cooler. The can lid can be slipped over the top to put out the flame.
When done, seal the lid with light taps from a hammer and store where you store other flammable materials like kerosene, gas, oil and propane. Before using again, top off the can without overflowing with more isopropyl alcohol.
Soda Can Jet Stove
This heater is an alcohol burner on steroids. One of these heaters under an upside down flower pot will do the trick and two will double the heat. However, this heater will also give off heat on its own so flower pots are optional.
The assembly is a little complicated compared to the other two heaters, but the materials are very easy to find around the house. Here's what you'll need:
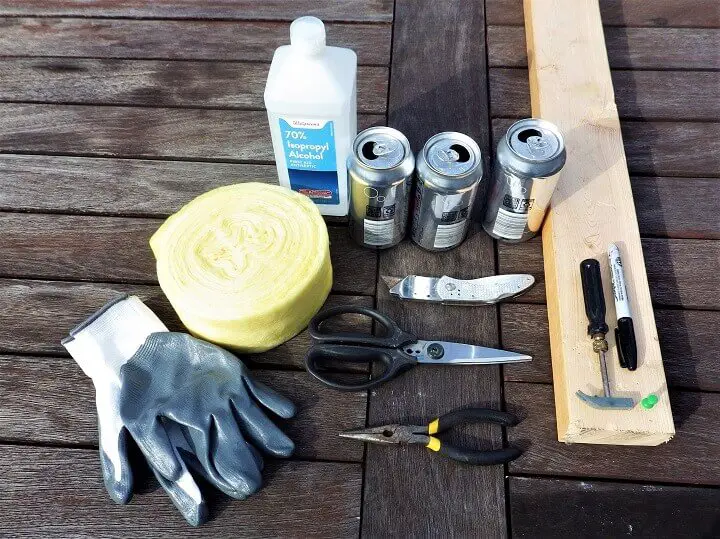
- 3 empty and rinsed aluminum soda cans
- A handful of fireproof insulation or pipe wrap insulation
- 1 bottle of 70% isopropyl alcohol
- A penny
- Kitchen shears
- A pushpin for punching the holes
- A small hammer of anything that can be used to pound the pushpin through the thin aluminum
- Gloves to protect your hands from the sharp edges of the aluminum
- Permanent marker
- A small piece of a 2×4 to guide the marker on the can before cutting
- Needle nose pliers
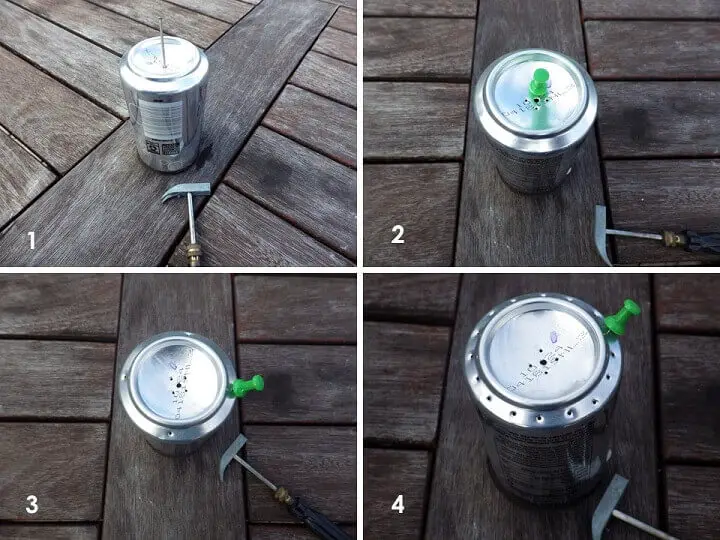
- Put the can down with the bottom up and using a nail, carefully drive the nail through the center of the bottom of the can.
- Using a pushpin, make 4 holes around the nail hole. Use the small hammer to help drive the pushpin into the aluminum.
- Use the same pushpin to make 16 evenly spaced holes around the ridge at the bottom of the canto do this, start with one hole and go to the opposite side of the can for the second hole and continue in this way to create evenly spaced holes.
- Split the difference between the two holes and punch again. Keep splitting the difference until you have 16 evenly spaced holes.
- After the holes are punched, rest the can against the 2×4 with the board lying flat. Hold the tip of the permanent market against the edge and slowly rotate the can to draw an even line around the circumference of the can. Repeat with the other can.
- Begin a starting cut on the can using a razor knife.
- Use the kitchen shears to cut the can along the line around the circumference.
- You now have the top burner section complete.
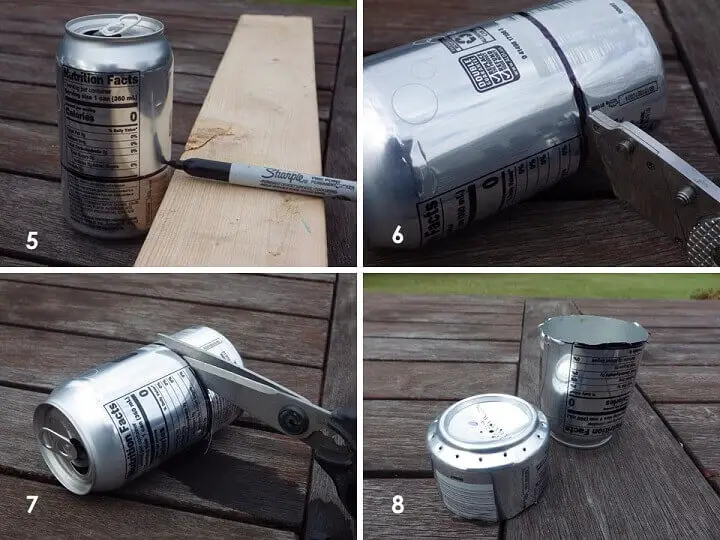
- Repeat with the other can and using the needle nose pliers, twist and crimp the can every half-inch to make it easier to insert into the top portion of the burner.
- Once you have both cans bottoms cut and the top punched, you’re ready for the insulation wick.
- If using pipe wrap insulation (which is a cheap way to pick up some insulation) cut it the long way to the height of the base can.
- Roll the insulation and stuff into the base can.
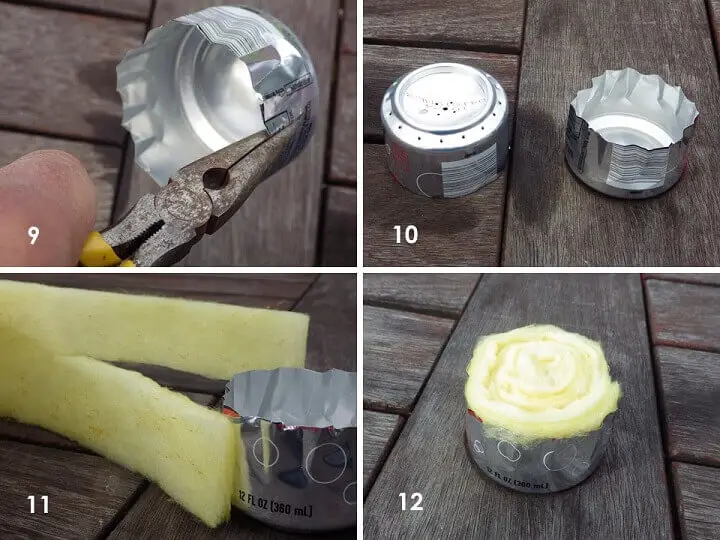
- Carefully place the top can over the insulation filled base to fit together.
- Press the top down gently until the cans are tightly joined. Pour the 70% isopropyl alcohol into the top and allow to percolate into the can. You could also use a gasoline additive like HEET but you’re probably better off with the alcohol. You’ll have to repeat this filling step numerous times. Lift the can from time to time to assess the amount of alcohol it’s holding.
- Using your kitchen shears, cut the bottom base off of the third can along the rim.
- This bottom rim can now be used to extinguish the flame.
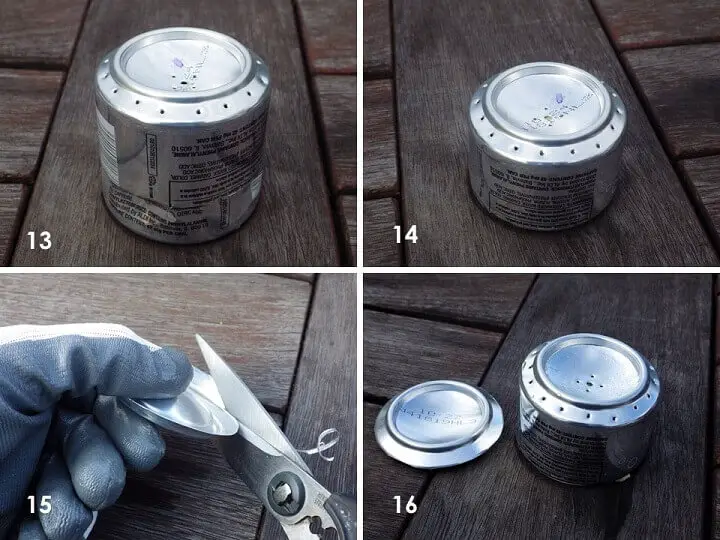
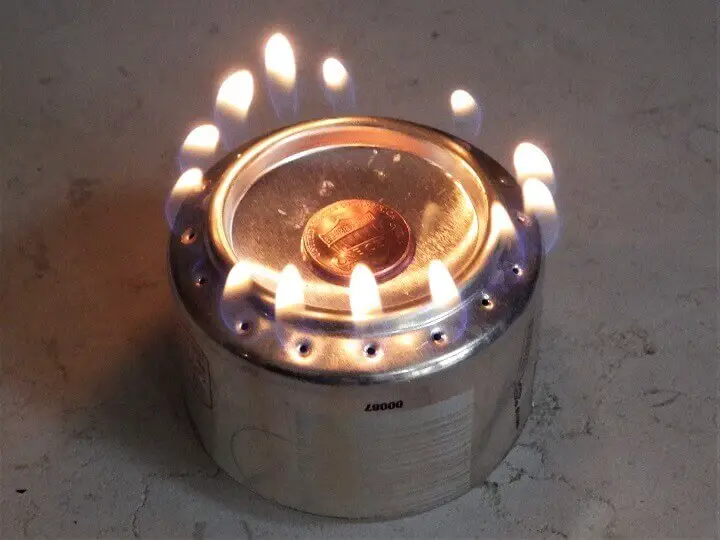
- To get the can kick-started pour a little of the fuel around the base of the heater to raise the temperature of the metal and encourage rapid evaporation. Remember to have a slab of tile to protect any surfaces from the flames. Light the top of the heater and the fuel around the base. You may have to repeat the lighting process a few times to get the burner started. (Wait until any flames are out before adding any alcohol to the heater or the tile base.) You should also be careful to watch for any phantom flames. Alcohol burns with a dim, blue flame and can be very hard to see.
- Once the can is starting to flame through the perimeter holes let it burn for a few minutes. Some holes will not be lit but in a bit of time they should catch flame.
- When a good number of the rim, perimeter holes are flaming, toss the penny onto the can to seal the center holes. Center it in place with a screwdriver.

Minimize and Prioritize
One last thing to keep in mind if you feel you’re overwhelmed by the cold is to minimize and prioritize the spaces you’re trying to heat. If you’re in survival mode, you might want to invite everybody to live and sleep in a dedicated room or a smaller group of rooms that you can reasonably keep warm.
You’ll also want to make sure that any rooms with running water are at least at a temperature above freezing. One thing you can do if you feel overwhelmed by the cold is to open any cabinet doors below faucets or sinks. That will at least keep some heat circulating into that space.
If you must, close off closets, bedrooms or other rooms like studies or offices that aren’t critical living spaces. Winter will eventually pass and a tough winter can be good motivation to make more robust plans for the cold winters to come.
Like this post? Don't Forget to Pin It On Pinterest!
You May Also Like: