Estimated reading time: 11 minutes
While the basic concept of shooting is easy to understand, many find that they struggle to maintain accurate groupings even under easy shooting conditions. When you are facing an urban survival scenario, you may not have the luxury of a missed shot.
In this article, we will go over the 5 main shooting principles taught to both the U.S. Army Snipers and United States Marines, to make you a better marksman. If you adhere to these basic principles and spend time practicing in a variety of terrain and atmospheric conditions, you will be capable of taking controlled and accurate shots no matter what situation you find yourself in. This can be the difference between life and death.
Want to save this post for later? Click Here to Pin It on Pinterest!
1. Solid Shooting Position
The first rule to shooting true is to have a stable firing position. A correct shooting position is a combination of holding the rifle correctly and positioning your body correctly for your terrain and situation. There are various ways to stand, sit, and kneel while shooting as well as competing theories for how best to hold the rifle.
In the end, what you are trying to achieve is a steady and relatively comfortable position that allows you to fire accurately, make use of your available cover, and will enable you to move quickly if need be.
It comes down to hand positioning and body positioning:
- Familiarize yourself with the various hand positions and decide through training which works better for you.
- Your body positioning will depend on your situation, and you should get familiar with shooting from all positions.
Basic Rifle Shooting Positions
There are four basic positions for shooting rifles or carbines. Obviously, it is impossible to encompass and name every possibility*. These are just the most basic stances you will want to practice.
*Snipers have something like 12 variations of the prone.
- Standing: This is simply shooting while standing. Either in a long-range marksmanship stance or in a combat-ready stance. This is the least stable position, provides the least concealment, but allows you maximum mobility.

- Kneeling: This is most commonly done with one knee down and one knee up, often with the support arm resting in the meat of the leg for added stability. This support provides more stability, in turn more accurate fire, and is a nice compromise between mobility, accuracy, and a small silhouette.
- Sitting: Sitting on the ground, either ‘open legged’ or ‘cross-legged’ with your elbows resting on the meat of the legs for stability. Another compromise between mobility, stability, and silhouette size. Sitting is often used when firing downhill or in awkward terrain.
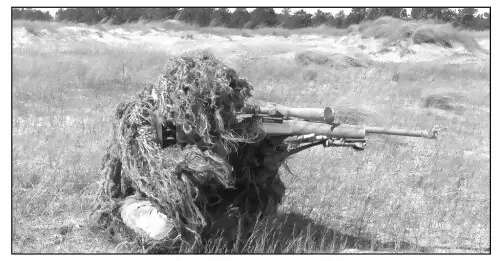
- The Prone: This is what you call lying down on your stomach. The feet are usually slightly bent to provide added stability. This is the most stable and accurate firing position but is also the slowest to move out of.
Tips for Creating a Solid Firing Position:
- Relax: You should be able to relax when in the correct position. Your bone structure should naturally support your firing position — muscle tension will cause shaking and muscle fatigue, killing your accuracy. Neck should be relaxed, and cheek should rest naturally on the weapon stock.
- Rifle Butt Placement: Should be firm and high in the shoulder. Snugness will reduce the disparity between the movement of the front sight and rear sight picture. Proper placement of the butt also helps to steady the rifle and lessen recoil.
- Avoid Bone On Bone: Your elbow directly on your knee, as an example, is hard to keep still. Put your elbow into the meat of your thigh (for example) and you will have less movement in your position.
Hand Positioning
Firing Hand: Once again, according to the U.S. Army’s Special Forces Sniper Training and Employment Handbook: The shooter should grasp the rifle firmly but not rigidly with the firing hand. Exerting light pressure rearward.
Off-Hand: let the weapon rest in your nonfiring hand. Where exactly you grab will depend on your preference and situation. Longer range shooting is usually done while resting the mid-point of the barrel on your hand. Close-range combat shooting has proponents both for short stocking the rifle as well as for grasping it further down the barrel.
Using Shooting Supports (Walls, Windows, etc.)
These are examples of Nonstandard Supported Positions and/or Field Expedient Weapon Supports Used by Army Snipers:
- Foxhole-Support Position: Used primarily in prepared defenses. Sandbags or other material may be used to provide a stable firing platform.
- Window-Supported Position: While the window edge can be used to stabilize the weapon for added accuracy, it makes you more conspicuous. Firing from inside a room will conceal your position better.
- Bench-Rest Position: Used when firing from a building, a cave, or a deeply shaded area. If you have time, you want to set this up inside the room. You can use a platform or table and chair to set up a comfortable and secure shooting position.
You will run into situations where properly supporting your weapon and getting a stable firing position will rely on common sense and imagination. Practice various support styles and positions – “Train as if in combat to avoid confusion and self-doubt.”

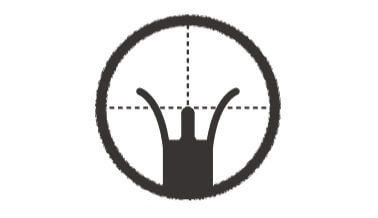
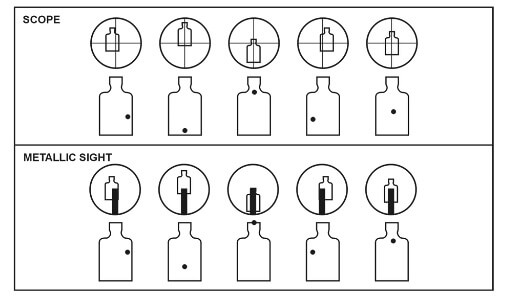
2. Proper Aiming (Correct Sight Alignment)
Your ‘sight picture’ is the term used to refer to the visual of the alignment of your front and rear sights when aiming in. One of the most common mistakes with inexperienced shooters is that they are not able to always bring the rifle, or their cheek, back to the same exact position each time they aim in and have to re-locate the correct alignment.
More experienced shooters will have the muscle memory that allows them to quickly aim in correctly. Many shooters will put a piece of tape on their buttstock to gauge were their cheek is resting and to assist them in finding the same spot each time.
A small misalignment in your sights can throw your shot way off target. As the Marine Corps Fundamentals of Marksmanship Handbook states: “A correct sight picture will be where the target, front sight post, rear sight and eye position are completely aligned.”
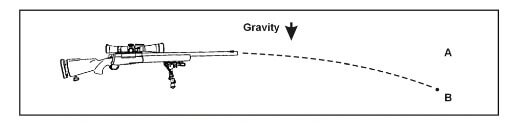
Determining Elevation and Distance
Another aspect of proper aim is ensuring that your sights are set at the proper distance. Having your sights set at 500m will not allow for accurate shots at 200m. While this is a subject all its own, it needs to be said at some point in this article. Get used to judging and determining distance and changing your sights to match.
Most urban combat training involves keeping your sights set to around 200m-300m and training your muscle memory to compensate for this on the fly. You don’t want to be stopping to adjust sights in the midst of a shootout.
As the Marine Corps Fundamentals of Marksmanship Handbook states: “When working with different distances, adjust your aim to the physics of the bullet. 300m is generally aimed at the center of the target.”
3. Breath and Muscle Control
Your breathing causes your chest to rise and expand, causing movement throughout your body. Learning to control and account for your breathing is key to high-level marksmanship.
The principles are simple to understand, but hard to master.
- When you are ready to shoot, take a deep breath and exhale about half of it out.
- Hold your breath as you compress the trigger.
- Release your breath only after you have taken the shot.
- If you hold your breath too long, your heartbeat will increase and your weapon accuracy will decrease.
- Learn to relax and calm yourself as you take the shot. Heavy breathing from exertion or adrenaline will decrease accuracy.

If you fire on the inhale, your shot will go high. If you shoot on the exhale, your shot will dip. If you are hitting in an up-down pattern you need to practice your breathing control more. Learn to fire on the pause, the stillness, between breaths.
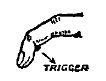
4. Steady Trigger Pull
Most shooting errors stem from improper trigger pull at some point.
Trigger control is not only the most important fundamental of marksmanship but also the most difficult to master.
– U.S. Army Special Forces Sniper Training and Employment
You must learn to press the trigger with consistent and steady pressure and without anticipating the shot. The goal is to maintain your aim as you pull the trigger and take the shot. This is harder than it sounds.
Many shooters will flinch as they squeeze the trigger, throwing their aim off. New shooters often squeeze the trigger too abruptly and pull on the rifle as they do so. The natural pull of your finger is not straight back, and it takes many shooters a while to figure that out.
If your shots are off in a left or right pattern group, trigger pull may be the culprit.
Snipers are trained in two methods of trigger pull:
- Smooth motion/constant pressure trigger pull – “The sniper pulls the trigger with a single, smooth action…This type of trigger control will help prevent flinching, jerking, and bucking the weapon.”
- Interrupted trigger pull – The sniper applies pressure to the trigger when the target is in sight alignment. If the target moves off, maintain trigger pressure and wait until sight alignment is regained. Continue this method until the weapon is fired. This technique is often used when standing due to wavering sights around.
Anticipating The Shot
You must try and be surprised each time you take a shot. Many shooters sub-consciously anticipate the shot and will flinch, if only just a little bit, as they shoot. You must train and train to work this out of your system if necessary.
5. Combat/Survival Marksmanship: Break the Rules
You must first learn to master the rules before you can break them. You must break the rules in order to survive. Many techniques like proper sight alignment cannot be properly utilized, nor do they need to be when engaging targets in close quarters and/or urban terrain.
In the Marine Corps Rifle Marksmanship Handbook, they delve into an engagement at around 50 meters (probable for urban or jungle scenarios). They stress that at close range, a target must be engaged quickly and accurately.

The closer a target, the less you need to focus on proper sight alignment. At close quarters combat, Marines are trained to point their shoulders at the enemy and to look just over their sights as they fire. This is trained often enough to allow them to be accurate at close range through muscle memory alone. This shows that with enough training, you can become accurate at close ranges without impairing your vision or wasting valuable time by ‘aiming in’.
At close ranges, trigger control should be applied quickly and instantly the moment that sight picture is achieved. Trigger control is applied as sight picture is being acquired.
Once the first two shots have been fired and you regain the initiative, your weapon should be moved to your shoulder and the tip of the front post used for the follow up shots.
– Marine Corps | Military Operations on Urbanized Terrain (MOUT)
In the end, you need to practice, practice, and practice some more. Test yourself and see how you perform with different challenges. The more versatile and accurate you can be in a variety of scenarios, the more likely you are to survive an engagement – or come back from a hunt successfully.
Like this post? Don't forget to Pin It on Pinterest!
Sources Used:
- U.S. Marine Corps
- U.S. Army
All Images Taken from Public Domain Government Publications (Free for Public Use).
You May Also Like: