Ancient Secrets to Measure and Track the Seasons, Months, Days, and Hours to the Minute.
When was the last time you wore a watch? We used to wear wristwatches all the time. And then cell phones showed up and wristwatches became a thing of the past.
That pattern has repeated over thousands of years as we continued to find new ways to keep track of time and replaced old methods with new. But some of those old methods are worth remembering not only from an historical perspective but because they work.
Want to save this post for later? Click Here to Pin It On Pinterest!
Ancient Solutions
Our primitive ancestors didn’t have clocks and they sure didn’t have cell phoned, but they knew how to tell time, although their definitions of time were a bit different than ours. The primary concern was estimating general things like how long before sunset, awareness of high noon or “midday”, clues to the progression of time across the night, when to plant crops, and the middle of winter and summer.
Think like an Egyptian
The Egyptians were the first to divide the day into 24 sections. This laid the foundation for the concept of measuring time in hours. Every ancient culture found different ways to measure and mark time and many of the concepts we still use today to measure time are ancient concepts and inventions from Stonehenge to sundials to windup mechanical clocks.
As civilization evolved, our obsession with time grew from measuring seasons and days to a new thing called hours and minutes. The ancient Chinese burned thick, smoldering ropes to measure hours and then someone figured out that sand trickling through a narrow funnel of glass could measure time by the minute.
Time has always been on our minds, and some people are so aware of the day’s passing that they can look at the sky and give you a pretty good guess about the time.
Many ancient people used landmarks like mountains or large trees to indicate general benchmarks like midday, midnight, and even some break points like midevening and midmorning. To this day there are mountains across Scandinavia that still carry names like Mount Midday.
Become a Master of Time
We’re going to explore 6 ways to measure time. Some are simple and observational like using our hands or shadows. Others involve some basic engineering to make sundials and even a burning rope clock. All can measure time from seasons to days, hours, and minutes, although we’re going to skip blowing the glass for an hourglass or constructing another Stonehenge.
It’s All about Temporal Time
Temporal time is the true time of day based on the cycle of the sun. Temporal time varies because our days are longer in summer and shorter in winter. It’s important to make the distinction because we have disrupted natural or temporal time with things like wide and ragged time zones, sometimes defined by the meandering course of a river, daylight savings time, and the reluctance of some countries and states to align with any artificial time manipulation.
What all of this points to is a definition of our current concept of time. It’s essentially an agreement. In the U.S. central standard time stretches across the Midwest from Nebraska to Indiana. Everyone in the Midwestern states agrees that its 2 o’clock in the afternoon but in actual fact, it’s may be 1:42 in western Nebraska and 2:13 in eastern Indiana measured by the sun but everyone agrees it’s 2.
Complicating matters further, the sun may tell you its midday or noon but your watch or cell phone will say it’s one in the afternoon. That’s daylight savings time in action.
And it doesn’t stop there. If you’re trying to measure hours, your hours may be 75 minutes long in summer and 45 minutes long in winter depending on your latitude. If you happen to live on the equator, you’re in luck. Every hour measured by the sun is 60 minutes.
If it all sounds confusing, it is. That’s why we’ve all agreed to simplify time-keeping with time zones and to walk away from temporal time.
Temporal hours ruled time-keeping until the 1300s when mechanical clocks first started to appear. It was then that “equal hours” replaced temporal hours and 60-minute hours simply became the standard for measuring time. By the way, it was Mesopotamian astronomers who first developed the concept of the 60-minute hour and 60-second minute 5,000 years ago. Apparently, it doesn’t take a mechanical or digital clock to understand time.
Obviously, these techniques aren’t designed for the business world or the politics of nations. Its nature’s time and it has been accurate and followed for thousands of years. Wouldn’t it be nice if we could follow it again? Let’s see how that’s done.
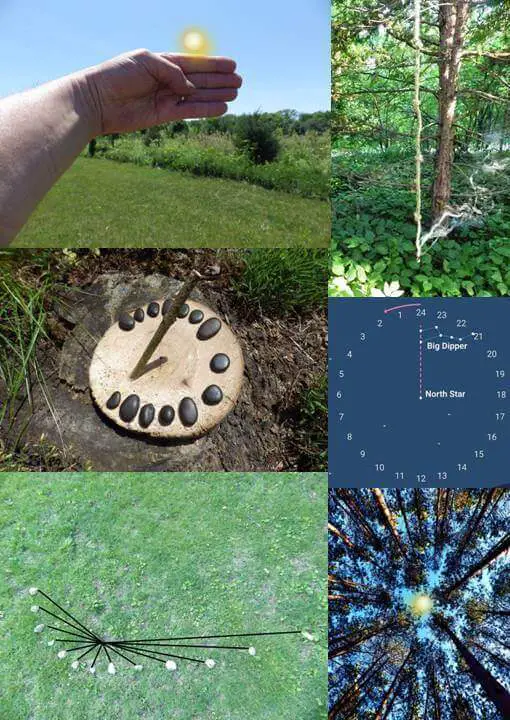
1. Using Your Hands and the Sun to Tell Time
Some of us learned this in Boy Scouts and Girl Scouts. It’s an easy way to determine when the sun will set and how to work backwards from that measurement to determine the time in hours before sunset. But you’ll need a couple of things to make it work.
A Clear View Of The Horizon
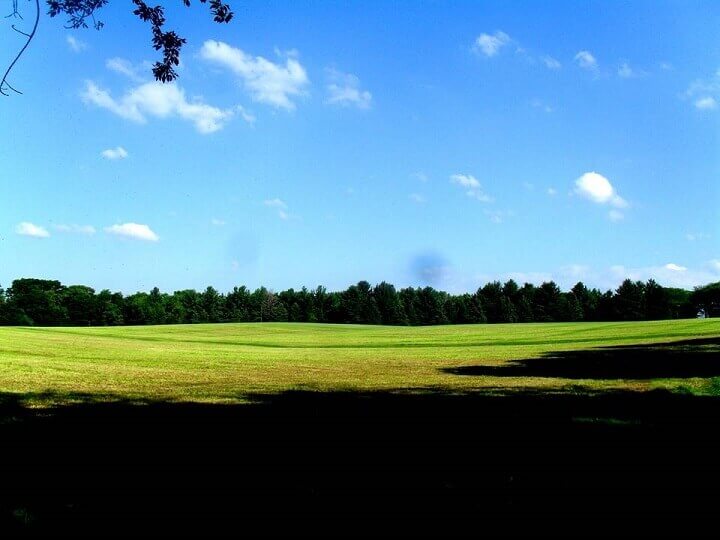
It’s easy to assume we can find the horizon but many times there are trees, mountains and even tall buildings blocking our view. In order to determine the time using this method, you need a clear and unobstructed view of the horizon. Anyone living by the ocean is in luck but with a little effort you may be able to find an opening.
Your Hands
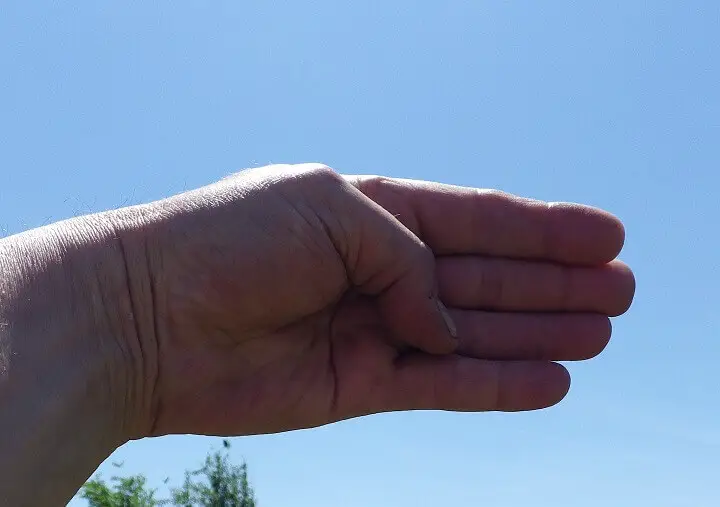
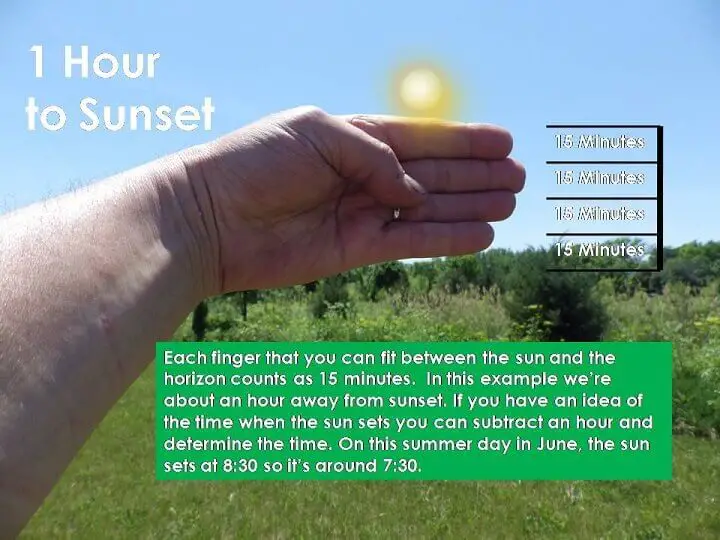
4 of your fingers not including your thumb can tell you a lot about the time until sunset. All 4 fingers when held together and extended at arm’s length from your body add up to an hour. Each individual finger counts as 15 minutes.
The Method
- Sit or stand facing the horizon in the direction of the sun.
- Extend your arm and turn your wrist so your 4 fingers are flat, together and facing you. Each finger equals 15 minutes.
- If you can fit your 4 fingers between the bottom disk of the sun and the horizon that means the sun will set in 1 hour.
- If the sun is higher in the sky, extend your other hand above your other and count how many fingers between the bottom of the sun’s disk and the horizon. If both hands or all 8 fingers fill that space it’s 2 hours before sunset. You can also do an estimate cycling one hand and remembering its position.
- If only 6 fingers fit in the space, remember the 15 minute rule for each finger. That means the sun will set in an hour and a half.
- It’s possible to continue to move the palm of your hand and 4 fingers up and higher into the sky to determine additional hours or 15 minute increments before sunset. Just try to visualize and remember where your hand was previously as you move your palms up in the sky to meet the sun.
Can this method tell you the exact time?
No. Unless you have a good idea of when the sun will set. If you know the sun sets at 8:30 pm and you were able to work your hands up to count 6 fingers (not including your thumb), just subtract 1½ hours from 8:30. You now know its 7:00, but a caveman would care less.
Our primitive ancestors were more concerned with real world things like when the sun would set, when to get back to the cave and when to collect firewood and build a fire before the bears and saber tooth tigers came out.
You can also do this method in reverse at sunrise to determine how the day is progressing, and once again if you know the time when the sun rises, you can add palms or fingers from the horizon and add that to the time the sun rose.
If you know the sun rose at 7 and you could fit 3 palms or 12 fingers between the bottom of the current position of the sun’s disk and the horizon you would add 3 hours to 7 and know that it’s 10 o’clock in the morning.
2. The Big and Little Dipper Clock
An obvious question is how to tell time at night long after the sun has set. There’s actually a way to do that, but it starts to get into the area of “approximate time.” That’s temporal time for you but if you wake up in the middle of the night in the middle of nowhere, it might be reassuring to know it’s around 2 in the morning and you should try to get some more sleep.
Unfortunately, this is not a simple method and by the time you’ve figured out the time, you’ll probably be wide awake in the middle of the night. It also requires imagining a large clock in the sky, but it’s a 24-hour clock and it runs backwards. If you were ever in the military, you’re familiar with 24-hour time and remember that 6 in the evening is always referred to as 1800.
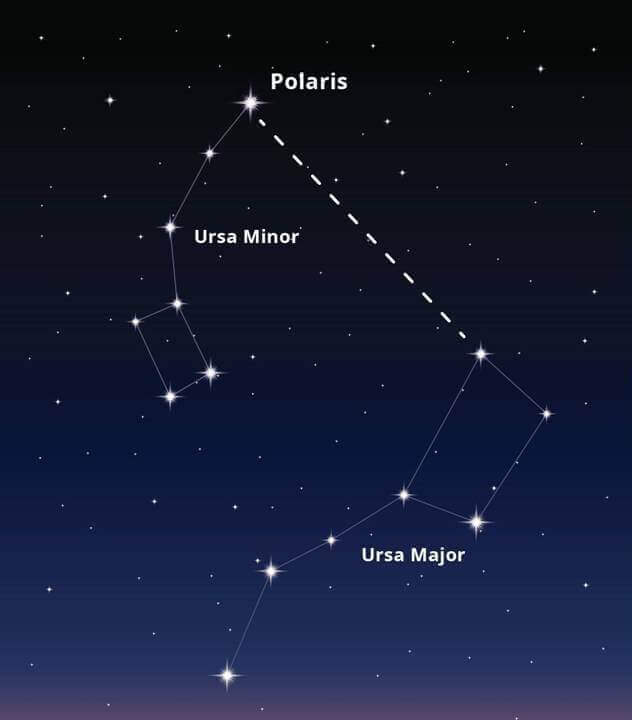
To start, locate the North Star. The two stars at the end of the dipper in the Big Dipper always point to the North Star. Over the course of a year, the Big Dipper circles around the North Star and will only tell you the time accurately on March 6th of every year.
However, there’s an equation you can use to compensate and get a rough idea of the time throughout the year. (Are you awake yet?) Here are the simple instructions from timeanddate.com.
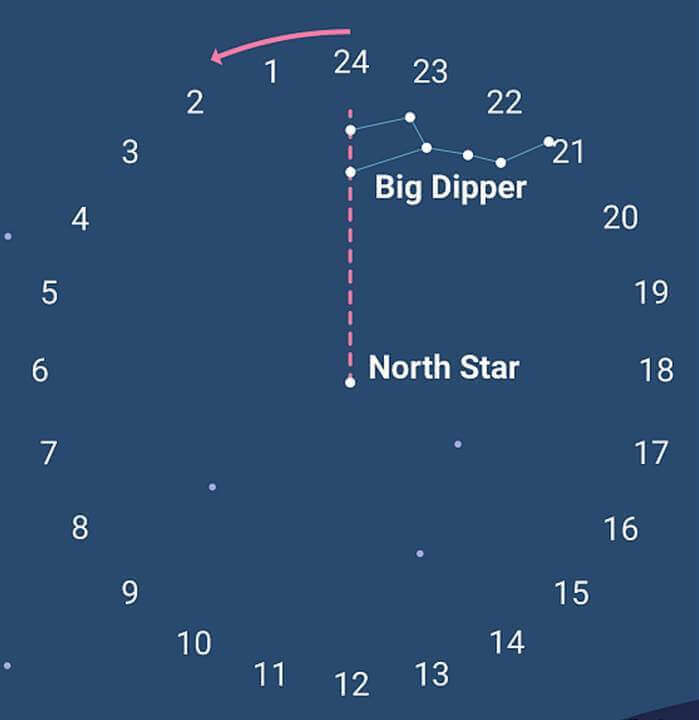
- To tell time, look at where the hour hand (the 2 stars at the end of the dipper on the Big Dipper) points to in relation to the reference line. Remember, each 15-degree movement corresponds with the passing of 1 hour.
- Now, look at the calendar for the date. If it is March 6, you do not need to do any calculations. The time on your imaginary clock will be the actual time. For example, if the pointer hour hand points straight to the top of the imaginary clock, the time will be midnight. If it points 30 degrees to the right of the reference line, the time would be 22:00 or 10 pm.
- To calculate times for different months, you will need to do the following calculation: Time = Dipper Time – 2 X the number of months since March 6.
- The time you get will be a rough estimate and may be off by about 30 minutes as compared to a clock.
- To account for Daylight Savings Time (DST), add 1 hour to the calculation in the months that DST is in place at your location.
And now you know the time using the Big and Little Dipper and after all this, good luck going back to bed.
3. How to Make 2 Sundials

We’ve all seen sundials. They show up in gardens all the time, usually as an ornament. However, there was a time when a sundial was cutting edge technology. Its invention is attributed to the Greeks who had adopted the ancient Egyptian concept of the “hour” but that’s a real long story.
What’s curious is that sundials usually don’t work. That’s because every sundial has to be customized and adjusted specifically for the latitude of your location. The result is that most sundials you buy at a garden center won’t work unless it’s tailored to your time-zone.
Some YouTube videos show someone making a sundial with a paper plate and a pencil. They simply write 12 numbers around the circle of the plate and stick a pencil in the center and claim that they have produced a working sundial.
What they fail to mention is that a sundial made that way will only work at the equator. If you live anywhere north or south of the equator it simply won’t work.
One way to determine the exact placement of hour-markers on a sundial is to make a primitive sundial with a straight stick in the ground.
How to Make a Primitive Sundial
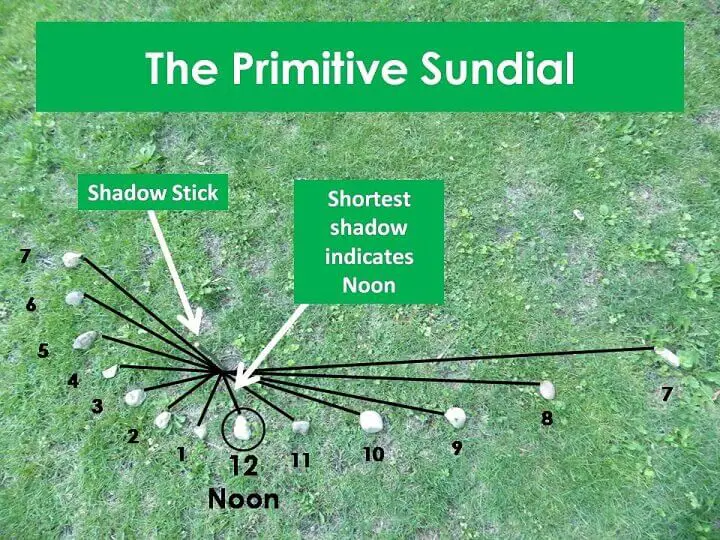
Making a primitive sundial is easy and you don’t have to go through a lot of trouble. All you need is a stick in the ground and a few small rocks to help you mark some critical shadows. But first, some more sun science.
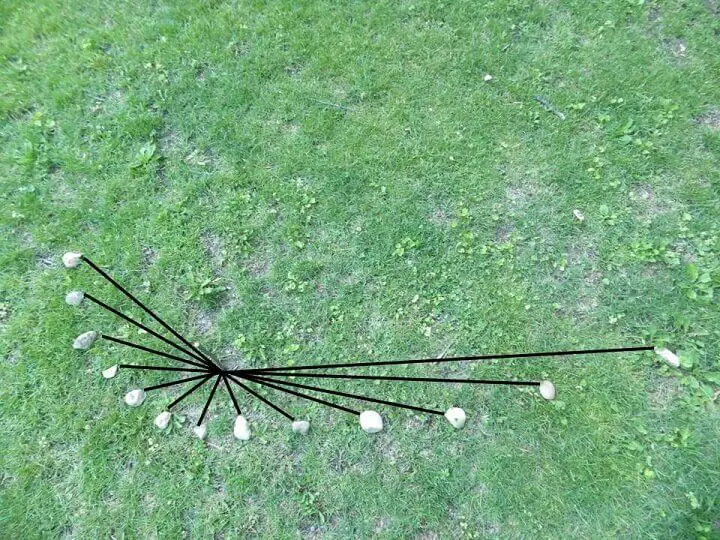
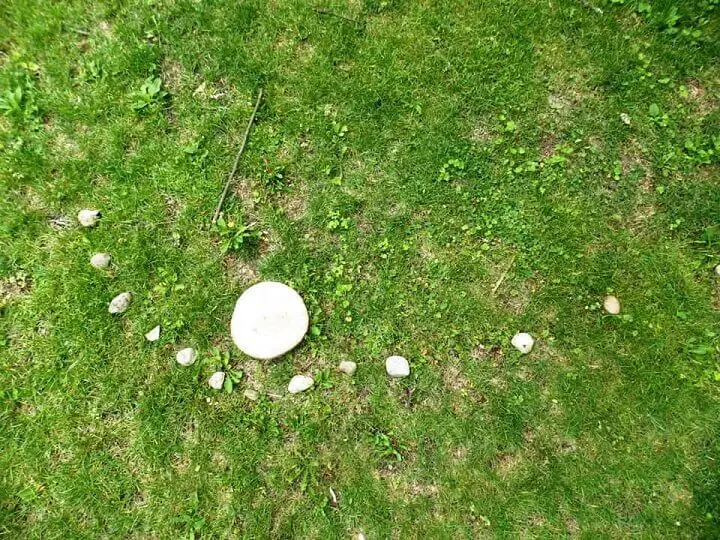
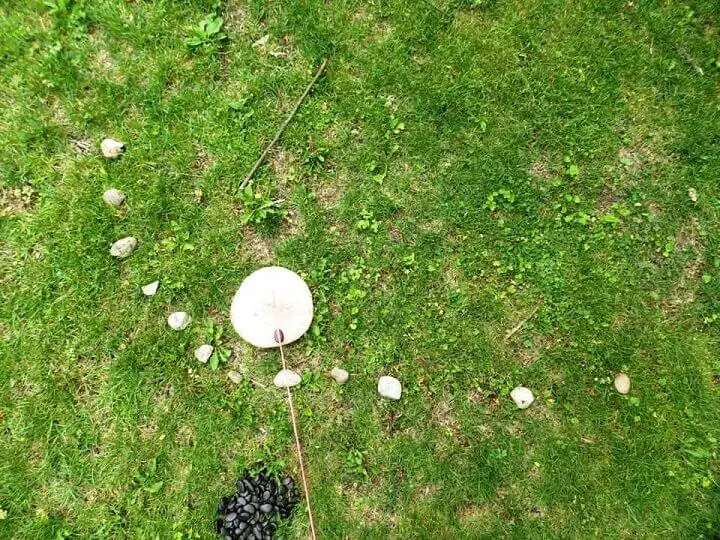
As the sun rises in the east, it defines an arc across the southern sky. Anything that casts a shadow will have a longer shadow in the morning that becomes shorter as we approach high noon and then begins to become longer again as the sun heads west to set. You can track the movement of the shadow with small stones.
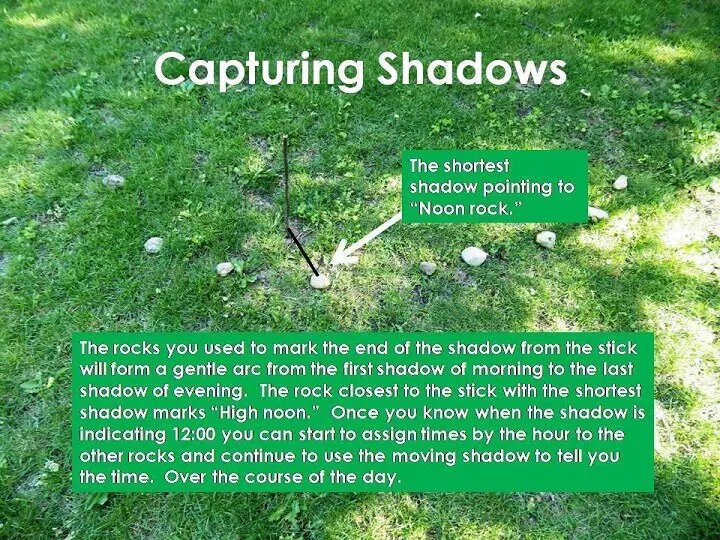
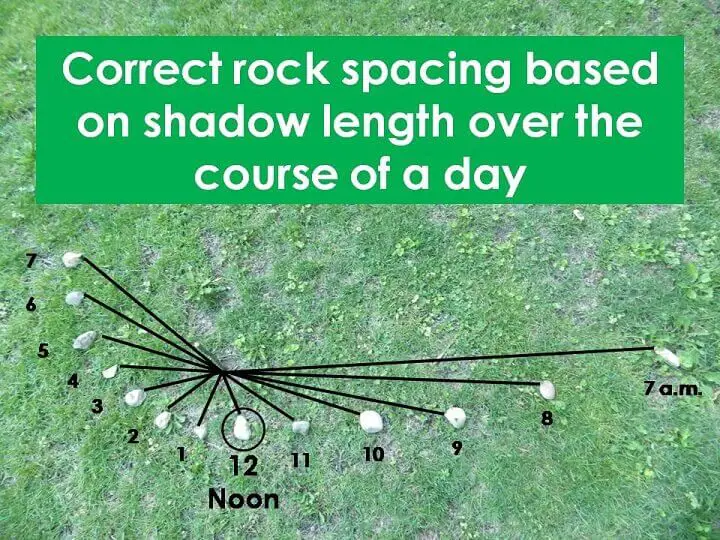
If you tracked the shadow from the stick from sunrise to sunset, you’ll see that the shadow defines a gentle, curving arc. That’s the arc of the sun moving across the sky. One thing you should be aware of is the fact that the distance between rocks (hours) gets closer as the shadow shortens.
When you’re first marking shadows that’s not a concern, but once you’ve tracked the course of the sun over a day be aware that the rocks closest to your shadow stick should be tighter in arrangement than the rocks at the tail of your shadow markers.
What’s critical is to capture and mark the first shadow from the morning sun and continue to track the shadow from the stick with stones as the day goes on. You then need to capture the last shadow.
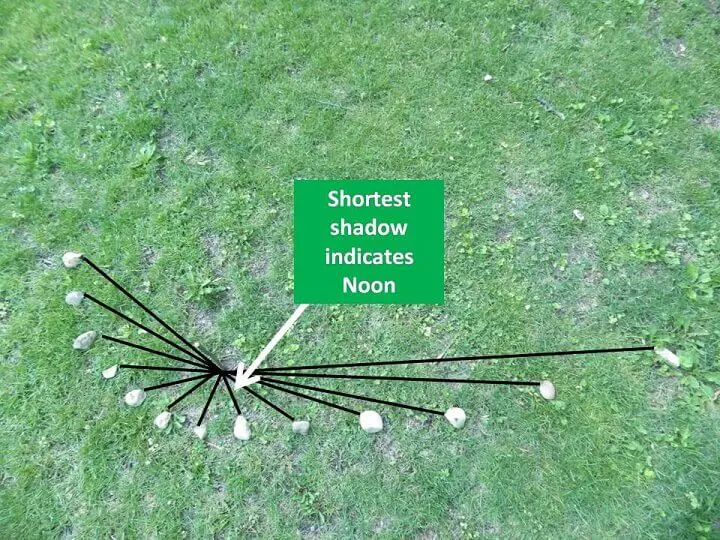
When you look at your stones on the ground, look for the shortest shadow from the stick. The thing to remember is that the short shadow that comes closest to your vertical stick in the ground is an indication of midday. That’s when the sun is the highest in the sky and it’s why it’s referred to as “high” noon.
Once you know where high noon lands on your in-ground sundial, you can do some simple geometry to figure out the other times on your improvised sundial. A lot depends on the time of year and your general awareness of the time when the sun rises and sets.
If you can at least make an educated guess of the time at sunrise or sunset, you can identify the rocks on your arc with the hours as your shadow line progresses. Here’s how to divide them if you don’t have a wristwatch to tell you where to place an hour marker.
After you’ve marked your rocks, you can use your primitive sundial to tell time day after day… or at least for a while. As the year progresses, the sun will shift slightly in the sky unless you live in that sweet spot called the equatorial zone. Most of us will have to mark the end of our shadows again, although the shortest shadow will always be noon.
Constructing a Permanent Sundial
If you’ve ever seen a sundial, you’ve probably noticed how simple they appear to be. They’re not, and there are two features many people just don’t notice.
For one, the shadow is created by an angled pointer towards the center of the sundial. The reason it’s on an angle is to compensate for latitudes north and south of the equator. This is called the “gnomon” but more about that later.
You’ll also have to “set” your sundial hour-markers to compensate for your latitude. There are 3 ways to do this that we’ll explain. One is complicated and the other two are easier.
Any sundial should be located in an area that gets the most sunlight over the course of a day. That’s why you see them in gardens so often. The obvious limitation is that they don’t work on cloudy days or at night, but if the sun’s out you’ll always know the time… if you set it up right.
What You’ll Need
• A platform for the base of your sundial.
This can be any flat surface including a cut round of a tree trunk, a plate, a board, anything that’s flat and big enough to capture some shadows. A 6-inch diameter is about the minimum but it can be larger.
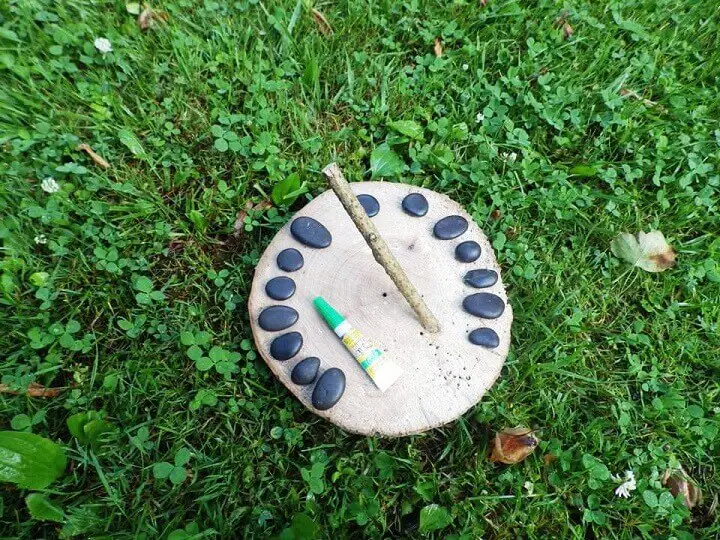
• Objects to mark 12 hours on your dial.
They can be rocks, walnuts, wood chips or anything that can fit on the dial and clearly mark hours. You could even write or carve the numbers into the dial face.
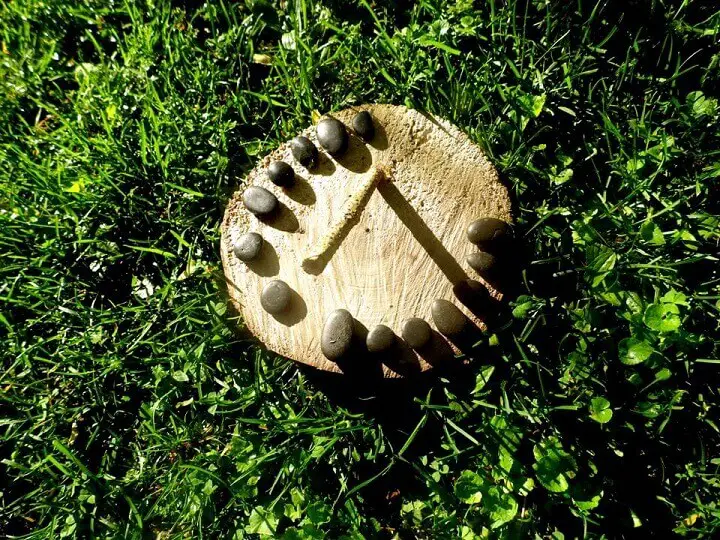
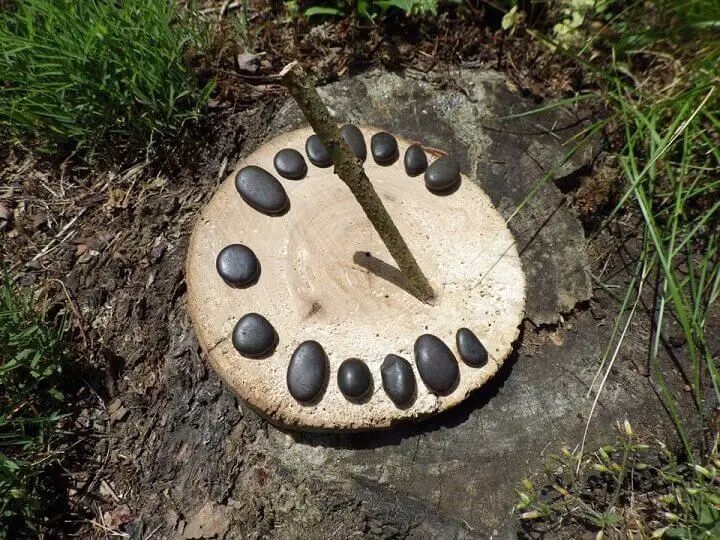
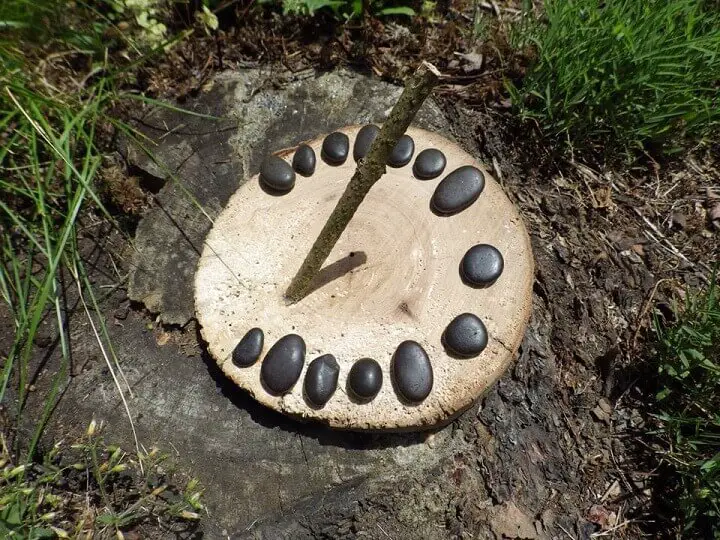
If you’re using objects like rocks, It helps to have one larger one to indicate noon and 3 medium size ones to indicate the midpoints of 3, 6 and 9 o’clock. That leaves you with 8 additional objects that should be smaller and about even in size. The most critical rock is the “noon” rock. You might want to find an object that’s not only larger than the others but a unique shape or color for this “noon” rock.
• A shadow stick.
It shouldn’t be called a stick. The ancient Greeks called it a “gnomon” or “one who knows.” And this isn’t as easy as just sticking a stick in the center unless you live at the equator. It works for our primitive sundial because we extended rocks outward to the end of the shadows, but when you concentrate the hour-markers into a small, concentrated area, you need a gnomon and it has to be cut to stand at a certain angle. The angle is determined by your latitude.
• Determining the angle of your shadow stick.
Once again, if you live at the equator you’re in luck. The sun is coming down at a 90 degree angle and your shadows will be equal in length and spacing on an hourly basis all year long. If you live at a latitude north or south of the equator you’ll have to do some math.
Subtract your latitude from 90 to get the slant degree. If you live at a latitude of around 42 degrees (Chicago) you should cut your shadow stick to stand at a 48 degree angle.
You’ll also want to attach your “gnomon” with the base or bottom of the stick located and attached at a midpoint between the center of your dial and the perimeter of your dial or numbers.
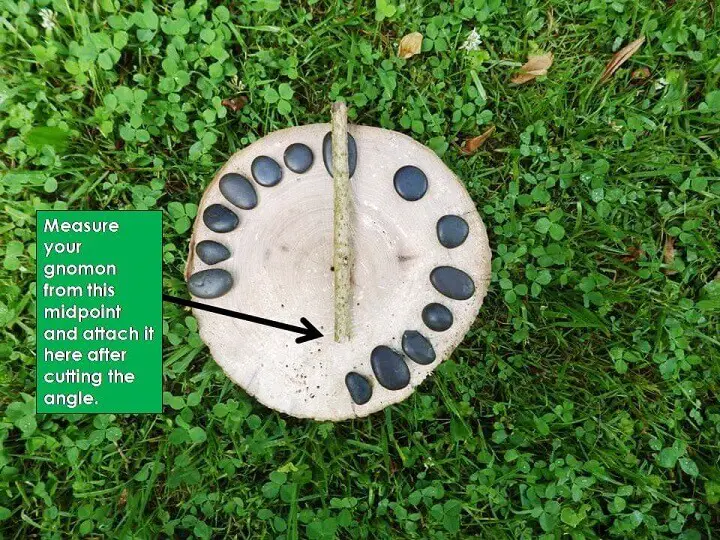
The total length of the gnomon should be measured from noon rock to this midpoint where it will be attached. Attach the gnomon facing towards the outer rim of the dial and directly towards the noon rock that will already be in place. (This is starting to make the whole Big Dipper/Little Dipper thing sound easy.)
• A way to attach things to the dial.
You can use glue, nails, screws, even pine pitch to attach and affix your rocks or other objects to the face of the sundial. The trickiest one will be attaching your gnomon stick at an angle. A gel super-glue is a good idea, or if you’re using a wooden stick to make your shadows, you could use small nails or screws. If you’re using a weaker adhesive like pine pitch use a lighter stick. All you need is the shadow.
Method
If you have already put together a primitive sundial, it will be very easy to build a permanent sundial using the coordinates you’ve already established. If you don’t have the inclination to assemble a primitive sundial, you can use a clock to help verify your time markers, but you’ll still need to use the sun to establish some settings from your angled gnomon.
Noon is the critical time to determine, but the spacing of the rocks on the dial is also critical because you’re most likely going to need to define an ellipse on your sundial rather than a circle of numbers like a conventional clock. Only people living on the equator can use a circle. The rest of us need an ellipse. Google “sundial” images to see what we mean.
There are three ways to determine the correct ellipse:
You can use an equation to determine the ellipse; use your primitive sundial or use a watch to align your hour marker. Here’s the first and hardest way. It’s an equation for an ellipse:
(xc+a²)²=(a√(x+c)²=y²)²
x²c²+2xca²+a⁴=a²(x²+2xc²+c²+y²)
x²c²+2xca²+a^4=a^2 x^2+2xca^2+a²c²+a²y²
x²c²+a^4=a^2 x^2+a^2 c^2+a²y²
(x²c² –a²x²)– a²y² =a²c² – a⁴
If that’s a little too complicated for you, here’s how to use a primitive sundial to properly setup your hour markers.
1. Take your sundial clock face and place the center of the sundial over the hole in the ground where your shadow stick was standing.
2. Drive a small nail into the center of the sundial and attach a piece of string that you can easily rotate to align your previously place rocks.
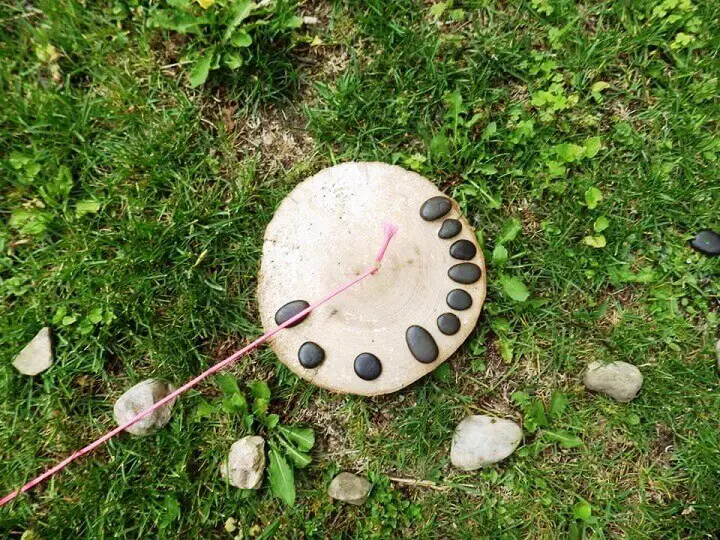
3. Align the string from the center of the clock face with your previously marked “noon” rock and place a new rock on the sundial aligned with the string from noon rock.
4. Move the string to the next rock you had identified and place a rock on the dial to align with the string once again.
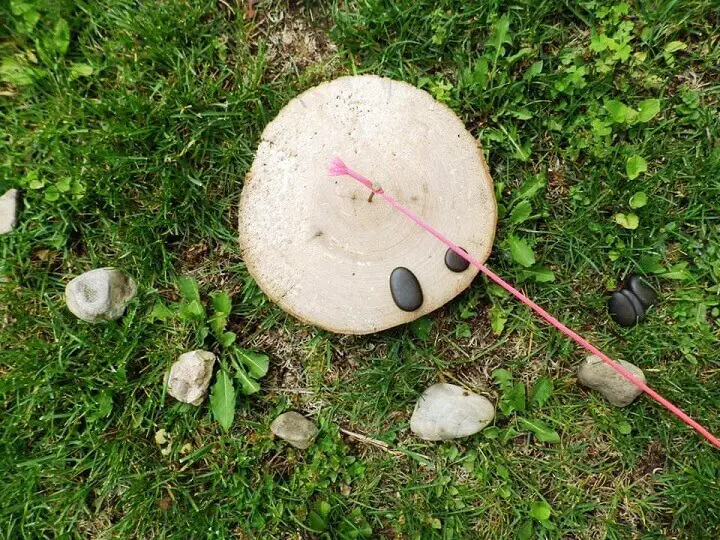
5. Repeat this process until you have placed all of your new hour-markers on the sundial face.

You’ll notice you don’t have the numbers in a perfect circle. What you’ll have is the ellipse that’s unique to your location.
6. Before you glue or attach, test your clock. Leave it in position and check it over the day to cross-reference your hour markers.
7. Glue all of your markers down.
8. Glue or attach your gnomon to the sundial clock face with the gnomon pointing towards your noon rock.
9. Let the glue dry and take your sundial to its new and permanent location and either set the time using a watch or wait for the shortest shadow to show up and tell you it’s noon. Rotate your dial to align with the time or your noon rock and you’re done.
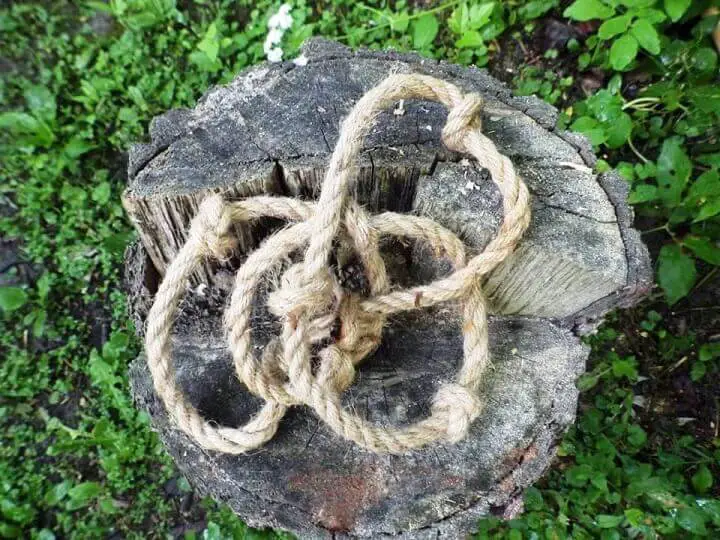
4. The Ancient Chinese Rope Clock
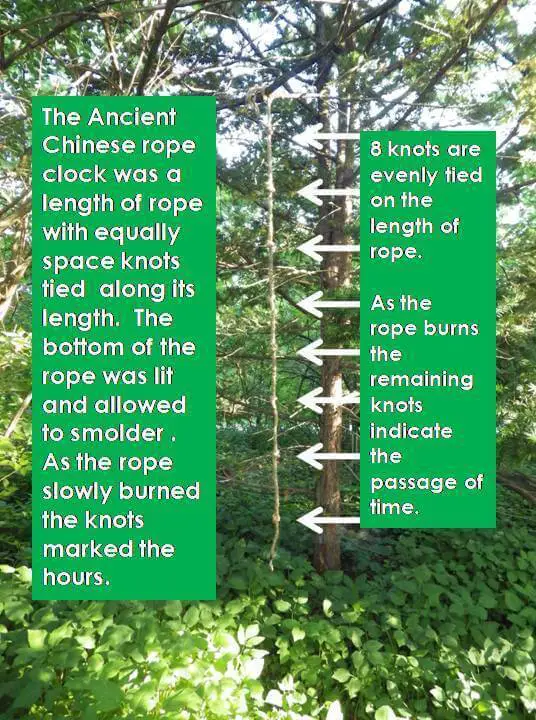
This clock is nothing more than a thick, knotted rope suspended vertically and allowed to smolder. Each knot along its length indicated an hour and once a knot had burned through to the next section of rope, an hour was counted.
The thickness of the rope and the type of fibers were critical to its successful function in addition to the distance of the knots along the length of the rope. Ropes vary, so you’ll have to do some tests to determine the spacing of the knots along the length of the rope. Once you have your knot spacing correct, you’re all good.
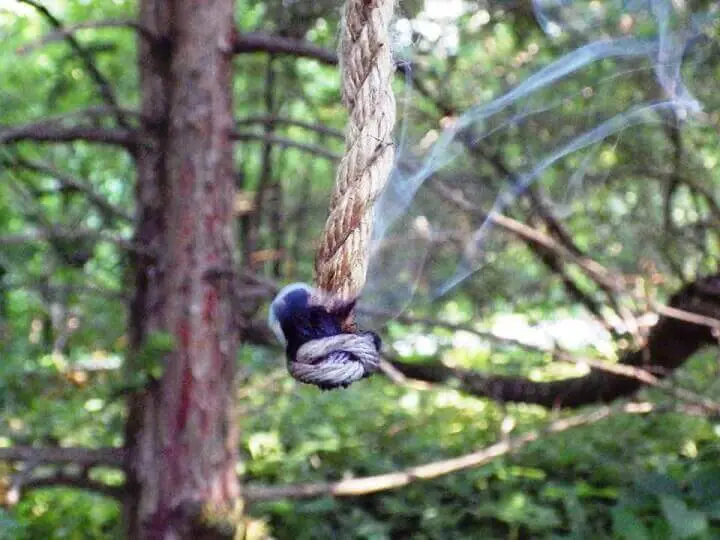
Because this rope smolders and smokes constantly as it burns to mark the time, you want to do this in an area where lingering smoke won’t be a problem. Outdoors is an obvious solution, but try to locate it in an area out of the wind and rain. Wind will cause the rope to burn too fast and rain will put it out.
The ancient Chinese actually built structures to protect their rope clocks to prevent this. It was also a fire hazard, so the rope was isolated away from anything flammable that could catch fire from a wandering coal or burning bit of rope.
What You Need
• A thick rope.
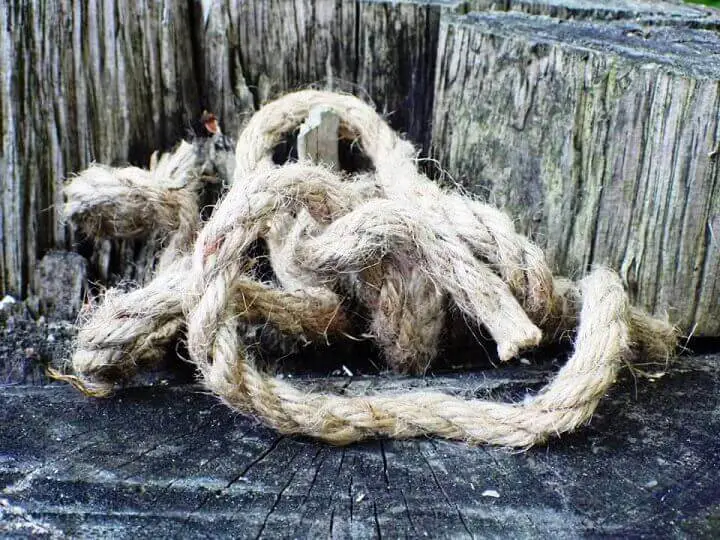
Hemp rope or any rope made from plant fibers is best. ¼ inch to 1-inch diameter works. You’ll do a test before you knot the rope to determine how fast it burns.
Don’t use a cotton rope. Cotton ropes burn too quickly or not at all. The worst rope is any nylon or plastic rope. It will burn, drip, smoke and fill the air with the smell of burning plastic. Worse, it doesn’t work because plastic won’t smolder, it will only burn.
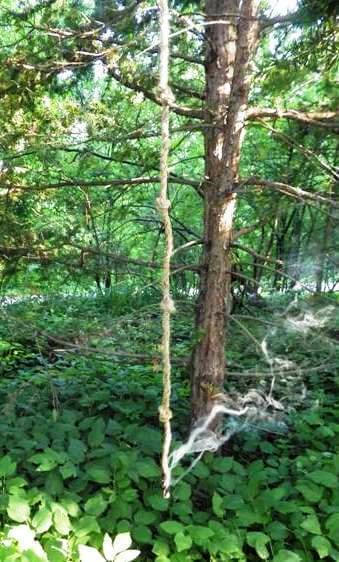
• A place to hang the rope.
Try to find an area protected from the wind. A cave is ideal but unless you’re planning on consistent use of a rope to tell time that might be overdoing it. We hung ours from a tree in a cluster of bushes and trees.
Method
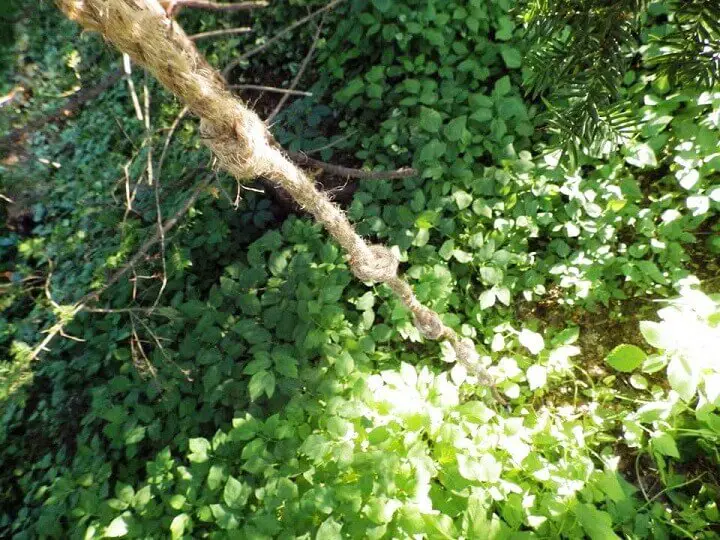
1. You need to determine how much rope will smolder and burn over the course of an hour. The easiest way to do that is to hang the rope and light the bottom.

Measure the full length of the rope after it’s hung and light the bottom of the rope on fire. Make sure it’s smoldering steadily.
2. Set a timer on your cell phone or use a stopwatch. You could also use your sundial. After an hour, measure how much rope has burned.
3. Extinguish the smoldering end and tie knots to the distance burned.
Remember that the knot has to burn as well so allow for the slack taken up by the knots in your measurements and your timing.
4. Light the rope again and see if you’ve come close to estimating hours with your knots.
If you have estimated properly, remember the type and thickness of the rope and the distance of the knots in case you ever have any reason to do this again. It actually works surprisingly well.
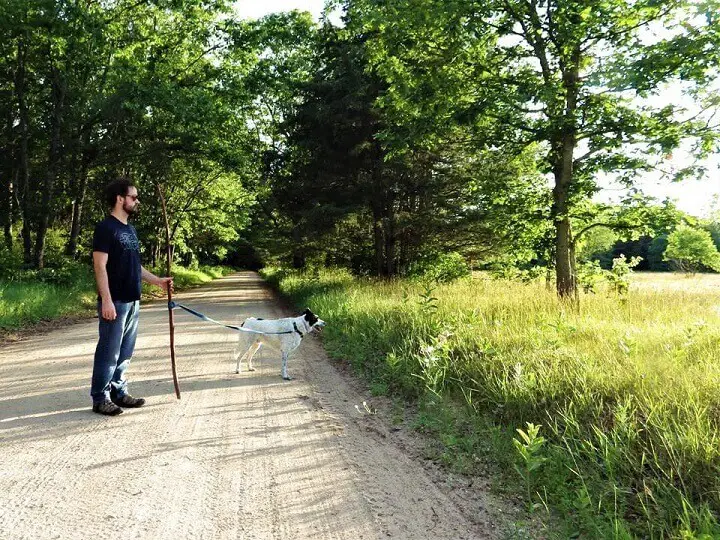
5. Using Landmarks and the Sun to Measure Time
This was a method used in ancient Scandinavia. As people determined key times of day like midday or high noon, they broke the day into other midpoints including midevening and midmorning. Rather than spend a lot of time making sundials or burning ropes, they simply took note of landmarks and natural features that aligned with the sun at those times of the day.

As a result, a mountain that aligned with midmorning was nature’s way of saying it was time for a coffee break or maybe some pine needle tea.

A valley in the distance could also become the marker for midday, or the time between noon and sunset. Time for high tea. Pine needle of course.

A forest of towering pines could serve as the marker for high noon or midday. In fact, any tall trees could mark this point in time.
Here again, they were using temporal time and were less concerned about numbers like 9 in the morning or 3 in the afternoon and were simply tracking the progression of the day.
You can do the same thing, and you can even use a wristwatch to do it. Just make note of any landmarks around your home or work that align with the sun at those 3 midpoints in the day: midmorning, midday, and midevening.
In a short period of time, you can simply look towards one of those landmarks and have a pretty good sense of what time it is and how much time is left in your day before dark. It’s so easy to do a caveman could do it, and they most likely did.
6. Training Your Brain to Read the Skies to Tell Time
The more you pay attention to how the sun and the stars mark the passage of time, the more attuned you’ll become to accurately guessing the time, particularly during the day. Here are some ways to train your brain to instinctively know a good approximation of the time.
- Every time you look at your watch or your cell phone to check the time for any reason, stop and look up at the sun’s position in the sky. Remind yourself and try to remember the sun’s position relative to the time.
- Any time you notice your shadow on the ground, stop and check the time. Try to remember the size of your shadow relative to the time of day. Is it taller and longer than you are, does it appear to be the same size, or does your shadow appear to be much longer? If you can learn to associate the size of your shadow with the time of day, you may not need that wristwatch, although you still may need that phone.
- Create your own daymarks where you live and work. Choose certain landmarks that are common to your everyday travels and take note of when the sun is directly over that landmark.
You’re not trying to remember every hour, only the mid marks of midmorning around 9 o’clock, midday or noon, midafternoon around 3 and midevening. Some of these mid readings will vary depending on the season. Midevening in summer will be sunset in winter but at least try to daymark noon.
- Play “Guess what time is it time.” Without looking for the sun, your shadow, or a landmark, try and guess the time and then check your watch or your phone. You’re trying to get your brain to associate the general quality of light around you to connect to a specific time frame. The more you do it, the more accurate you’ll become.
- Create your own primitive sundials around your yard or neighborhood. Anytime you pass a relatively short, vertical structure that casts a shadow, place a small, recognizable marker at the end of the shadow and take note of the time. As you continue to wander your yard or neighborhood, over time you’ll pass these improvised sundials and may enjoy the idea that you have your own clocks everywhere. At least until your spouse wonders why there are all these little rocks all over the yard.
A New Appreciation of Time
Doing any one of these time exercises will give you a new appreciation of time and maybe a connection to how important it was to our past, present, and future. If you have kids, it’s a fun way to teach them about the world around them and how our distant ancestors were so aware of their surroundings.
It’s also an excellent survival skill if you ever find yourself in an environment without a functioning clock. Regardless of your motivation, it’s worth taking a little time to understand and appreciate all of the ways that time surrounds us.
Like this post? Don't Forget to Pin It On Pinterest!
You May Also Like: