Estimated reading time: 18 minutes
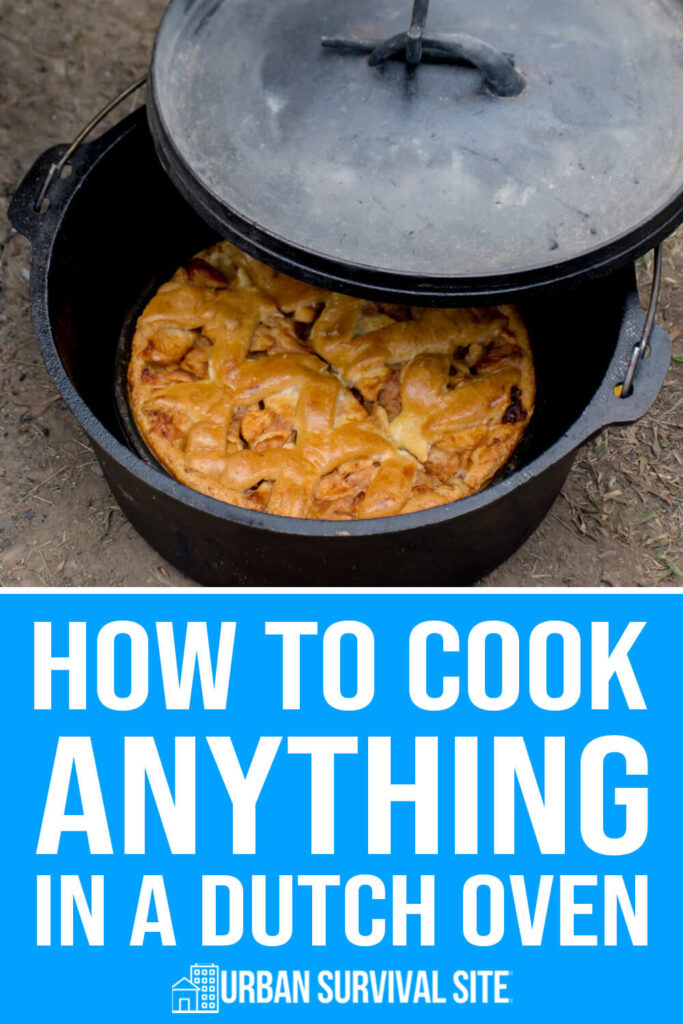
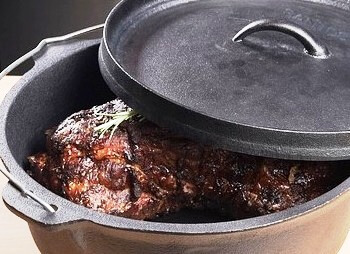
Dutch Ovens are large, cast iron cooking pots largely intended for outdoor cooking with open coals. They’ve been around since the 1700’s and were a standard cooking utensil for pioneers, homesteaders, miners, and anyone else surviving in an outdoor situation.
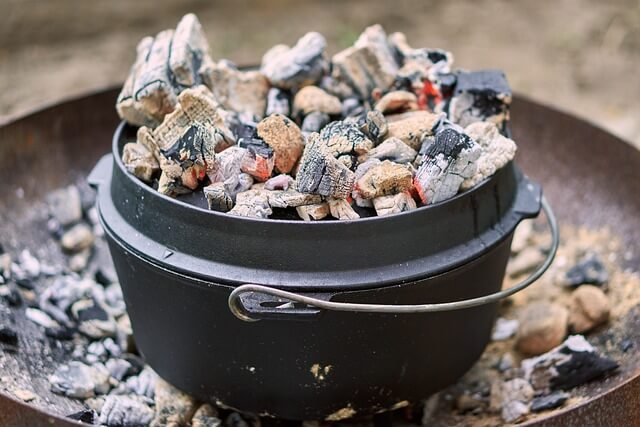
The feature that makes a Dutch Oven unique is a rimmed, cast iron lid designed to hold coals on top of the pot. The result is that both heat beneath the cast iron pot and from above literally create an oven environment inside.
Various tools were developed to cook with a Dutch Oven including a specialized lifting handled to remove the hot, rimmed lid in addition to stands to elevate the pot higher off the ground.
Most outdoor Dutch Ovens have legs on the bottom that are anywhere from 1-inch to 6-inches in length to keep the pot elevated above the coals without a stand.
The unique cooking environment inside a Dutch Oven allowed camp chefs to cook a surprising variety of foods. In fact, with the proper usage a Dutch Oven can cook just about anything. It can produce all of the cooking environments for any recipe including browning, braising, frying, baking and stewing.
Want to save this post for later? Click Here to Pin It On Pinterest!
Dutch Oven Food Examples
The customary usage of a Dutch Oven has the coals both beneath or around the base of the pot in addition to coals piled onto the rimmed lid. This was a great way to bake breads, pies, cakes, cookies, cupcakes, biscuits and anything else that required the hot, surrounding heat of an oven.
One thing to remember when baking is to try to avoid lifting the lid as much as possible. It’s always tempting to take a peek, but unless you’re really unsure about how things are doing, leave the lid in place and trust the timing on your recipe. It’s another reason why proper coal placement is so important.
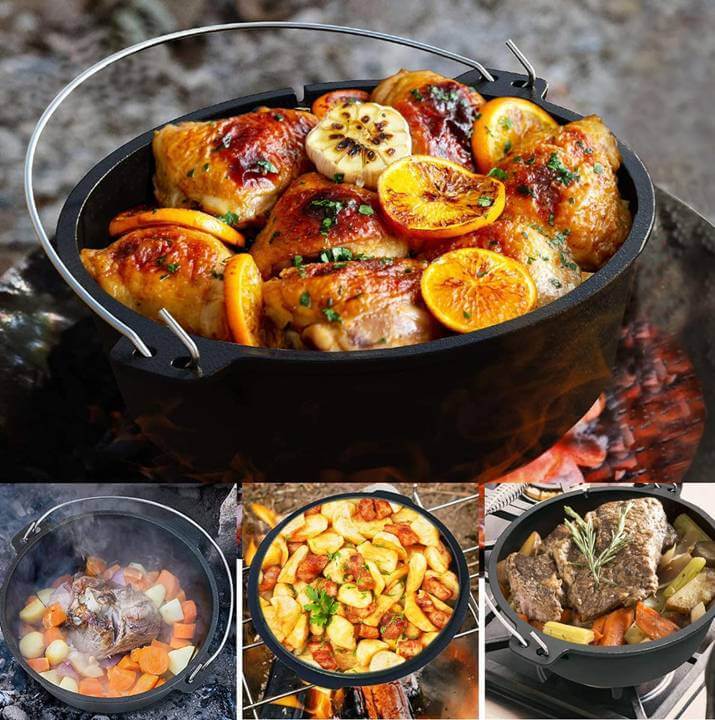
However, anything could be cooked in a Dutch Oven without the lid presenting an open cooking environment in a pot for soups, stews, chili, or even just boiling water for pasta or anything else requiring a hot pot.
Finally, the lid could be turned over on the coals and used as a frying pan. Most of the lids were slightly concave which kept anything fried from overflowing into the coals or the fire.
Related: 50 Best Dutch Oven Recipes
Dutch Oven 101
There are some minor variations on the design of Dutch evens. Some are enameled cast iron without legs on the bottom or a rimmed lid for coals and is intended for indoor, oven use.
The cast iron creates the same contained heat environment but it’s the oven itself that surrounds the pot and lid with heat.
The type of Dutch Oven we’re going to focus on is the outdoor Dutch Oven with legs attached and the rimmed lid. However, there are two design variations of the outdoor Dutch Oven.
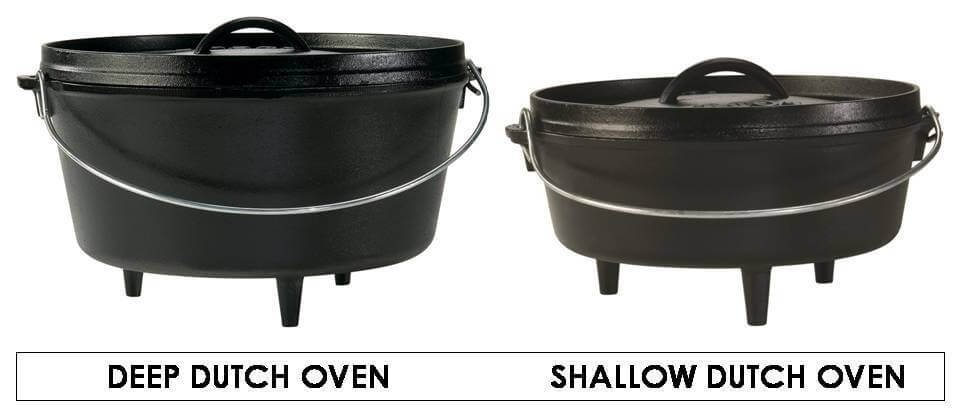
One is deep and the other is shallower. The reason is to not only accommodate a larger size or amount of food, but to manage and moderate the internal temperature particularly towards to top of the oven.
Delicate baked foods like breads, cakes, pies, or anything else that could burn or darken at the top do better with a deep Dutch Oven that puts some distance between the heat from the coals on the top and the surface of the bread, cake, or pie.
More savory foods or foods in a broth or sauce are more tolerant of the surface heat and often cook faster and better with the shallower Dutch Ovens. If you can only afford or transport one, go with the deeper Dutch Oven.
Cleaning and Seasoning a New Dutch Oven
New Dutch Ovens are often coated in a release oil that was used in the forging and casting process.
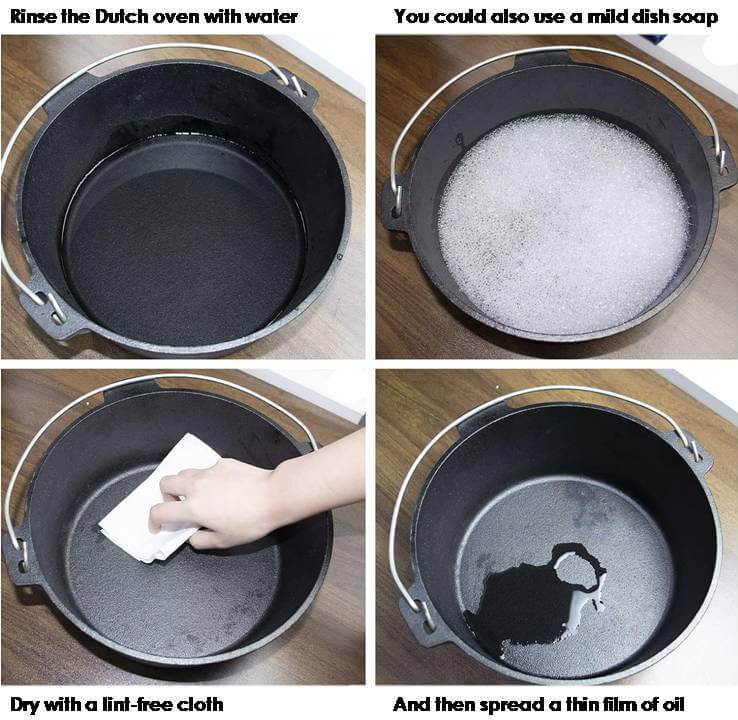
It’s best to wash and rinse any new Dutch Oven in water or even dish soap and then thoroughly dry and season with a cooking oil wiped around and into the cast iron with a lint-free cloth.
Gently heating the Dutch oven after seasoning over a small bed of coals or in an oven will help the cast iron get off to a good start.
Related: How to Restore Old Cast Iron Cookware
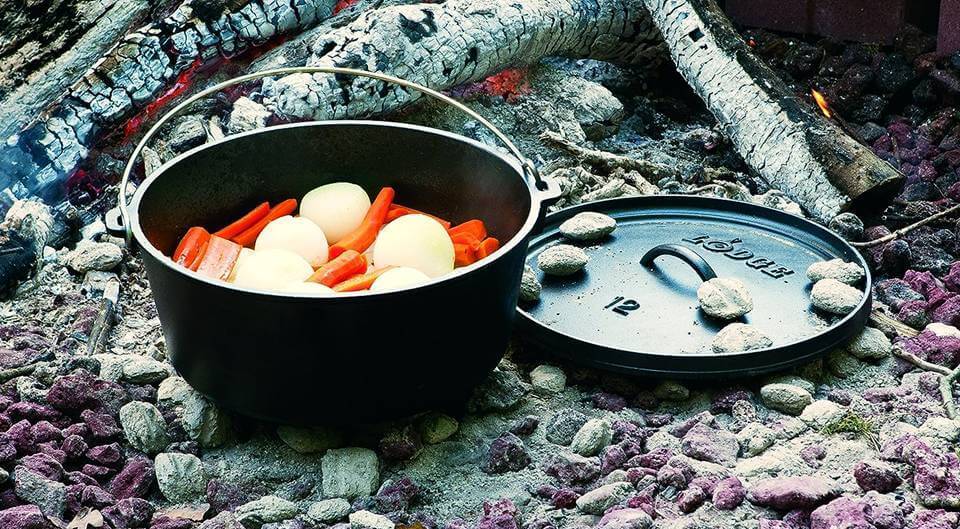
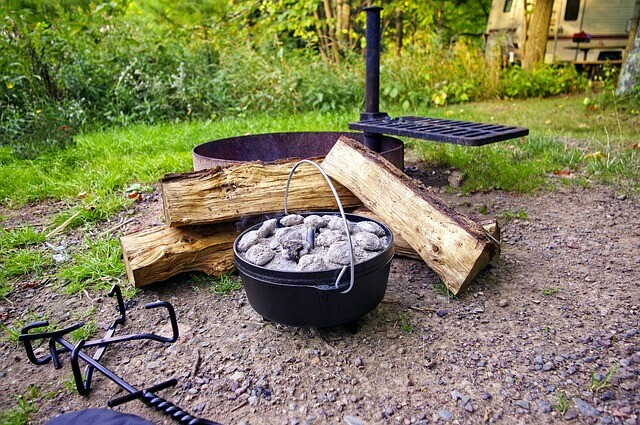
Coal Placement
The assumption that’s easy to make is that the Dutch oven should simply be placed over a bed of coals and some coals piled on top. That can work but can give you mixed results.
Coals directly beneath the Dutch Oven will make the bottom of the oven very hot and without proper attention and stirring can burn food at the bottom of the pot.
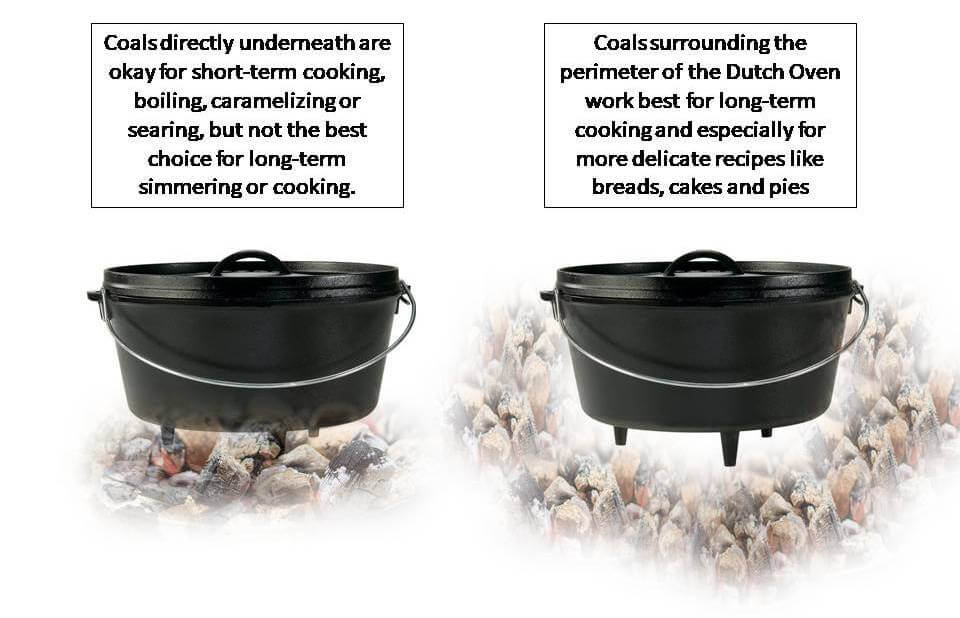
A better idea is to place the coals around the perimeter of the Dutch Oven at the base. You can move some coals underneath to get things started if you’re trying to caramelize or brown something at the beginning of a recipe, but when you decide to let the covered pot cook for any length of time it’s better to keep the surrounding coals at the bottom out and away from the Dutch Oven rather than directly underneath.
Related: How to Make Charcoal from Scratch
The same moderation applies to the coals on the lid. Just because the lid will accommodate a lot of coals doesn’t mean you need to fill it. We’ll indicate coal placement and amounts with each recipe type when we get into them, but too much heat can ruin the meal.
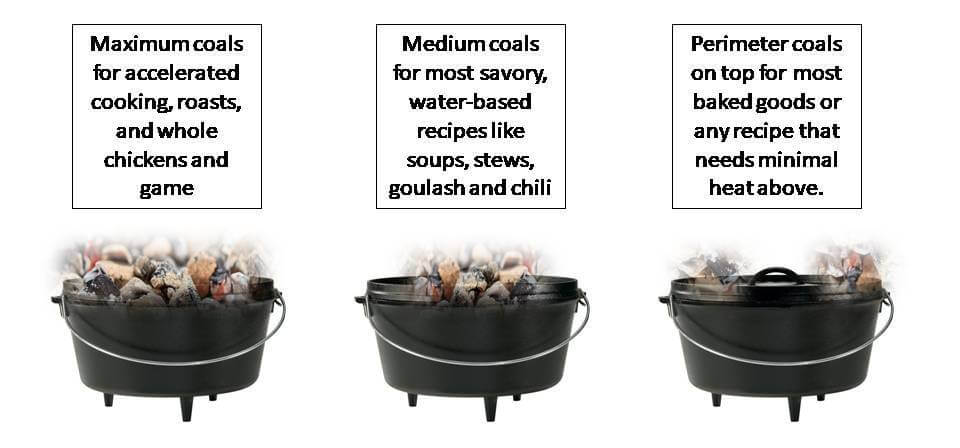
What compensates if you use fewer coals rather than many is the heat conductivity of cast iron. If you keep the iron hot it will spread throughout the sides, bottom and top of the pot. It takes some practice but once you’ve mastered a few recipes it will become second nature.
Replenish Your Coals
Hot coals make a great heat source for Dutch Oven Cooking as opposed to an open flame. The challenge with hot coals is they eventually burn out so keep an eye on your coals and replenish them from time to time.
Many Dutch Oven chefs have a fire going off to the side so they have easy access to a steady supply of coals.
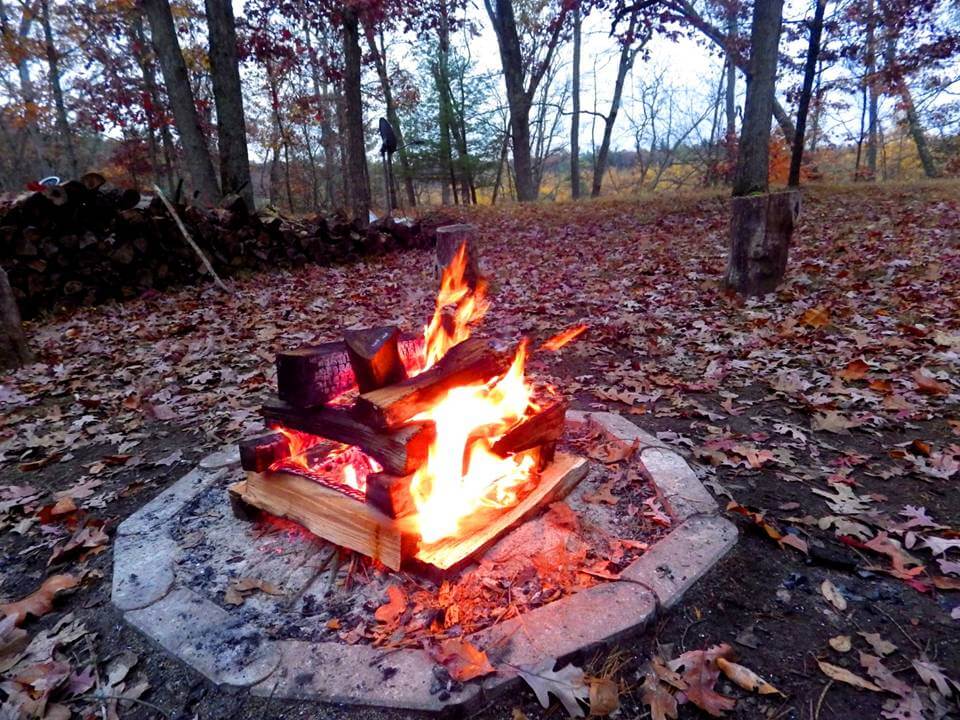
The best woods for this fire are hardwoods but you could also use lump charcoal that you toss into your fire from time to time and then shovel them under, around or on top of your Dutch Oven. Charcoal briquettes are another option but are rarely recommended for Dutch Oven cooking because they burn down rather quickly when exposed to the open air.
Related: How to Cook with a Dutch Oven while Camping
Internal Adjustments
Many of the recipes we’ll cover fall in the dump and stir category. You put the ingredients in the pot, sir them around in the beginning and then cover them and let them cook.
However, some of the more delicate recipes particularly the baked recipes require some internal adjustments. This is nothing more than placing a cake pan, cupcake pan or even a small grate in the bottom to keep the ingredients a small distance from the hot bottom.
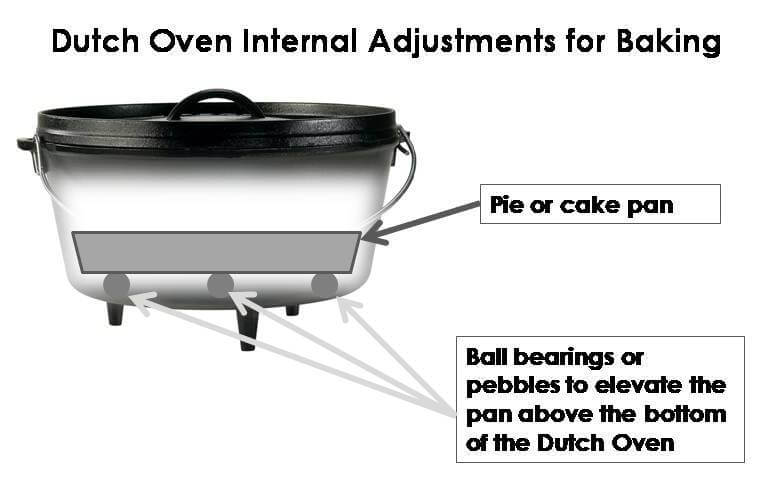
It’s an effort to elevate what’s being cooked or baked so it is still exposed to the high temperatures inside the Dutch Oven without coming in direct contact with the hot cast-iron surfaces.
Sometimes a grate is placed in the bottom of the Dutch Oven to support the pan, but you could also use ball bearing or even pebbles to keep a pan above the hot bottom of the pot.
Traditional Dutch Oven Recipes
Many Dutch Oven recipes fall in the category of one-pan or one-pot meals. As a result, there are lot of variations on soups, stews, chili and assorted pot roasts that all feature a combination of ingredients cooked together at the same time.
Then again, many Dutch Oven cooks pushed the envelope to make breads, pies, cakes, upside-down cakes, biscuits, muffins, cookies and even cupcakes and brownies.
What’s important is to follow the steps in the recipe; keep an eye on the coals and replenish when necessary, stir or turn the ingredients from time to time if required, and make sure the coals are properly placed around or under or on top of the Dutch Oven.
Related: 29 Camping Dutch Oven Recipes
Dutch Oven Chili
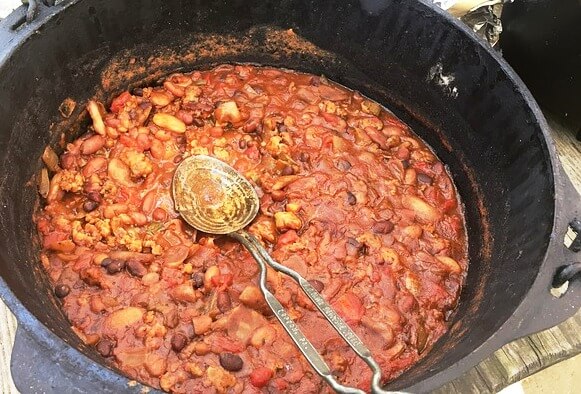
You can vary this chili recipe to suit your taste and spice level. There is no need for coals on the lid for this recipe but it should be covered while simmering.
Ingredients:
- 2 tablespoons oil
- 4 pounds ground beef
- 2 medium onions, chopped
- 1 medium green pepper, chopped
- 3 large cans (28 ounces each) of stewed tomatoes, cut up
- 4 cans (16 ounces each) kidney beans, rinsed and drained
- 1 can (14 ounces) beef broth
- 3 tablespoons chili powder
- 2 tablespoons ground cumin
- 4 garlic cloves, minced
- 1 teaspoon dried oregano
Directions:
- Preheat the Dutch Oven over coals directly under the Dutch Oven.
- Add the oil and brown the beef partially.
- Add the onions and green peppers and cook until tender while continuing to brown the beef.
- Stir in the remaining ingredients and bring to a boil.
- Pull the coals away from the bottom of the Dutch Oven so they are surrounding the perimeter and cover with the lid.
- Simmer covered with coals surrounding the bottom perimeter of the Dutch Oven for 1 to 1 ½ hours.
- Stir and serve.
- To keep warm, return the lid and pull the coals away from the perimeter a bit more to maintain heat without cooking the chili any further.
Dutch Oven Complete Breakfast
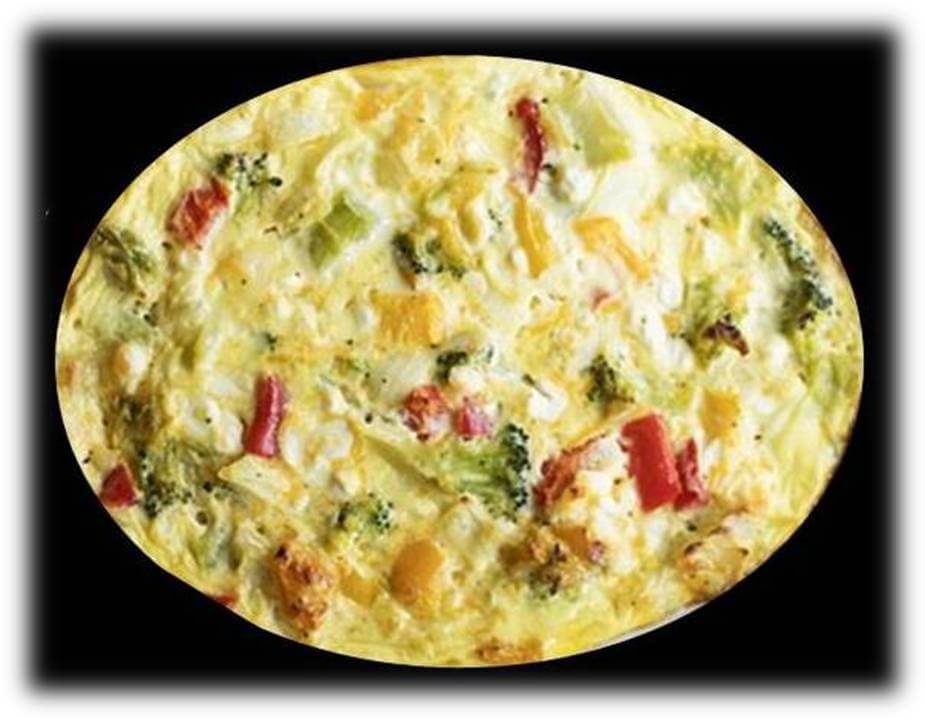
This is essentially a breakfast casserole that combines numerous breakfast ingredients that are combined and cooked together before serving.
Ingredients:
- 1 pound bacon strips, chopped
- 1 package (20 ounces) refrigerated O'Brien hash brown potatoes
- 8 large eggs
- 1/2 cup half-and-half cream
- 1/2 to 1 teaspoon hot pepper sauce, optional
- 2 cups shredded cheddar-Monterey Jack cheese
Directions:
- Setup the Dutch Oven with coals under the pot to start. About 16 to 18 coals should work.
- Cook the bacon until crisp and discard the bacon drippings reserving 2 tablespoons in the pan.
- Press the sliced potatoes onto the bottom of the pot and about 1-inch up along the sides.
- Whisk the eggs, cream and pepper sauce if you’re using it.
- Pour the eggs over the potatoes and sprinkle with the bacon and cheese.
- Cover the Dutch Oven and place 16 to 18 coals on top.
- Cook covered for 20 to 25 minutes until eggs are completely cooked and the cheese is melted. If you lift the lid and it’s not done give it another 5-minutes and check again.
- Use a spatula to cut through the potatoes and lift to plates and serve.
Dutch Oven Bread

A Dutch Oven actually makes a great bread. What’s critical is placing the coals around the perimeter rather than underneath the bottom of the pot, and using a deep Dutch Oven with about 12 coals spread around evenly on the top.
Ingredients:
- 2 cups of warm water
- 1 tbsp. yeast
- 1 tsp. sugar
- 5 cups of flour
- 1 tsp. salt
Directions:
- Combine the warm water, yeast and sugar in a bowl and cover. Let rest or proof for 5 minutes.
- Add the flour and the salt and stir and then move the wet dough to a floured board and knead for 5 minutes.
- Lightly oil the Dutch Oven and drop the dough into the center and cover off the coals for 30 to 45 minutes to allow the bread to rise. It’s best to use the taller style of Dutch Oven if you Have one.
- Surround the perimeter of the Dutch Oven with coals around the base. Do not put the coals directly under the Dutch Oven.
- Cover and top the lid with 14 to 16 coals.
- Bake for 30 minutes and then carefully remove the cover to check progress. You want the top to be a deep, golden brown.
- If the top is not browned sufficiently, return the cover and bake another 15 to 20 minutes. Replenish some of the coals on top if needed.
- When the bread looks done, tap on the top. If you hear a somewhat hollow sound you’re done.
- Remove the loaf using a knife or spatula run around the sides of the bread and let rest on a wire rack or a lattice of sticks for 15 minutes.
- Slice and serve.
Dutch Oven Apple Cobbler
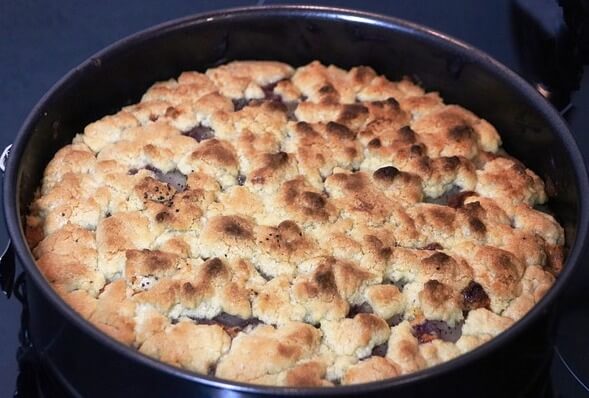
Cobblers are traditional Dutch Oven recipes and a variety of fruits can be used. It’s sometimes called a dump cake because you literally dump the ingredients into the Dutch Oven and bake.
This recipe uses apples but you can substitute any fruits you may have wild foraged. Just make sure you to keep the ingredient quantities the same as the recipe.
A cobbler requires some precision placement of coals. The usual recommendation is about 7 to 10 coals on top and 12 to 15 coals underneath the bottom. You don’t need to rearrange coals as the cobbler bakes.
Ingredients:
- 6-8 large apples (peeled + sliced) This yields about 4 cups of apple slices so if you’re using wild foraged fruits measure out 4 cups.
- 1 teaspoon cinnamon
- 1 cup sugar
- 1 3/4 cups all-purpose flour
- 1 cup brown sugar
- 1 teaspoon baking powder
- 2 eggs, beaten
- 2/3 cup melted butter
- pinch of salt
Directions:
- Preheat the Dutch Oven by placing the coals underneath and on the lid while the pot is empty.
- In a bowl, whisk together the flour, baking powder, brown sugar, salt, ½ teaspoon of cinnamon and ¼ cup of the brown sugar.
- Add the eggs to the flour mix and whisk until blended.
- In a separate bowl combine the apples, the other ½ teaspoon of cinnamon and the remaining ¾ cup of brown sugar and stir and blend with a spoon.
- Add the apple mixture to the bottom of the Dutch Oven.
- Dump the flour mixture over the top.
- Bake for 40 to 50 minutes until the top is browned.
- Spoon out the cobbler onto plates or bowls and serve.
Dutch Oven Baked Beans
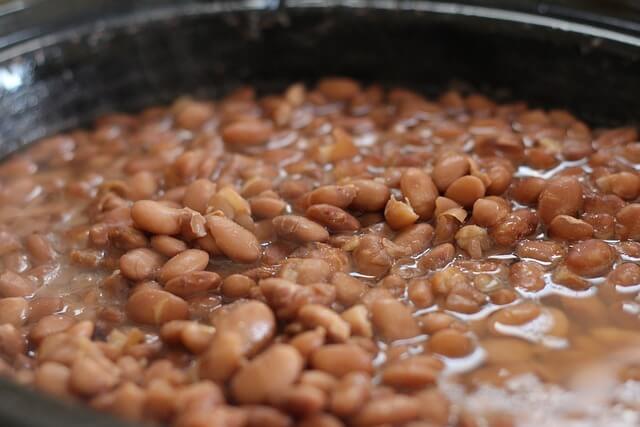
Baked beans is another traditional Dutch Oven recipe and was a favorite cowboy recipe. This recipe features numerous beans from cans but you can use dried beans (precook and soften them first), and you can use as few or as many types of beans as you want.
This recipe makes a lot of baked beans and is great for a hungry crowd.
Ingredients:
- 1 pound bacon strips, chopped
- 1 large onion, chopped
- 1 large sweet yellow pepper, chopped
- 1 large sweet red pepper, chopped
- 6 garlic cloves, minced
- 1/2 teaspoon pepper
- 2 cans (15 ounces each) pork and beans
- 1 can (16 ounces) butter beans, rinsed and drained
- 1 can (16 ounces) kidney beans, rinsed and drained
- 1 can (15-1/2 ounces) black-eyed peas, rinsed and drained
- 1 can (15 ounces) garbanzo beans or chickpeas, rinsed and drained
- 1 can (15 ounces) pinto beans, rinsed and drained
- 1 can (15 ounces) black beans, rinsed and drained
- 2 bottles (total of 36 ounces) barbecue sauce
- 1/3 cup cider vinegar
Directions:
- Preheat the Dutch Oven starting with about a dozen coals underneath the pot.
- Fry the bacon until crisp and remove.
- Add the onion, peppers, garlic and sauté until vegetables are tender.
- Remove the oven from the coals and add the beans, reserved bacon, barbecue sauce and vinegar.
- Return to the coals and cover.
- Place 6 to 8 coals on top and cook covered for an hour.
- Lift the lid and stir and serve.
Dutch Oven Pot Roast
A pot roast can be made with any cut of meat including game. The whole roast or chunk of meat is browned and then cooked. We’re using beer for the broth but you can use water.
Ingredients:
- 3 tablespoons olive oil, divided
- 1 boneless beef chuck roast (2 to 3 pounds) or any other cut of meat including game like venison
- 2 medium onions, sliced
- 1 garlic clove, minced
- 1 bottle (12 ounces) beer
- 1/2 ounce dried mushrooms (about 1/2 cup) Or a full cup of fresh wild foraged mushrooms like cubed puffball or chicken of the woods.
- 1 tablespoon brown sugar
- 1 teaspoon Worcestershire sauce
- 1 pound red potatoes (about 8 small), cut into 1-inch pieces
- 2 medium carrots, sliced
- 1/2 cup water
- 1/2 teaspoon salt
- 1/4 teaspoon pepper
Directions:
- Preheat the Dutch Oven over 16 to 20 coals directly underneath the pot.
- Add the tablespoon of olive oil to the preheated pot and add the roast.
- Brown the roast on all sides until caramelized (deep brown color)
- Remove the roast from the pan and add the onions and garlic under onions are browned and somewhat caramelized. (Caramelization adds flavor and color to the broth/gravy).
- Add the beer (or 12 ounces of water/ cup and half) and stir to loosen any brown bits in the bottom of the pot.
- Stir in the mushrooms and brown sugar.
- Return the roast to the pay and add the additional cup of water and all other ingredients and stir.
- Cover and no need for coals on the lid. Cook for 90 minutes with coals directly under the pot. Check and replenish coals as needed.
- Lift cover and remove roast and vegetables from pot to serving dish and ladle broth/gravy into a separate bowl or pour over all.
- Serve with bread or biscuits.
The List Goes On
Here are some additional links to articles, recipes and videos exploring a range of recipes and meal ideas with a Dutch Oven:
- Cooking Over a Fire In a Dutch Oven
- 2 Ingredient Biscuit Recipe
- 30 Min Dutch Oven Breakfast
- Slumgullion Recipe – Cast Iron Camp Dutch Oven
- 7 Ways to Use a Dutch Oven
- The Easy Way To Make Charcoal
Just about anything you make on a stovetop or in a conventional oven can be made in a Dutch Oven. What’s critical is to understand how to choreography the coals under, around and on top of the pot.
Once you understand the concept and dynamics of how different recipes cook you can begin to master temperatures and cooking styles with your Dutch Oven and make just about everything.
Like this post? Don't Forget to Pin It On Pinterest!
You May Also Like:
- Over 500 Camping and Dutch Oven Recipes
- 6 Reasons to Get a Dutch Oven
- 10 Ways to Bake Bread Without An Oven
- 150 Camping Recipes With 5 Ingredients Or Less
- How to Restore Old Cast Iron Cookware