
ReadyNutrition Guys and Gals, this article is going to explain some methods to help you better defend your property. These are some simple and inexpensive methods that are not subject to power loss from an EMP or station failure. They are simple to employ as well as remember, and they can be tailored to meet the needs of your property.
Obviously if you live in a high-rise apartment building or a multi-family structure, your methods are going to differ, and that will be addressed in Part 2.
Sector Stakes
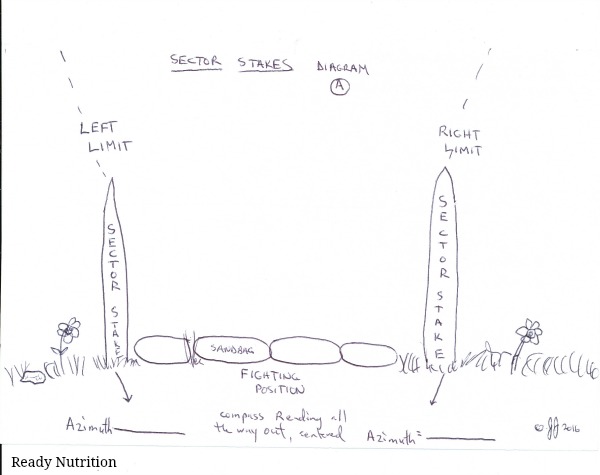
Now, firstly, what are a sector stakes? The sector stakes are prepositioned markers for use as boundaries for the field of fire of your weapon. They physically allow the firer to concentrate on his or her sector of fire without haphazard lateral movement. By utilizing one on your left and right, they establish left and right limits for you to employ your rifle or firearm. These stakes are best used between multiple team-members. The sector stakes are driven into the ground or firmly emplaced vertically, so as to allow the defender’s weapon to traverse (move laterally) back and forth and be bounded within the confines of his or her sector. See Diagram A, “Sector Stakes” to get a picture of how it appears.
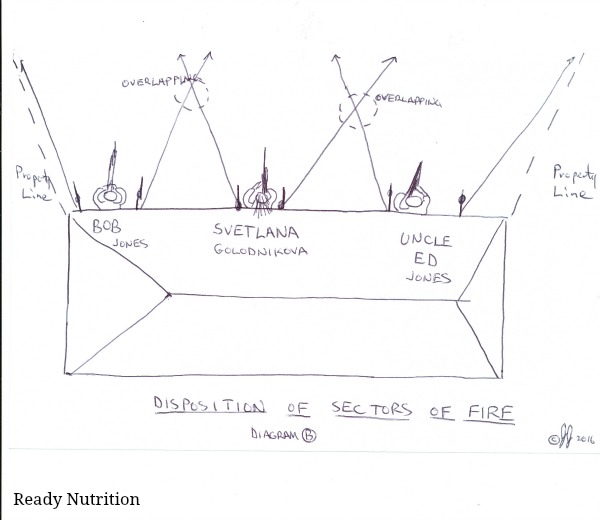
Your sectors need to range to the end of your property, or out to about 500 feet, whichever is closer. The sectors need to interlock, so as to create interlocking fields of fire, a condition that is met where the left and right limits of two adjacent firers intersect one another, and permit overlapping fire on an enemy. See Diagram B, “Disposition of Sectors of Fire” to illustrate this concept. Each sector stake must be measured with a compass to provide an azimuth for the entire straight-line length of the right or left limit.
It is important for you and your team to walk the entire length of the property, and pace out the areas where obstacles that can provide dead space, cover, and concealment to the enemy are known, along with their exact distances. It is also very important for you to be able to make laminated copies of these sector sketches, and using a grease pencil (dry erase are garbage) to note down your information of things found in your sector. Identify each fighting position (FP) by number, not by the person’s name! If you’re overrun, you don’t want your names going into someone else’s head or intel files.
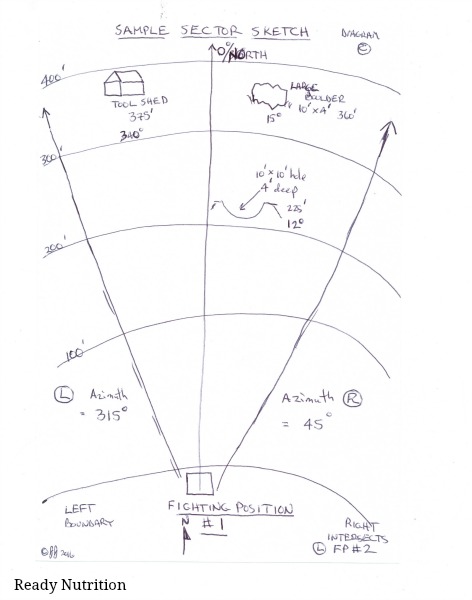
Another key reason for these sketches is if for a reason such as changing a guard shift, or a shift between team members to one another’s fighting positions. In this manner, you have a nice laminated diagram that gives them all of the information they need about the position. The midline (middle of the sector) should also have its own azimuth and azimuth line. Take note of the concentric circles. This is to establish an increment (I used “feet” to make for ease of understanding in this example), and the sample sketch has each circle in 100’ increments.
If you’re going to defend a fixed position such as a house, you need to have sector sketches for each fighting position, bottom line.
Another thing that you can do is to employ paintball guns in practice with this, for periods of low light and low visibility. This will give you a good idea of how well you know the sectors, as to where your paintballs mark the area. Just because there is not an item within your sector does not mean you cannot fabricate one as well, such as a couple of crossed boards affixed to the ground midline to the sector out at 300’, and/or smaller stakes with small markers or tapes affixed to them. These are pre-measured distances, and when you see a “zombie” staggering across your yard, when his feet are on the “X” it’ll help you to light him up.
For some further reading, get ahold of a Soldier’s Manual of Common Tasks, or a Soldier’s Handbook for the basics we have outlined here. Be prepared to deal in metric units. This is a general overview to get you started. On “Part 2” we’re going to go over how to take similar measures in an urban/heavily populated environment. Until next time, keep up the good work, and remember: when bad guys are coming over, before your barbeque and fireworks display put down the Porterhouse steaks and go to your sector stakes! JJ out!
Continue reading part 2 of this article
This article was originally published at Ready Nutrition™ on August 30th, 2016


Thanks for sharing your thoughts and experience with us the people.
Pick up a 7-8 FM… This stuff is basic training stuff lol… If you want to know how to really protect your family and home … Learn CQB and MOUT…. Green beret training …. Chuckle…. Maybe if you are a civilian and you don’t know basic infantryman stuff this is “green beret” training lol
How about living in a GRAY MAN HOUSE?
1) Do not landscape your yard. Mow it yourself. Or hire a kid to mow it.
2) Drive a USED car. If you own a new one; park it in your garage.
3) if you own a gas grill; don’t leave it out where people can see it.
4) Do not have any political signs in your yard.
5) Do Not leave AMAZON boxes out with your regular trash pick up.
6) try not to be seen wearing “FLASHY” clothes. The same goes for wearing excessive a jewelry.
have you ever heard of a mugger robbing you for a CASIO watch?
Who seriously gives a #$$%^^& if your clothes are seen in GQ or VOGUE magazine?
You can now rechamber a Rifle to shoot .50 Ca. BMG shells. How can you fortify a house to stop one of them?